Geo Data Wizard: Difference between revisions
mNo edit summary |
|||
| (61 intermediate revisions by 8 users not shown) | |||
| Line 1: | Line 1: | ||
The Geo Data Wizard is a [[Configuration Wizard]] that is part of the {{software|client}} is a series of steps to guide you through the process of importing [[Geo_Data#Import_vector_data|Geo data]] in the {{software}}. It is designed to minimalise the use of a GIS for preparing the data. | |||
== | ===Import type=== | ||
There are several different Data Wizards which each guide you through different processes for importing [[Geo_Data#Import_vector_data|Geo data]] in the {{software}}.<br> | |||
There are several different Data Wizards which each guide you through different processes for importing [[ | |||
The different wizards are for importing data as: | The different wizards are for importing data as: | ||
* [[ | * [[Building|Buildings]] - Importing [[Buildings]] (3D-objects) into the model and for updating attributes of [[Buildings]] based on the attributes in the data | ||
* [[Terrain]] - Importing shapes to define the terrain | * [[Terrain]] - Importing shapes to define the terrain | ||
* [[Neighborhoods]] - Importing shapes to define the neighborhoods | * [[Neighborhoods]] - Importing shapes to define the neighborhoods | ||
| Line 15: | Line 10: | ||
* [[Area|Areas]] - Importing areas to create a 2D [[Overlay]] | * [[Area|Areas]] - Importing areas to create a 2D [[Overlay]] | ||
* [[Measures]] - Importing a group of 3D-objects as a [[Measures|measure]] to perform as an action | * [[Measures]] - Importing a group of 3D-objects as a [[Measures|measure]] to perform as an action | ||
* [[Measuring_tool#Import.2C_export_and_saving_measurements|Point Measurements]] - Importing measurements to visualize in the [[Measuring tool]] | |||
Each of these wizards contain comparable steps which are described below. | Each of these wizards contain comparable steps which are described below. | ||
The wizard can be found by following these steps: | |||
{{editor location|geo import}} | |||
[[File:Geo_data_wizard.JPG|thumb|350px|The Geo data wizard can be found by clicking on Geo Import in the Current Situation tab.]] | |||
{{clear}} | |||
== | ==Steps in the Geo Data Wizard== | ||
In the data wizards there are several steps to guide you in transforming your dataset in order to only import the relevant features in the data into the {{software}}. | |||
== | ===Import method=== | ||
There are | There are four methods for importing Geo Data in the data wizard. These methods can be divided into two: uploading data from a file to the {{software}} and the other is downloading data through an URL to the {{software}}. | ||
# Through a [[GeoJSON]] file | The method to choose is based on how you have your data available: | ||
# Through a [[GeoJSON]] file: ''If you have a file with 2D data, choose the first option. Make sure you create the [[GeoJSON]] file first, if your data is in another format.'' | |||
# Through a [[ | # Through a [[SLPK|I3S Scene Layer Package file (SLPK)]]: ''If you have a 3D model and want to import this as a 3D model in the {{software}}, choose the second option. Make sure you create the [[SLPK]] file first, if your data is in another file format.'' | ||
# Through a [[CityGML|CityJSON/CityGML]] file: ''Although CityJSON and CityGML are two different formats, the underlying datastructure is the same. You can use this option for both file formats. | |||
If you have a | # Through a [[WFS|Web Feature Service (WFS)]]: ''If you have an URL on where data is published according to the WFS standard, choose this option: [[WFS]].'' | ||
If you have an URL on where | # Through a [[CSW|Catalogue Service for the Web (CSW)]]: ''If you do not have data available but want to browse through an online catalogue in search for datasets or you have a Catalogue service URL, choose the last option: [[CSW]].'' | ||
If you do not have data available but want to browse through an online catalogue in search for datasets or you have a Catalogue service URL, choose the | |||
When selecting any of the file options, it's possible to either upload your own file, or to use a file from the [[Geo Share]]. | |||
===View=== | ====View==== | ||
In step 2, the data that is currently in your project in the | In step 2, the data that is currently in your project in the {{software}} is visible. The amount of points, lines or polygons in the dataset are visible. Since only polygons are allowed in the {{software}}, the points and lines need to be buffered. By buffering these features, the points and lines become polygons. The buffer size is adjustable. Based on the data, choose a realistic buffer size. If your dataset contains of lines which represent roads, choose a buffer size that is realistic for the width of these roads. if your dataset consists of only polygons, the buffer size is not used. | ||
===Filter=== | ====Filter==== | ||
In the next step you can filter the features. For example, if you have a dataset containing all sorts of roads, you can filter only the highways in this dataset. The filtering is based on Attribute name ( attribute textual value) or on Attribute value(a numerical condition). For example, if the roads have an attribute max. speed in km/h. You can filter the roads that have a max. speed of 80 or more km/h to get only the highways. | In the next step you can filter the features. For example, if you have a dataset containing all sorts of roads, you can filter only the highways in this dataset. The filtering is based on Attribute name ( attribute textual value) or on Attribute value(a numerical condition). For example, if the roads have an attribute max. speed in km/h. You can filter the roads that have a max. speed of 80 or more km/h to get only the highways. | ||
===Add or update=== | ====Add or update==== | ||
In this step you are asked | In this step you are asked whether you want to add new data or update the data already present in your project. If you want to import the roads dataset as functions while there are already roads present in the project, updating would be the way to go. <br> | ||
For importing a [[SLPK]] file, choose if you want to Create a new building or Update existing buildings with the new model. | |||
Create means that you delete the existing building(s) and their function(s) (which intersect with your new data) and completely replace them. | |||
If you choose Create you get some additional steps which must be setup. You will have new options for naming, assigning Functions and assigning Stakeholders to the newly imported building. | |||
Updating means that you are only replacing the model of existing buildings (which intersect with your new data). The new imported building will keep the function of the previous building. | |||
===Select attributes=== | ====Select attributes==== | ||
As mentioned in the requirements for importing geo data in the | As mentioned in the requirements for importing geo data in the {{software}}, only numerical attributes can be imported. In this screen all the attributes in the dataset are listed. The attributes that are numerical, are already checked. In the TQL Name column, you are given the option to rename your attribute. | ||
===Name the features=== | ====Name the features==== | ||
If you choose to add new features, the Naming step will be visible. This step is necessary to keep track of the data you imported in the | If you choose to add new features, the Naming step will be visible. This step is necessary to keep track of the data you imported in the {{software}}. With a clever chosen name, it is easy to distinguish features from each other. | ||
There are three options for naming your features: | There are three options for naming your features: | ||
# By their file name | # By their file name | ||
| Line 69: | Line 55: | ||
# A word with a number | # A word with a number | ||
===Assign | ====Assign types==== | ||
When using the Geo Data Wizard to import [[Item]]s which has a defined type, some mapping for that type must be provided. For example for [[Building]]s and by extension [[Measure]]s, a [[Function]] must be provided. For [[Terrain]]s, a [[Terrain Type]] must be provided. | |||
If all features in the dataset should be imported as the same type, a single type can be selected. If the dataset contains features of varying types, such as various types of buildings and roads, a mapping can be provided. The mapping will relate the presence (and optionally value) of attributes in the dataset to an intended type. This requires one or more attributes to exist in the dataset which properly indicate what types are intended for what features. | |||
Available mappings include: | |||
* Mapping everything to a single type. | |||
* Mapping features to specific types based on the presence (or value) of [[Attribute]]s in the features. | |||
* Mapping features to specific types based on a name of a type. An [[Attribute]] is specified, and the value of that [[Attribute]] in a feature should match the name of an applicable type. | |||
* Mapping features to [[Function]]s as defined by a [[Geo Plugin]]. | |||
===Assign stakeholders=== | ====Assign stakeholders==== | ||
Choose the owner of the features you want to import. Also, multiple owners can be chosen, based on a mapping of attribute names or attribute values. | Choose the owner of the features you want to import. Also, multiple owners can be chosen, based on a mapping of attribute names or attribute values. | ||
==Error messages in the Geo Data Wizard== | |||
Errors when importing data most of the time have to do with no CRS (Coordinate Reference System) or the wrong CRS definition. | |||
====No CRS defined==== | |||
"Invalid detected CRS name: null" | |||
'''Error:''' This error message means that the dataset you are trying to import does not have a CRS (Coordinate Reference System) and therefore the {{software}} can't place the data on the right location. This error mostly occurs when having a GeoJSON file without a CRS property defined. <br> | |||
'''Solution:''' Open the GeoJSON file in a GIS and save it with the correct CRS, so the property is added to the GeoJSON file. See below for the steps in QGIS. | |||
<gallery> | |||
File:Null_error.JPG|Error message in the Geo data wizard | |||
File:Null_error_save_as.JPG|Open the file in QGIS and right click on the layer to choose Save as. | |||
File:Null_error_crs.JPG|In the Save as menu, choose the right CRS the data is in. In the Netherlands, this is probably EPSG:28992 - Amersfooort/RD New | |||
</gallery> | |||
====The imported data does not have a location anywhere in your project==== | |||
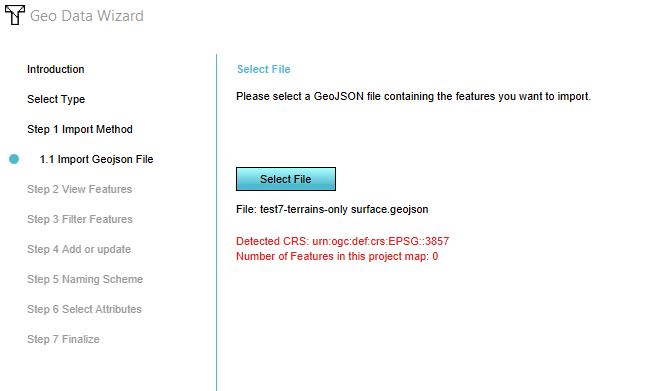
"Detected CRS: <nowiki>urn:ogc:def:crs:EPSG:3857</nowiki> Number of Features in this project map: 0" ''(or something similar)'' | |||
'''Error:''' Geo data always has a location in the real world. This error message means that the dataset you are trying to import does not have a location in your project. For example if you have a project of an area in Amsterdam and you are trying to import data of neighborhoods in the Hague, you will get this error message. If you are sure that the data you are trying to import is in the same location (for example data of neighborhoods in Amsterdam into a {{software}} project in one of these neighborhoods in Amsterdam), the error message could also mean that the defined CRS is not correct for the data. <br> | |||
'''Solution 1:''' Check the box: Longitude first''': In case the selected CRS is based on WGS84, the official order of coordinates is Latitude first, Longitude second. However, some software programs prefer the x-y order and export files accordingly, which means that coordinates are defined as Longitude first, Latitude second. To support both options, the Longitude First checkbox is added next to the CRS selection box. | |||
<gallery> | |||
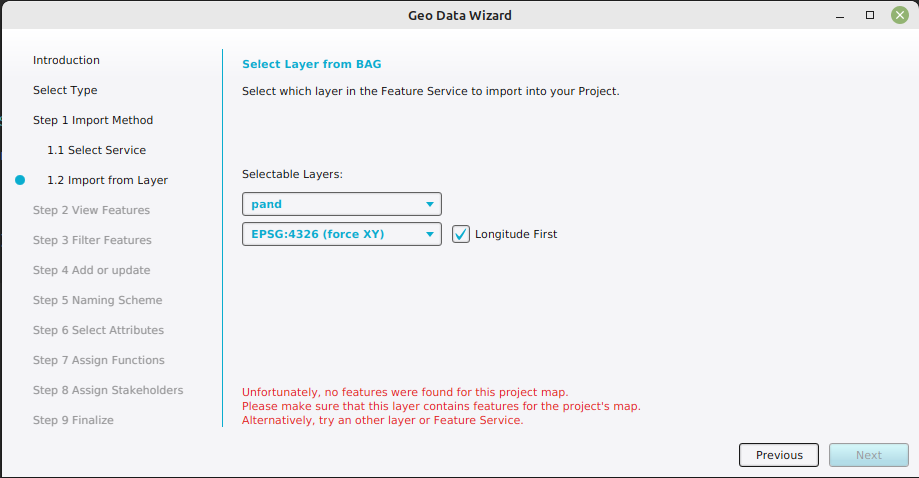
File:longitude_first.png|Error message in the Geo data wizard when longitude first is selected. Depends on the selected server. | |||
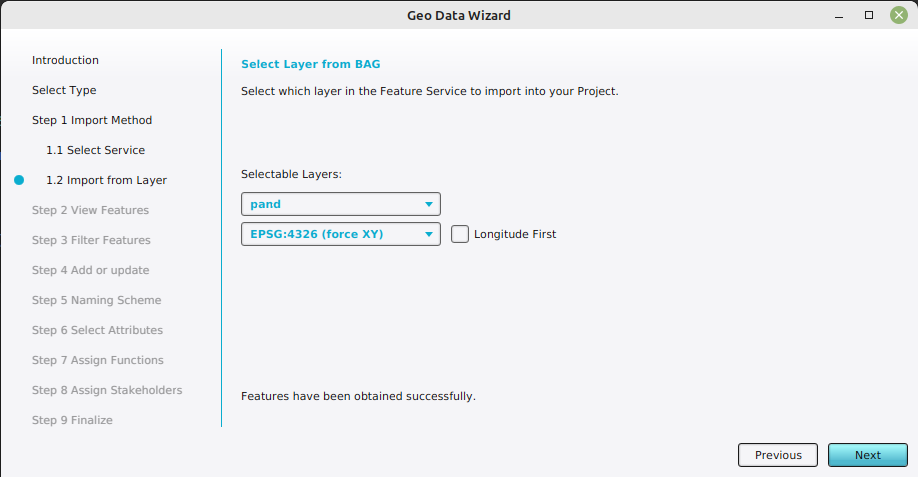
File:latitude_first.png|This particular service provides latitude first, then longitude, therefore uncheck the box. | |||
</gallery> | |||
'''Solution 2:''' Import data that has a location in your project or if you are sure that the data you are trying to import is in the same location, open the GeoJSON file in a GIS and save it with the correct CRS. See below for the steps in QGIS. | |||
<gallery> | |||
File:Location_error.JPG|Error message in the Geo data wizard | |||
File:Null_error_save_as.JPG|Open the file in QGIS and right click on the layer to choose Save as. | |||
File:Null_error_crs.JPG|In the Save as menu, choose the right CRS the data is in. In the Netherlands, this is probably EPSG:28992 - Amersfooort/RD New | |||
</gallery> | |||
====Longitude and Latitude error==== | |||
"Please check if the coordinates are correct in the original crs EPSG:4326 (Longitude first). Projection error: Latitude 483504 36.1'N is too close to a pole.'' | |||
'''Error:''' This can happen when importing a dataset using the WGS84 Coordinate Reference System (EPSG:4326) and means that the data can not be correctly imported by the {{software}}. It can be that the dataset's coordinates are actually not WGS84, but in an other coordinate reference system that uses an alternative unit of measurement, such as meters or feet. | |||
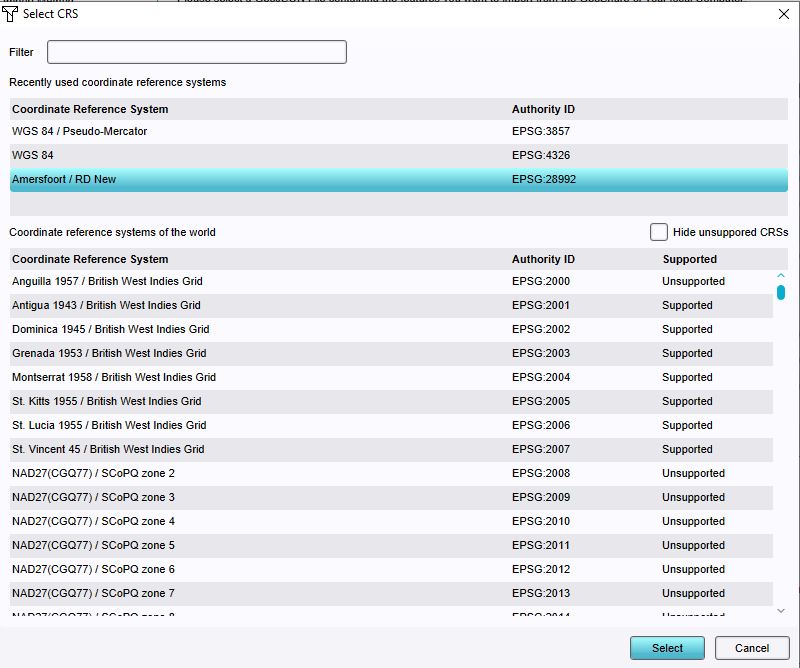
'''Solution 1:''' Click on the ''Select CRS'' button and select a Coordinate Reference System (CRS) that you expect the data is actually defined in. | |||
<gallery widths=300px> | |||
File:crs_long_lat_error.jpg|Latitude close to pole error shown when importing a file that have coordinates that are actually defined in a different coordinate reference system. | |||
File:crs_selection_panel.JPG|Coordinate reference system selection panel opened when clicking on the Select CRS button. A difference coordinate system is selected. | |||
</gallery> | |||
'''Solution 2:''' Open the GeoJSON file in a GIS and transform the data to a different CRS. See below for the steps in QGIS. | |||
<gallery> | |||
File:Lonlat_error.JPG|Error message in the Geo data wizard | |||
File:Null_error_save_as.JPG|Open the file in QGIS and right click on the layer to choose Save as. | |||
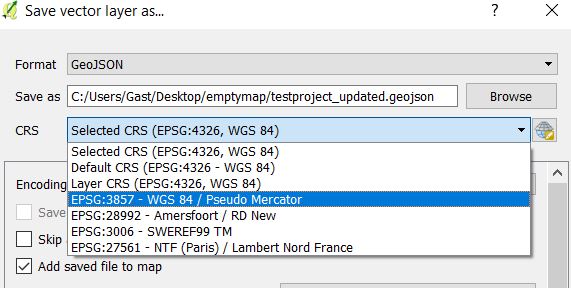
File:Error_pseudo_mercator.JPG|In the Save as menu, choose a different CRS to transform the data to, for example EPSG:3857 WGS84/Pseudo Mercator | |||
</gallery> | |||
{{article end | |||
|seealso= | |||
* [[Geo Plugin]] | |||
* [[New Project Wizard]] | |||
* [[Sources]] | |||
|howtos= | |||
* [[Import Geo data ]] | |||
* [[How to import data from a WFS ]] | |||
* [[How to import 3D BAG data ]] | |||
* [[How to import a CityGML/CityJSON file ]] | |||
* [[How to import a CityGML/CityJSON file for 2D spatial data]] | |||
* [[How to import an SLPK file]] | |||
* [[How to import an SLPK file for 2D Spatial data ]] | |||
* [[How to import a measure with water ]] | |||
* [[How to add terrain changes to a measure from a DXF file]] | |||
}} | |||
{{GeoDataOverview}} | |||
{{Editor current situation nav}} | |||
Latest revision as of 10:06, 7 October 2024
The Geo Data Wizard is a Configuration Wizard that is part of the Tygron Client is a series of steps to guide you through the process of importing Geo data in the Tygron Platform. It is designed to minimalise the use of a GIS for preparing the data.
Import type
There are several different Data Wizards which each guide you through different processes for importing Geo data in the Tygron Platform.
The different wizards are for importing data as:
- Buildings - Importing Buildings (3D-objects) into the model and for updating attributes of Buildings based on the attributes in the data
- Terrain - Importing shapes to define the terrain
- Neighborhoods - Importing shapes to define the neighborhoods
- Zoning - Importing Zones in the Zoning plan (Bestemmingsplan)
- Areas - Importing areas to create a 2D Overlay
- Measures - Importing a group of 3D-objects as a measure to perform as an action
- Point Measurements - Importing measurements to visualize in the Measuring tool
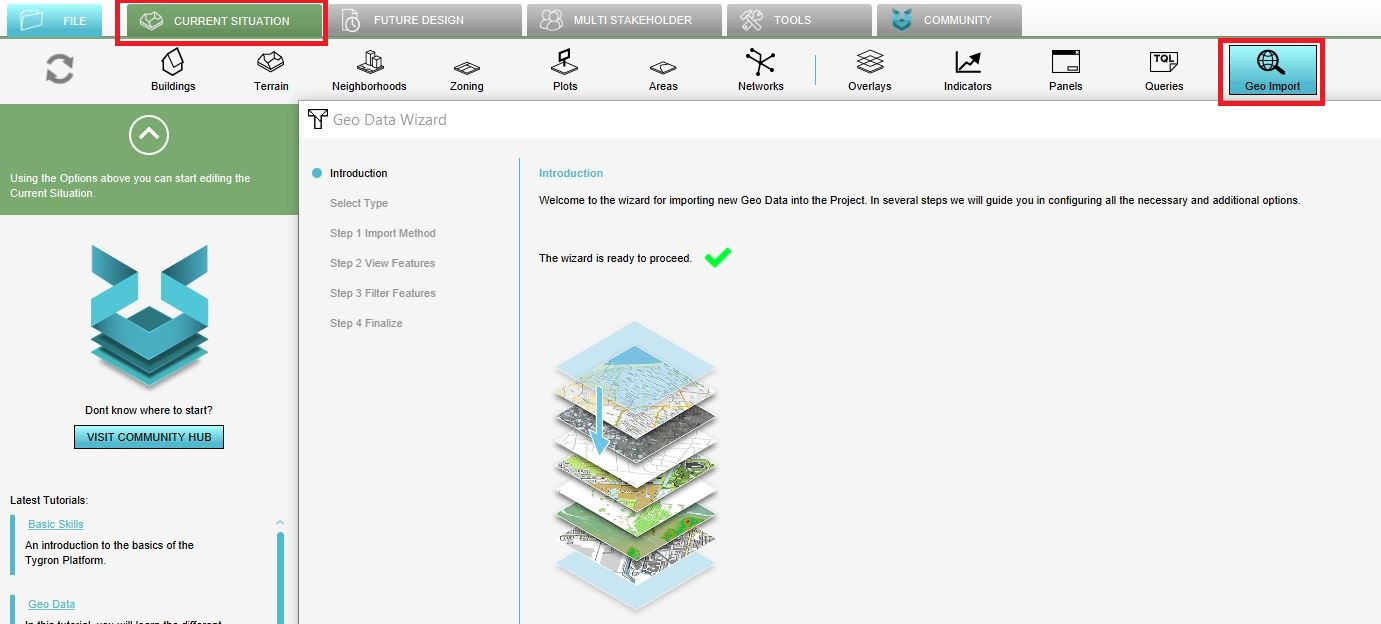
Each of these wizards contain comparable steps which are described below. The wizard can be found by following these steps:
Steps in the Geo Data Wizard
In the data wizards there are several steps to guide you in transforming your dataset in order to only import the relevant features in the data into the Tygron Platform.
Import method
There are four methods for importing Geo Data in the data wizard. These methods can be divided into two: uploading data from a file to the Tygron Platform and the other is downloading data through an URL to the Tygron Platform. The method to choose is based on how you have your data available:
- Through a GeoJSON file: If you have a file with 2D data, choose the first option. Make sure you create the GeoJSON file first, if your data is in another format.
- Through a I3S Scene Layer Package file (SLPK): If you have a 3D model and want to import this as a 3D model in the Tygron Platform, choose the second option. Make sure you create the SLPK file first, if your data is in another file format.
- Through a CityJSON/CityGML file: Although CityJSON and CityGML are two different formats, the underlying datastructure is the same. You can use this option for both file formats.
- Through a Web Feature Service (WFS): If you have an URL on where data is published according to the WFS standard, choose this option: WFS.
- Through a Catalogue Service for the Web (CSW): If you do not have data available but want to browse through an online catalogue in search for datasets or you have a Catalogue service URL, choose the last option: CSW.
When selecting any of the file options, it's possible to either upload your own file, or to use a file from the Geo Share.
View
In step 2, the data that is currently in your project in the Tygron Platform is visible. The amount of points, lines or polygons in the dataset are visible. Since only polygons are allowed in the Tygron Platform, the points and lines need to be buffered. By buffering these features, the points and lines become polygons. The buffer size is adjustable. Based on the data, choose a realistic buffer size. If your dataset contains of lines which represent roads, choose a buffer size that is realistic for the width of these roads. if your dataset consists of only polygons, the buffer size is not used.
Filter
In the next step you can filter the features. For example, if you have a dataset containing all sorts of roads, you can filter only the highways in this dataset. The filtering is based on Attribute name ( attribute textual value) or on Attribute value(a numerical condition). For example, if the roads have an attribute max. speed in km/h. You can filter the roads that have a max. speed of 80 or more km/h to get only the highways.
Add or update
In this step you are asked whether you want to add new data or update the data already present in your project. If you want to import the roads dataset as functions while there are already roads present in the project, updating would be the way to go.
For importing a SLPK file, choose if you want to Create a new building or Update existing buildings with the new model.
Create means that you delete the existing building(s) and their function(s) (which intersect with your new data) and completely replace them.
If you choose Create you get some additional steps which must be setup. You will have new options for naming, assigning Functions and assigning Stakeholders to the newly imported building.
Updating means that you are only replacing the model of existing buildings (which intersect with your new data). The new imported building will keep the function of the previous building.
Select attributes
As mentioned in the requirements for importing geo data in the Tygron Platform, only numerical attributes can be imported. In this screen all the attributes in the dataset are listed. The attributes that are numerical, are already checked. In the TQL Name column, you are given the option to rename your attribute.
Name the features
If you choose to add new features, the Naming step will be visible. This step is necessary to keep track of the data you imported in the Tygron Platform. With a clever chosen name, it is easy to distinguish features from each other. There are three options for naming your features:
- By their file name
- Based on an attribute
- A word with a number
Assign types
When using the Geo Data Wizard to import Items which has a defined type, some mapping for that type must be provided. For example for Buildings and by extension Measures, a Function must be provided. For Terrains, a Terrain Type must be provided.
If all features in the dataset should be imported as the same type, a single type can be selected. If the dataset contains features of varying types, such as various types of buildings and roads, a mapping can be provided. The mapping will relate the presence (and optionally value) of attributes in the dataset to an intended type. This requires one or more attributes to exist in the dataset which properly indicate what types are intended for what features.
Available mappings include:
- Mapping everything to a single type.
- Mapping features to specific types based on the presence (or value) of Attributes in the features.
- Mapping features to specific types based on a name of a type. An Attribute is specified, and the value of that Attribute in a feature should match the name of an applicable type.
- Mapping features to Functions as defined by a Geo Plugin.
Assign stakeholders
Choose the owner of the features you want to import. Also, multiple owners can be chosen, based on a mapping of attribute names or attribute values.
Error messages in the Geo Data Wizard
Errors when importing data most of the time have to do with no CRS (Coordinate Reference System) or the wrong CRS definition.
No CRS defined
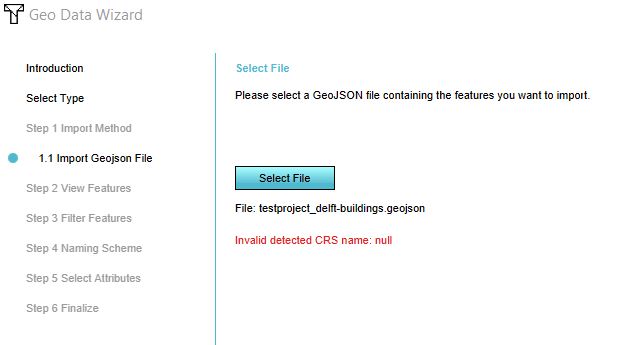
"Invalid detected CRS name: null"
Error: This error message means that the dataset you are trying to import does not have a CRS (Coordinate Reference System) and therefore the Tygron Platform can't place the data on the right location. This error mostly occurs when having a GeoJSON file without a CRS property defined.
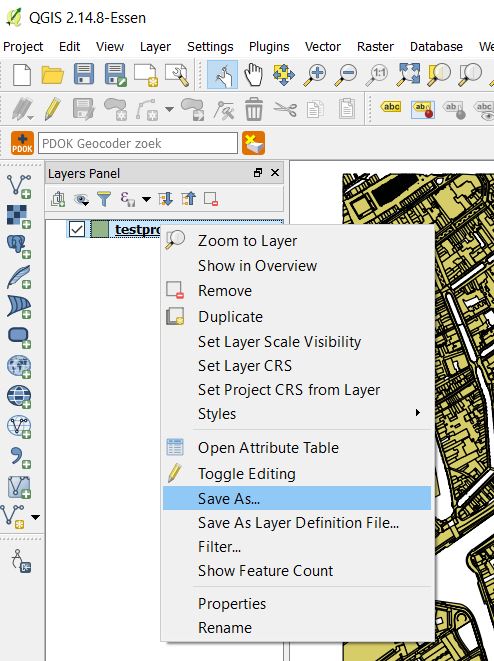
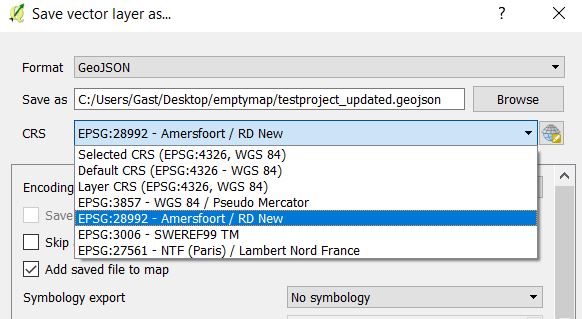
Solution: Open the GeoJSON file in a GIS and save it with the correct CRS, so the property is added to the GeoJSON file. See below for the steps in QGIS.
The imported data does not have a location anywhere in your project
"Detected CRS: urn:ogc:def:crs:EPSG:3857 Number of Features in this project map: 0" (or something similar)
Error: Geo data always has a location in the real world. This error message means that the dataset you are trying to import does not have a location in your project. For example if you have a project of an area in Amsterdam and you are trying to import data of neighborhoods in the Hague, you will get this error message. If you are sure that the data you are trying to import is in the same location (for example data of neighborhoods in Amsterdam into a Tygron Platform project in one of these neighborhoods in Amsterdam), the error message could also mean that the defined CRS is not correct for the data.
Solution 1: Check the box: Longitude first: In case the selected CRS is based on WGS84, the official order of coordinates is Latitude first, Longitude second. However, some software programs prefer the x-y order and export files accordingly, which means that coordinates are defined as Longitude first, Latitude second. To support both options, the Longitude First checkbox is added next to the CRS selection box.
Solution 2: Import data that has a location in your project or if you are sure that the data you are trying to import is in the same location, open the GeoJSON file in a GIS and save it with the correct CRS. See below for the steps in QGIS.
Longitude and Latitude error
"Please check if the coordinates are correct in the original crs EPSG:4326 (Longitude first). Projection error: Latitude 483504 36.1'N is too close to a pole.
Error: This can happen when importing a dataset using the WGS84 Coordinate Reference System (EPSG:4326) and means that the data can not be correctly imported by the Tygron Platform. It can be that the dataset's coordinates are actually not WGS84, but in an other coordinate reference system that uses an alternative unit of measurement, such as meters or feet. Solution 1: Click on the Select CRS button and select a Coordinate Reference System (CRS) that you expect the data is actually defined in.
Solution 2: Open the GeoJSON file in a GIS and transform the data to a different CRS. See below for the steps in QGIS.
How-to's
- Import Geo data
- How to import data from a WFS
- How to import 3D BAG data
- How to import a CityGML/CityJSON file
- How to import a CityGML/CityJSON file for 2D spatial data
- How to import an SLPK file
- How to import an SLPK file for 2D Spatial data
- How to import a measure with water
- How to add terrain changes to a measure from a DXF file
See also
