Weir angle (Water Overlay): Difference between revisions
Jump to navigation
Jump to search
(→Notes) |
No edit summary |
||
| (21 intermediate revisions by 4 users not shown) | |||
| Line 1: | Line 1: | ||
[[File:Weir_angle_explain_(Water_Overlay).png|thumb|right|x300px]] | |||
{{Overlay keys|<onlyinclude> | |||
{{Overlay keys|type=row|group=Water Overlay | |||
|key=WEIR_ANGLE | |||
|unit={{geoangle}} | |unit={{geoangle}} | ||
|description=The top down orientation angle of the weir. | |description=The top down orientation angle of the [[Weir (Water Overlay)|weir]]. | ||
|defaultvalue=0 | |defaultvalue=0 | ||
|icon=[[File: | |icon=waterwizard_icon_weir_angle.png | ||
|range=-{{doublemaxvalue}} to {{doublemaxvalue}} | |||
}}</onlyinclude>}} | |||
The weir angle is used to convert a weir loaded in as point-based data to a line which is used in the simulation to define from where to where the water should flow across the weir. | |||
In the Water Wizard a weir angle is automatically generated. There are currently 4 options on how this is (automatically) generated: | |||
# The weir is located on the edge of 2 water level areas. The weir is then automatically installed correctly and no message is displayed. A note about this option is necessary: The weirs are automatically well oriented, but the waterways are not blocked, which means that water can flow past the weirs. That is why we recommend using a dataset in which the attribute is already present, because then the block is in effect. | |||
# The weir is located in exactly 1 level area. Then the warning appears that the weir has no angle, with the option to fix it. | |||
# The weir is located in exactly 0 level areas. Then a comment is displayed about the absence of a water level area. | |||
# The weir angle attribute is pre-added to a dataset and this dataset is imported into the project. No angle needs to be generated automatically. | |||
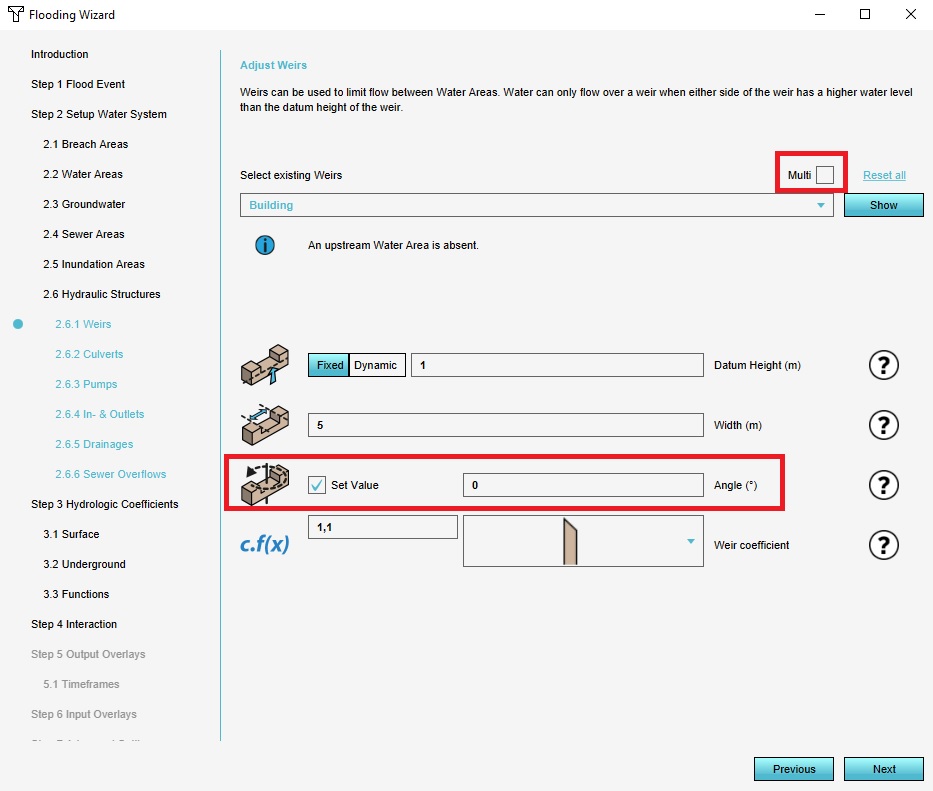
[[File:Set_Multi_Weir_value.jpg|thumb|left|x200px|The weir angle is adjustable in the weir step of a [[Water Overlay]] wizard]] | |||
{{article end | |||
|notes= | |||
* The width of the generated dam is equal to the weir's [[Weir width (Water Overlay)|WEIR_WIDTH]], multiplied by the [[Weir dam multiplier (Water Overlay)|WEIR_DAM_MULTIPLIER]] of the [[Water Overlay]]. | |||
* If a weir angle is available for a weir which is already line-shaped, the weir is first interpreted as a point, and then the direction and elevation are adjusted accordingly. The centre of the weir's polygon is used. | |||
* If no angle is available as an attribute, the angle weir angles are automatically oriented based on the water level areas. | |||
* The weir angle is automatically converted to a range within 0 and 360. | |||
|seealso= | |||
* [[Weir width (Water Overlay)]] | |||
* [[Weir dam multiplier (Water Overlay)]] | |||
|howtos= | |||
}} | }} | ||
{{WaterOverlay hydraulic structure nav}} | {{WaterOverlay hydraulic structure nav}} | ||
Latest revision as of 15:30, 26 February 2024
.png)
| Icon | Key | Unit | Range | Description | Default value |
|---|---|---|---|---|---|
| |
WEIR_ANGLE | geo angle (0-360°) | -1.7976931348623157E308 to 1.7976931348623157E308 | The top down orientation angle of the weir. | 0 |
The weir angle is used to convert a weir loaded in as point-based data to a line which is used in the simulation to define from where to where the water should flow across the weir. In the Water Wizard a weir angle is automatically generated. There are currently 4 options on how this is (automatically) generated:
- The weir is located on the edge of 2 water level areas. The weir is then automatically installed correctly and no message is displayed. A note about this option is necessary: The weirs are automatically well oriented, but the waterways are not blocked, which means that water can flow past the weirs. That is why we recommend using a dataset in which the attribute is already present, because then the block is in effect.
- The weir is located in exactly 1 level area. Then the warning appears that the weir has no angle, with the option to fix it.
- The weir is located in exactly 0 level areas. Then a comment is displayed about the absence of a water level area.
- The weir angle attribute is pre-added to a dataset and this dataset is imported into the project. No angle needs to be generated automatically.

The weir angle is adjustable in the weir step of a Water Overlay wizard
Notes
- The width of the generated dam is equal to the weir's WEIR_WIDTH, multiplied by the WEIR_DAM_MULTIPLIER of the Water Overlay.
- If a weir angle is available for a weir which is already line-shaped, the weir is first interpreted as a point, and then the direction and elevation are adjusted accordingly. The centre of the weir's polygon is used.
- If no angle is available as an attribute, the angle weir angles are automatically oriented based on the water level areas.
- The weir angle is automatically converted to a range within 0 and 360.
See also


- Group
- Inlet