Tygron Client: Difference between revisions
m (Frank@tygron.nl moved page Interface to Tygron Client) |
No edit summary Tag: Manual revert |
||
| (12 intermediate revisions by the same user not shown) | |||
| Line 1: | Line 1: | ||
The [[{{software|client}}]] is an application that allows users to log in and interact with the {{software}}. It can be used to: | |||
* [[New Project Wizard|Create new projects]]; | |||
* [[editor|Edit existing projects]]; | |||
* Explore [[scenario]]s using [[session|test-run sessions]]; | |||
* Host [[session|single and multi-stakeholder sessions]]; | |||
* [[Account management|Manage your {{software}} account]]. | |||
The [[{{software|client}}]] provides distinct user interfaces for these various actions: | |||
; Login screens | |||
; | : ''The login screen and various validation screens. These are shown before you have logged in and shortly after to check if the user can connect with the {{software}} and properly run the {{software|client}}.'' | ||
: ''The login screen and | ; [[Administration]]: | ||
; | : ''To manage your [[project]]s and [[Account Management|account]] and optionally [[domain]], you can use the administration interface.'' | ||
: '' | ; [[Viewer]] | ||
; [[ | : ''The interface relevant to [[Stakeholder]]s in a the project [[session]]. This interface is rendered on top of the [[3D Visualization]], and provides a user with all the options and information relevant to their role as stakeholder. This is the most complex interface.'' | ||
: ''The | ;[[Editor]] | ||
;[[Editor | : ''The interface used to [[editor|edit]] a [[project]]. It is structured around the [[Viewer]] and also rendered on top of the [[3D Visualization]].'' | ||
: ''The interface used to [[editor|edit]] a [[project]]. It is also rendered on top of the [[3D Visualization]] | |||
== | ===Viewer=== | ||
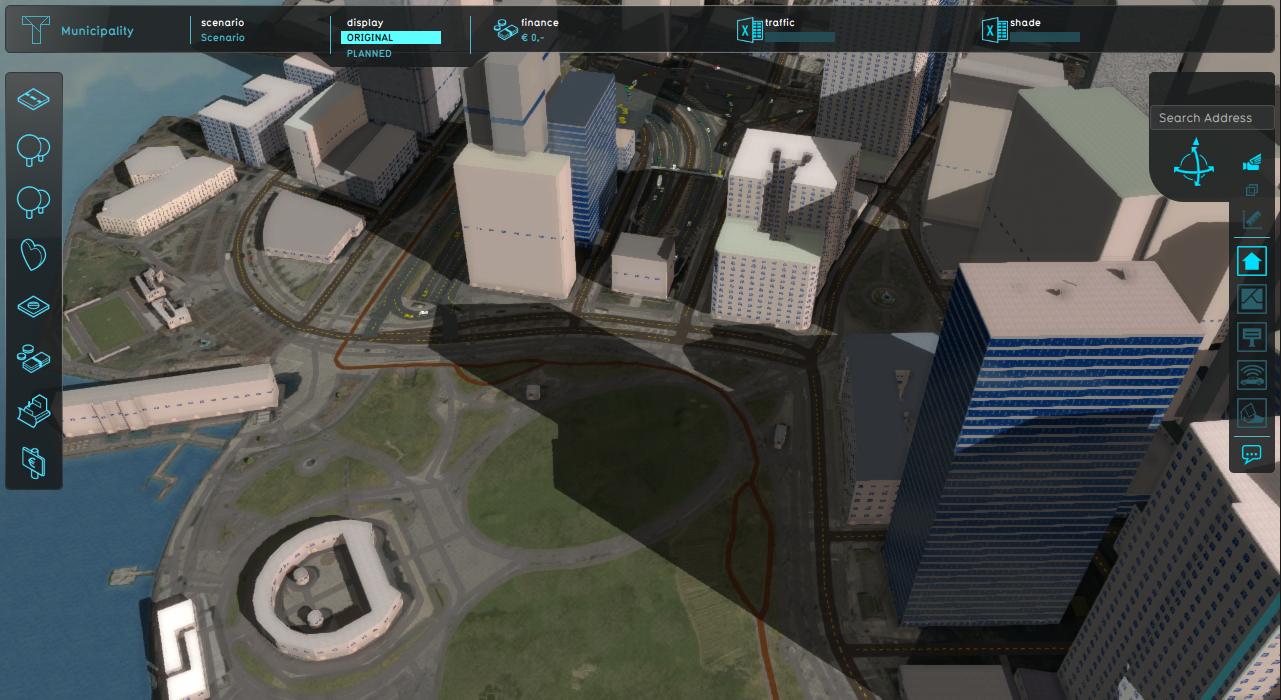
[[File:Interface_game_general.jpg|thumb|800px|center|The [[Viewer ]]interface.]]<br clear=both> | |||
The [[Viewer]] is the interface relevant to [[Stakeholder]] during a session. It is rendered on top of the [[3D Visualization]]. Near the edges of the screen you can find the most prominent parts of the interface; the [[Top bar]], the [[Action menu panel]], the [[Navigation panel]]. These are available to provide information to the user, provide means to the user to gather more information, and to interact with the [[Session|project session]]. | |||
[[File:Interface_game_general.jpg|thumb|800px| | |||
The [[ | |||
Other panels, such as [[Popup panel|popup]], [[Indicator panel|indicator]] and [[budget panel]]s are accessible through these panels or by interacting with objects, such as [[popup]]s, in the [[3D Visualization]]. | Other panels, such as [[Popup panel|popup]], [[Indicator panel|indicator]] and [[budget panel]]s are accessible through these panels or by interacting with objects, such as [[popup]]s, in the [[3D Visualization]]. | ||
{{ | {{viewer nav}} | ||
===Editor=== | ===Editor=== | ||
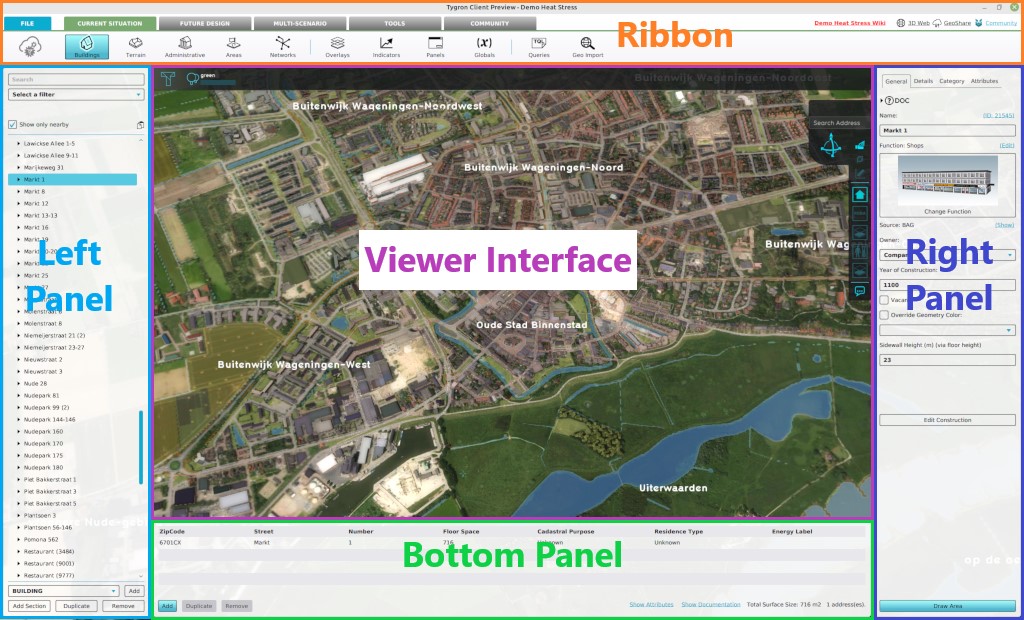
[[File:Q1-2016-EditorPanel.jpg|thumb|850px| | [[File:Q1-2016-EditorPanel.jpg|thumb|850px|center|The Tygron Editor. The Ribbon at the top of the screen, the Left Panel on the left side of the screen, the User Main Interface in the center of the screen, the Right Panel on the right side of the screen, and the Bottom Panel at the bottom of the screen.]]<br clear=both> | ||
The [[Editor|Editor interface]] is synonymous with the editor. It is the interface which allows you to change projects as desired. The editor interface consists of the Editor Menu bar, the Editing area and the [[3D Visualization]], which is itself the user interface. The editor allows access to editor panels which allow various components of a project to be added, changed, and removed, such as [[stakeholders]], [[indicators]] and [[building]]s. | The [[Editor|Editor interface]] is synonymous with the editor. It is the interface which allows you to change projects as desired. The editor interface consists of the Editor Menu bar, the Editing area and the [[3D Visualization]], which is itself the user interface. The editor allows access to editor panels which allow various components of a project to be added, changed, and removed, such as [[stakeholders]], [[indicators]] and [[building]]s. | ||
{{Template:Editor ui nav}} | {{Template:Editor ui nav}} | ||
Latest revision as of 09:08, 21 February 2023
The Tygron Client is an application that allows users to log in and interact with the Tygron Platform. It can be used to:
- Create new projects;
- Edit existing projects;
- Explore scenarios using test-run sessions;
- Host single and multi-stakeholder sessions;
- Manage your Tygron Platform account.
The Tygron Client provides distinct user interfaces for these various actions:
- Login screens
- The login screen and various validation screens. These are shown before you have logged in and shortly after to check if the user can connect with the Tygron Platform and properly run the Tygron Client.
- Administration
- To manage your projects and account and optionally domain, you can use the administration interface.
- Viewer
- The interface relevant to Stakeholders in a the project session. This interface is rendered on top of the 3D Visualization, and provides a user with all the options and information relevant to their role as stakeholder. This is the most complex interface.
- Editor
- The interface used to edit a project. It is structured around the Viewer and also rendered on top of the 3D Visualization.
Viewer

The Viewer is the interface relevant to Stakeholder during a session. It is rendered on top of the 3D Visualization. Near the edges of the screen you can find the most prominent parts of the interface; the Top bar, the Action menu panel, the Navigation panel. These are available to provide information to the user, provide means to the user to gather more information, and to interact with the project session. Other panels, such as popup, indicator and budget panels are accessible through these panels or by interacting with objects, such as popups, in the 3D Visualization.
Editor
The Editor interface is synonymous with the editor. It is the interface which allows you to change projects as desired. The editor interface consists of the Editor Menu bar, the Editing area and the 3D Visualization, which is itself the user interface. The editor allows access to editor panels which allow various components of a project to be added, changed, and removed, such as stakeholders, indicators and buildings.
