File Menu: Difference between revisions
| (21 intermediate revisions by 2 users not shown) | |||
| Line 1: | Line 1: | ||
The File menu opens a properties pane and provides access to detailed project information, who can access this project, enables users to save the project, to save different versions of the project and enables users to exit their project. In the {{software}} the file menu is located on the left side of the Ribbon Bar. | The File menu opens a properties pane and provides access to detailed project information, who can access this project, enables users to save the project, to save different versions of the project and enables users to exit their project. In the {{software}} the file menu is located on the left side of the Ribbon Bar. | ||
| Line 36: | Line 26: | ||
[[File:Editor_file_pane_details.jpg|450px|right|Bottom panel]] | [[File:Editor_file_pane_details.jpg|450px|right|Bottom panel]] | ||
====Map Size==== | ====Map Size==== | ||
The current map size of the project. The map size can be displayed in meters or in feet (m or ft). The Map Size was selected when initially creating the project. | |||
The current map size of the project. The map size can be displayed in meters or in feet (m or ft). The Map Size was selected when initially creating the project. | ====Map Center==== | ||
The map center of your project in longitude /latitude or x / y, depending on the selected Export CRS EPSC Code. | |||
====Export CRS EPSG Code==== | |||
The currently selected Coordinate Reference System (CRS) used when [[Export Geo data|exporting Geo data]]. The name is mentioned in the label next to the change CRS button. Clicking on the button opens the [[CRS Selection Panel]]. | |||
==== | ====Timestamp Format==== | ||
The adjustable [[timestamp]] format used when showing a date in your project. For example, the date of [[Water Overlay]] or [[Heat Stress Overlay]] [[timeframe]] shown in the [[Legend panel]]. | |||
The | ====Max Attribute Decimals (3-12)==== | ||
The amount of decimals allowed for [[attributes]] in the [[editor]] interface. | |||
====Project Time Zone==== | |||
The [[Time Zone]] of the project. The time zone is automatically selected based on the location when creating a new project. It can be changed however, using the choice box that lists the available time zones. | |||
====Unit System==== | ====Unit System==== | ||
The current active Unit System. The Unit System determines which units are being used to display measurements. The Unit System is set when initially creating the project. Available unit systems: [https://en.wikipedia.org/wiki/United_States_customary_units|US Customary (feet)], [https://en.wikipedia.org/wiki/Metric_system| International (metric)], [https://en.wikipedia.org/wiki/Imperial_units| British Imperial System] | |||
====Currency==== | |||
The current active [[Currency]]. The Currency was selected when initially creating the project. | |||
====Available languages==== | |||
The language selected for your project, as provided by the user when initially creating the project. Currently available Languages: EN / NL. Both can be selected, however only one can be active for a session. | |||
===Edit Rights=== | ===Edit Rights=== | ||
| Line 99: | Line 80: | ||
==Versions== | ==Versions== | ||
[[File:Editor_file_pane_versions.jpg|450px|right|File Pane]] | [[File:Editor_file_pane_versions.jpg|450px|right|File Pane]] | ||
Versions assist users in saving different versions of a certain project, instead of having to save to a different filename | [[Project Version|Versions]] assist users in saving different versions of a certain project, instead of having to save to a different filename every time. | ||
The table displays a list of Versions available for this project. The table has 3 | The table displays a list of Versions available for this project. The table has 3 columns: Version, Text and Active. The "Version" column displays a linear number, the Text column displays the text as input by the user in the "Description" Field. The "Active" Column displays "Active" next to the Version row which is active. | ||
The current project has | The current project has 2 versions are available: 0 (Base Version) and a second version 1 with a date; This is an automatically generated name. | ||
===Switching Versions=== | ===Switching Versions=== | ||
You can revert to an old version by closing the Project and switch versions in the Main Menu. | You can revert to an old version by closing the [[Project]] and switch [[Project Version|versions]] in the [[Main Menu]]. | ||
"Main Menu" -> "Options" -> "My Account" | "Main Menu" -> "Options" -> "My Account" | ||
| Line 128: | Line 109: | ||
Pressing "Save As" facilitates users in saving the project with a new name. | Pressing "Save As" facilitates users in saving the project with a new name. | ||
The same restrictions apply when creating a new project, between 3- | The same restrictions apply when creating a new project, between 3-20 characters. | ||
==Exit== | ==Exit== | ||
| Line 134: | Line 115: | ||
Pressing the exit button exits the Application. | Pressing the exit button exits the Application. | ||
[[File:Editor_file_pane_save_exit_confirmation.jpg| | [[File:Editor_file_pane_save_exit_confirmation_keepalive.jpg|Exiting a project [[session]] with keep alive selected.]][[File:Editor_file_pane_save_exit_confirmation.jpg|Exiting a project [[session]] without keep alive selected.]] | ||
A popup-message is being displayed asking the user if he would like to save his project. The actions to select depend on whether the project [[session]] should be [[Keep alive|kept alive]]. | |||
* Keep alive: | |||
** Pressing "Save" saves the project and exits the application, but keeps the session running on the server for you to join later. | |||
** Pressing "Exit only" exits the application without saving the project. The session is kept running on the server for you to join later. Changes made are still in the session, however, will be lost when the session is closed. | |||
** Pressing Cancel does not save the project and returns the user to the menu. | |||
* Not Keep alive: | |||
** Pressing "Save" saves the project and exits the application. When no other users are connected to the session, the session is closed as well. | |||
** Pressing "Discard" exits the application without saving changes made to the project. When no other users are connected to the session, the session is closed as well. | |||
** Pressing Cancel does not save the project and returns the user to the menu. | |||
{{editor ui nav}} | |||
Latest revision as of 11:59, 1 February 2024
The File menu opens a properties pane and provides access to detailed project information, who can access this project, enables users to save the project, to save different versions of the project and enables users to exit their project. In the Tygron Platform the file menu is located on the left side of the Ribbon Bar.
Accessing the File Menu

Selecting the "File" Tab from the ribbon header opens the File Menu properties window.
File Menu Overview

The File Menu provides access to detailed project information and properties of your project. The menu on the left side provides access to: Details, Versions, Save, Save As, Exit.
When opening the File Menu, the "Details" menu item opens.
 The white arrow on top takes you back to the main view of the editor.
Details Panel
The Details Panel provides access to project specific characteristics and details.
Project Name

The name of your project is provided in the Details Panel. The project name is provided by the user when initially creating the project.
Details

Map Size
The current map size of the project. The map size can be displayed in meters or in feet (m or ft). The Map Size was selected when initially creating the project.
Map Center
The map center of your project in longitude /latitude or x / y, depending on the selected Export CRS EPSC Code.
Export CRS EPSG Code
The currently selected Coordinate Reference System (CRS) used when exporting Geo data. The name is mentioned in the label next to the change CRS button. Clicking on the button opens the CRS Selection Panel.
Timestamp Format
The adjustable timestamp format used when showing a date in your project. For example, the date of Water Overlay or Heat Stress Overlay timeframe shown in the Legend panel.
Max Attribute Decimals (3-12)
The amount of decimals allowed for attributes in the editor interface.
Project Time Zone
The Time Zone of the project. The time zone is automatically selected based on the location when creating a new project. It can be changed however, using the choice box that lists the available time zones.
Unit System
The current active Unit System. The Unit System determines which units are being used to display measurements. The Unit System is set when initially creating the project. Available unit systems: Customary (feet), International (metric), British Imperial System
Currency
The current active Currency. The Currency was selected when initially creating the project.
Available languages
The language selected for your project, as provided by the user when initially creating the project. Currently available Languages: EN / NL. Both can be selected, however only one can be active for a session.
Edit Rights
- See also: Permissions


The Edit Rights properties describe which users can access and edit the currently opened project.
Owner
The Owner is the user initially creating the project, often the e-mail address of the user.
The dropdown-listbox next to the user provides access to the parameters "Write" and "Read". This makes it possible to make your project read-only.
Other users in domain
Users are grouped inside a domain, a domain can consist, for example, out of people from the same organisation.
The dropdown-listbox next to the domain provides access to the parameters "None" and "Read" and "Write". This parameter controls if users inside your domain have access to the selected project and if they have read-only access, or can also write (save) the currently selected project.
Tygron Support
This parameter grants Tygron Support access to the project. By default the selected parameter is set to "None", so the project can not be viewed or changed by Tygron Support. If the selected parameter is set to "Read" or "Write", Tygron Support can respectively view and change the project data.
Tygron Support will only ask for access after a support request has been made. This is to better shield any proprietary data that your project may contain.
Keep Editor Session alive for one week after last user exit:
In most cases, an Editor Session is only alive when there are users connected to a session. Sometimes, you want a session to be active, without anyone being connected all the time. This means a user in a different timezone for example can join this active session. You don't have to keep your own computer connected to the session at all times in this way.
Versions

Versions assist users in saving different versions of a certain project, instead of having to save to a different filename every time.
The table displays a list of Versions available for this project. The table has 3 columns: Version, Text and Active. The "Version" column displays a linear number, the Text column displays the text as input by the user in the "Description" Field. The "Active" Column displays "Active" next to the Version row which is active.
The current project has 2 versions are available: 0 (Base Version) and a second version 1 with a date; This is an automatically generated name.
Switching Versions
You can revert to an old version by closing the Project and switch versions in the Main Menu.
"Main Menu" -> "Options" -> "My Account"
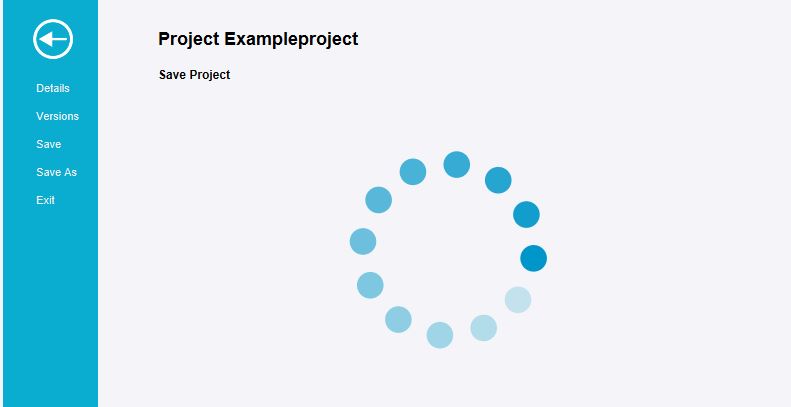
Save
Pressing "Save" saves your project data. A spinner will appear indicating that the project is saving. When succesfully saved the spinner will disappear and the screen will indicate a successful save message.
"Project ... was successfully saved"
- File -> Save
- Spinner appears
- Confirmation message
2. Spinner
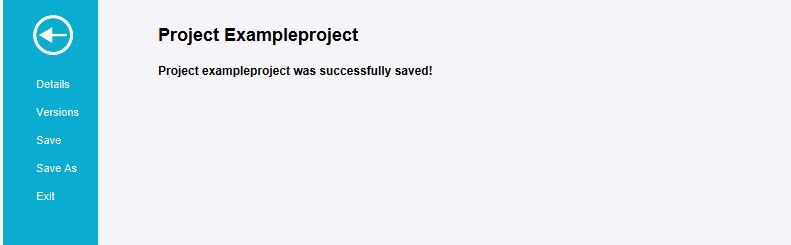
3. Confirmation

Save As
Pressing "Save As" facilitates users in saving the project with a new name.
The same restrictions apply when creating a new project, between 3-20 characters.
Exit
Pressing the exit button exits the Application.


A popup-message is being displayed asking the user if he would like to save his project. The actions to select depend on whether the project session should be kept alive.
- Keep alive:
- Pressing "Save" saves the project and exits the application, but keeps the session running on the server for you to join later.
- Pressing "Exit only" exits the application without saving the project. The session is kept running on the server for you to join later. Changes made are still in the session, however, will be lost when the session is closed.
- Pressing Cancel does not save the project and returns the user to the menu.
- Not Keep alive:
- Pressing "Save" saves the project and exits the application. When no other users are connected to the session, the session is closed as well.
- Pressing "Discard" exits the application without saving changes made to the project. When no other users are connected to the session, the session is closed as well.
- Pressing Cancel does not save the project and returns the user to the menu.