Editor: Difference between revisions

From Tygron Support wiki
Jump to navigation Jump to search
 
(51 intermediate revisions by 4 users not shown)
Line 1: Line 1:
{{learned|what the editor is|how the editor relates to the {{software}}|how to reach the editor|the general layout of the editor|what options are available in the editor|how to perform a testrun in the editor|how to edit with multiple users at the same time}}
[[File:Q1-2016-EditorPanel.jpg|thumb|850px|left|The [[Editor ]]interface in the [[{{software|client}}]]. The Ribbon at the top of the screen, the Left Panel on the left side of the screen, the [[Viewer ]]interface in the center of the screen, the Right Panel on the right side of the screen, and the Bottom Panel at the bottom of the screen.]]
 
==Editor==
 
The editor is the system with which you are able to create your own projects in the {{software}}. By using the Editor to create your own project rather than using a pre-made or default project, you are able to model the project more closely to the real-world situation faced by you and your stakeholders. Although the term has a generic meaning, in context of the {{software}} the term Editor always refers to the {{software}}'s built-in editing functionality.
 
==How does the editor relate to the {{software}}==
 
The Editor allows you to improve and edit your own project in the {{software}}. The {{software}} stores projects as datastructures, which the editor presents in an understandable and editable manner. Many components of a project can be freely edited using the editor.
 
==Editor layout==
 
The editor is composed of several sections: the [[Ribbon]], the [[Left_Panel|left panel]], the [[3D World|Virtual 3D World]], the [[Right_Panel|right panel]], and the [[Bottom_Panel|bottom panel]]. Each editor panel has its own distinct functionality.
 
[[File:Q1-2016-EditorPanel.jpg|thumb|850px|left|The Tygron Editor. The Ribbon at the top of the screen, the Left Panel on the left side of the screen, the User Main Interface in the center of the screen, the Right Panel on the right side of the screen, and the Bottom Panel at the bottom of the screen.]]
<br clear=left>
<br clear=left>
===Default layout / Maximized layout===
The Editor interface is subdivided in the following 5 sections:
 
* [[Ribbon]]. This the generic header of the Editor. It is a tabbed header, which provides access to tools grouped by categories. Those categories are in organized in tabs. This makes tools accessible in a logical way.
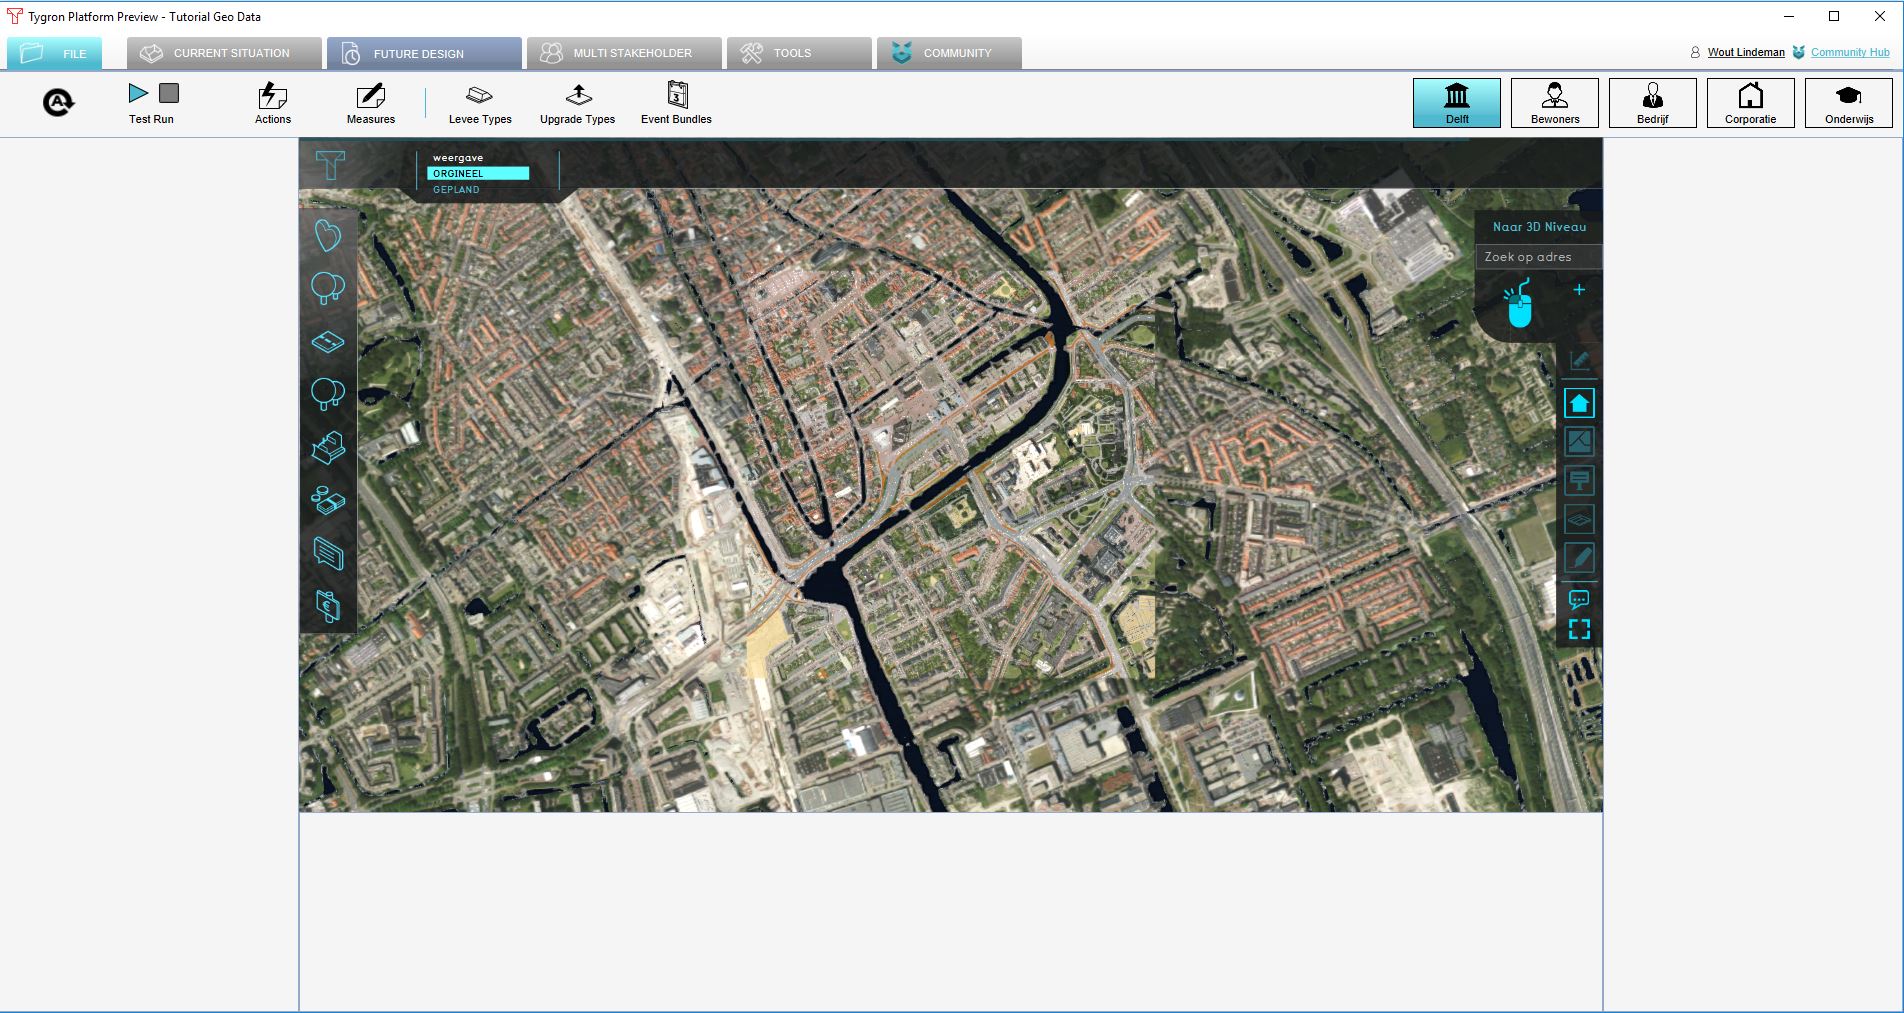
[[File:Editor_game_interface_maximize.jpg|frame|left|Maximize user interface button, maximizing the user interface panel for a better view of the [[User Interface]]]]
* [[Left Panel]]. This panel provides access to sub-items and functionality of the item currently selected on the ribbon bar. For example, if the Indicators button is currently selected on the ribbon bar, access to the current active indicators in the [[project]] is available.
[[File:Editor_game_interface_standard.jpg|thumb|right|The default editor layout, with access to all available panels.]]
* [[Right Panel]]. This panel allows you to change properties of selected items in the left panel. Often called the "Detail Panel".
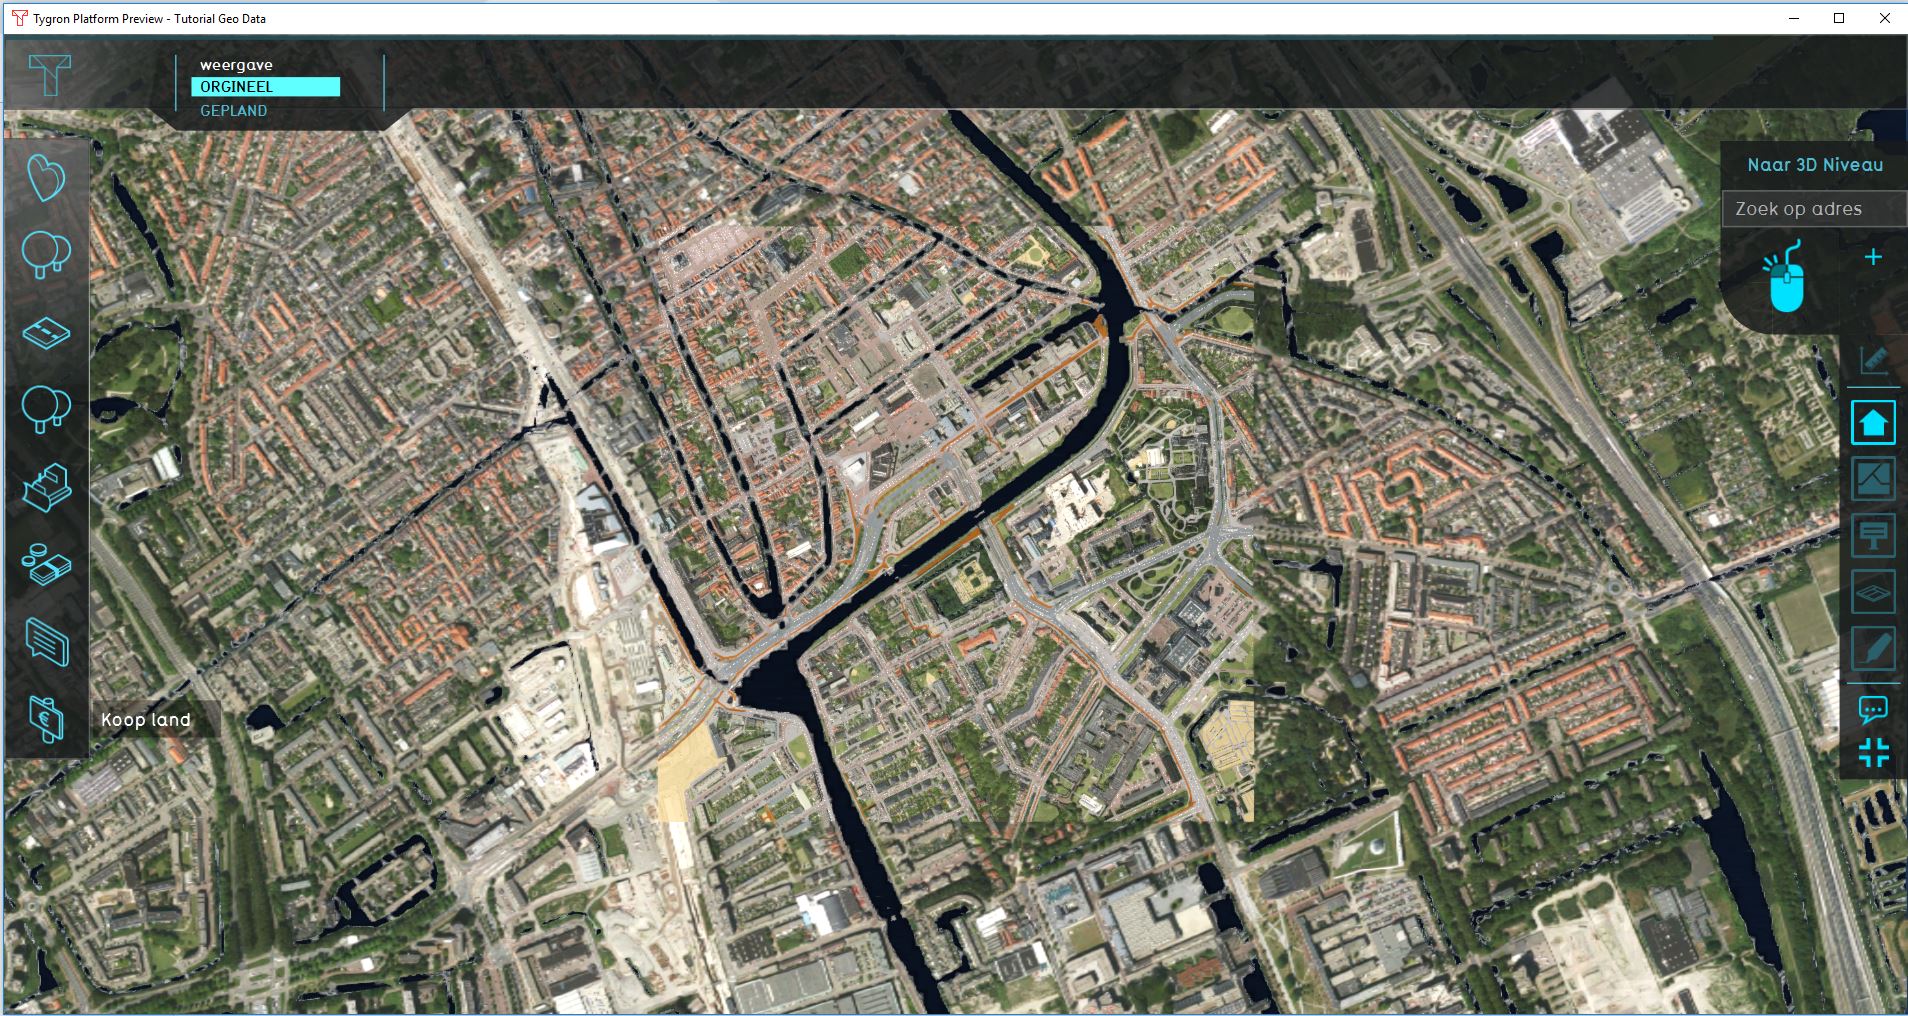
[[File:Editor_game_interface_maximized.jpg|thumb|right|The editor with a maximized user interface panel.]]
* [[Bottom Panel]]. This panel is used for detailed editing, and changing parameters for using the brush inside the [[3D Visualization]]. It is context-sensitive and used for example for changing indicator targets, pairing upgrades and changing environment settings.
 
* [[Viewer ]]interface. This interface allows end users to interact with a session from the perspective of a [[stakeholder]]. It is rendered on top of the [[3D Visualization]] and displays panels for various means of taking [[action]]s and inspecting the state of the project.
The maximize view port button on the bottom right side of the [[Game_Interface| user interface]] changes the editor layout, to minimize or maximize the main user interface, .
 
====Default editor layout====
 
The default editor layout, with access to all available panels.
 
====Maximized user interface layout====
 
The editor with a maximized user interface panel. This view hides the [[left panel]], the [[right panel]] and the [[Bottom_Panel|bottom panel]] of the Tygron Editor interface.
<br clear=all>
 
==Ribbon==
 
: ''Main article: [[Ribbon]].
[[File:Editor_ribbon.jpg|850px|thumb|left|]]<br clear=all>
 
The ribbon is the generic header of the Tygron Editor. It is a tabbed header, which provides access to tools grouped by categories. Those categories are in organized in tabs. This makes tools accessible in a logical way.
 
==Left panel==
: ''Main article: [[Left Panel]].
 
[[File:Editor_left_panel.jpg|thumb|100px|left|The [[Editor#left panel|left panel]] allows you to select, add and remove items.]]
 
The left panel, on the left side of the screen, provides access to sub-items and functionality of the item currently selected on the ribbon bar. For example, if the Indicators button is currently selected on the ribbon bar, access to the current active indicators in the project is available.
<br clear=all>
 
==User Interface==
: ''Main article: [[Game_Interface|User Interface]].
[[File:Editor_virtual_3dworld.jpg|middle|thumb|200px|The user (main) interface]]
 
The largest panel is the [[Game_Interface|User Interface]]. This panel displays the current state of your project. All elements that are present in a regular project are present in this panel. The user interface consists of prominently available, interactive interface elements, as well as a number of contextually available information panels. The interface elements can be considered to be part of either of two groups: the main interface elements or the additional interface elements. The main interface elements are either always available or vital for interacting with the project session. The additional interface elements provide additional information, and are only available in certain contexts or when taking specific actions.
<br clear=all>
 
==Right panel==
: ''Main article: [[Right Panel]].
[[File:Editor_right_panel.jpg|thumb|100px|right|The [[Editor#right panel|right panel]] allows you to change properties of selected items in the left panel.]]
 
The right panel, on the right side of the screen, provides access to properties currently selected in the left panel. The "Finance Municipality" item is currently selected in the left panel. Its properties can be changed from within the right panel.
<br clear=all>
 
==Bottom panel==
: ''Main article: [[Bottom Panel]]
[[File:Editor_bottom_panel.jpg|450px|left|bottom panel]]


The bottom panel is used for detailed editing, and changing parameters for using the brush inside the 3D World. It is context-sensitive and used for example for changing indicator targets, pairing upgrades and changing environment settings.<br clear=all>
==Maximizing viewer interface==
<gallery widths=300px heights=200px>
File:Editor_game_interface_standard.jpg|The default editor layout, with access to all available panels.
File:Editor_game_interface_maximized.jpg|thumb|left|The editor with a maximized [[viewer ]]interface. This view hides the [[left panel]], the [[right panel]] and the [[Bottom_Panel|bottom panel]] of the Editor interface.
</gallery>


==Editing with multiple users==
Line 71: Line 18:
Just like the process in which a project is created, a project can be edited by multiple users at the same time. The number of users that can work simultaneously on the same project is equal to the number of [[playable stakeholder]]s in the project. Only one instance of the project can be edited at the same time. If a user is already editing a project, you can decide to [[main menu#Sub menus of the main menu|join their editing session]]. A project which is being edited cannot be opened again for editing, or opened for a session, until all users have closed their editing sessions of the project.


==Starting the editor==
{{article end
 
|howtos=
To start the editor [[logging in|log in]] to the {{software}}. From the [[main menu]], you can either choose to create a new project, edit an existing project, or join an editing session.
*[[How to start the Editor]]
 
*[[List of Keyboard Shortcuts]]
Creating a new project:
}}
 
{{Location steps|Main menu|New Project}}
 
Editing an existing Project:
 
{{Location steps|Main menu|Edit Project|''The project you wish to edit''|''The language you wish to edit''}}
 
Joining an existing editing session:
 
{{Location steps|Join|''The project you wish to join''}}
 
When creating a new project, you will first be presented with a [[wizard]] to set up the basis of your project.


When you have completed the wizard, selected to edit an existing project or chosen to join an existing editing session, you will be presented with the primary editing interface, and the starting screens for the project.
{{Editor ui nav}}
[[Category:Interface]]

Latest revision as of 11:12, 23 February 2023
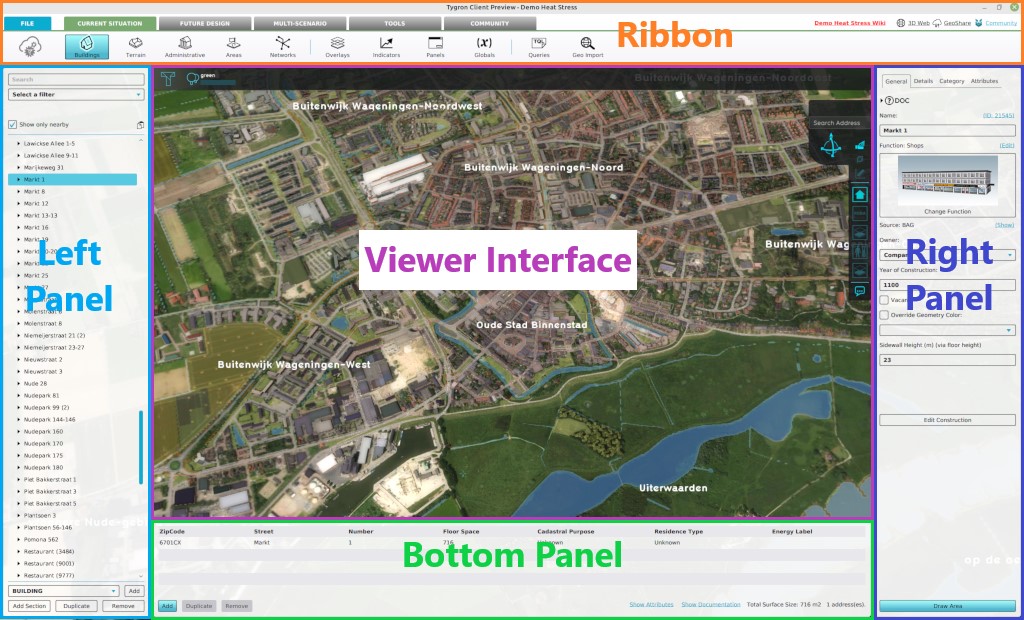
The Editor interface in the Tygron Client. The Ribbon at the top of the screen, the Left Panel on the left side of the screen, the Viewer interface in the center of the screen, the Right Panel on the right side of the screen, and the Bottom Panel at the bottom of the screen.


The Editor interface is subdivided in the following 5 sections:

  • Ribbon. This the generic header of the Editor. It is a tabbed header, which provides access to tools grouped by categories. Those categories are in organized in tabs. This makes tools accessible in a logical way.
  • Left Panel. This panel provides access to sub-items and functionality of the item currently selected on the ribbon bar. For example, if the Indicators button is currently selected on the ribbon bar, access to the current active indicators in the project is available.
  • Right Panel. This panel allows you to change properties of selected items in the left panel. Often called the "Detail Panel".
  • Bottom Panel. This panel is used for detailed editing, and changing parameters for using the brush inside the 3D Visualization. It is context-sensitive and used for example for changing indicator targets, pairing upgrades and changing environment settings.
  • Viewer interface. This interface allows end users to interact with a session from the perspective of a stakeholder. It is rendered on top of the 3D Visualization and displays panels for various means of taking actions and inspecting the state of the project.

Maximizing viewer interface

Editing with multiple users

Just like the process in which a project is created, a project can be edited by multiple users at the same time. The number of users that can work simultaneously on the same project is equal to the number of playable stakeholders in the project. Only one instance of the project can be edited at the same time. If a user is already editing a project, you can decide to join their editing session. A project which is being edited cannot be opened again for editing, or opened for a session, until all users have closed their editing sessions of the project.