Overlay: Difference between revisions
No edit summary |
No edit summary |
||
| Line 112: | Line 112: | ||
: ''Main article: [[Subsidence calculation]]. | : ''Main article: [[Subsidence calculation]]. | ||
The subsidence collection of overlays are a collection of overlays which concern peat subsidence. Because of the interconnected nature of ground water levels and subsidence, these overlays all contain the same model for their calculations, but will display different outputs.--> | The subsidence collection of overlays are a collection of overlays which concern peat subsidence. Because of the interconnected nature of ground water levels and subsidence, these overlays all contain the same model for their calculations, but will display different outputs.--> | ||
====Subsidence==== | <!--====Subsidence==== | ||
[[File:Subsidence-Overlay.jpg|thumb|left|The subsidence overlay]] | [[File:Subsidence-Overlay.jpg|thumb|left|The subsidence overlay]] | ||
: ''Main article: [[Subsidence (Overlay)]]. | : ''Main article: [[Subsidence (Overlay)]]. | ||
: This [[Grid overlay|overlay]] calculates the subsidence of peat in the project area. The subsidence can be caused by oxidation and compaction of the soil. This overlay is part of the [[Subsidence calculation]] collection of overlays. | : This [[Grid overlay|overlay]] calculates the subsidence of peat in the project area. The subsidence can be caused by oxidation and compaction of the soil. This overlay is part of the [[Subsidence calculation]] collection of overlays. | ||
<br clear=all> | <br clear=all>--> | ||
<!--=====Subsidence (oxidation)===== | <!--=====Subsidence (oxidation)===== | ||
: ''Main article: [[Subsidence (Overlay)#Oxidation|Subsidence (Overlay)]]. | : ''Main article: [[Subsidence (Overlay)#Oxidation|Subsidence (Overlay)]]. | ||
| Line 134: | Line 134: | ||
: This overlay displays the ground water level. | : This overlay displays the ground water level. | ||
<br clear=all>--> | <br clear=all>--> | ||
<!-- | |||
==Custom overlays== | ==Custom overlays== | ||
====Areas==== | ====Areas==== | ||
| Line 174: | Line 174: | ||
: ''Main article: [[Source (Overlay)]]. | : ''Main article: [[Source (Overlay)]]. | ||
: ''The Source overlay displays the datasets/sources that are used for and in the project. This overlay becomes available for each stakeholder.'' | : ''The Source overlay displays the datasets/sources that are used for and in the project. This overlay becomes available for each stakeholder.'' | ||
<br clear=all> | <br clear=all>--> | ||
<!--====Online GIS data==== | <!--====Online GIS data==== | ||
[[File:GIS-Overlay.jpg|thumb|left|Optional Online GIS data overlay, based on public available noise pollution data (PDOK)]] | [[File:GIS-Overlay.jpg|thumb|left|Optional Online GIS data overlay, based on public available noise pollution data (PDOK)]] | ||
Revision as of 14:51, 2 April 2019
What are overlays
An overlay is a layer drawn over the 3D world to illustrate different properties. They do not contain all the information of a given visualization, but serve as a supplement. By adding these properties onto the same view, the additional information can immediately be made understandable in the same way. A reason to split information off into other layers in this fashion can be to avoid overwhelming a user with too much information.
How do overlays relate to the Tygron Platform interface
Overlays are implemented in the Tygron Platform as part of the interface. Properties such as ownership and zoning are important pieces of information to the user, but would be very overwhelming to display at all times. Instead, a user can activate on overlay to make these pieces of information visible. In principle, all spatially varied information is accessible as an overlay.
How to access overlays in a project
Overlays available to stakeholders appear as buttons on the right side of the interface. Clicking on any of these buttons will switch the view to the specific overlay. Clicking on the "City" overlay will switch the view back to default. Some overlays are automatically added when a project is created, see default overlay types. Some overlays are closely related to indicators, such as Heatstress and Livability.
List of Available Overlays
Notes

- The following overlays are available by default when creating a new project: City, Neighborhoods, Ownership and Zoning
- Grid overlays have the ability to show the difference between the maquette and the original state. The difference visualization uses its own legend. The option to show the difference can be turned on or off per Grid Overlay. For more information, see: Main article: Difference (Overlay)
Adding and removing overlays
Adding and removing overlays is a generic process, however, certain overlays are dependent on other assets being present too, such as indicators, terrains, vacancy, images, etc. For more information please refer to the respective main articles for the specific overlays.
- Select in the editor '3D World' from the ribbon
- Select 'Overlays' > 'Edit overlays' from the ribbon bar
- Select the desired overlay'*' from the drop down menu on the bottom of the left panel
- Select 'Add' from the bottom of the left panel
- Fill in parameters on the right panel, as required for some overlays
- The overlay icon will now appear under the mini map'**'
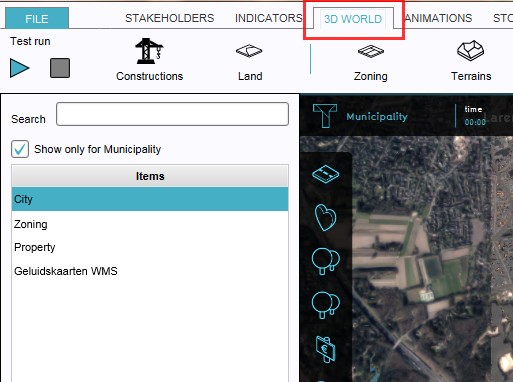
1. Select 3D World
- SelectEditOverlay.jpg
2. Select Overlays > Edit overlays
- SelectDropDown.jpg
3. Select desired overlay from drop down menu on the bottom of the left panel
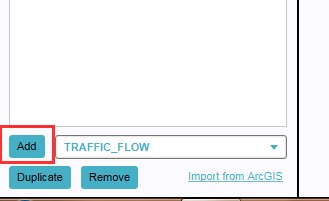
4. Select 'Add' from the bottom of the left panel
- OverlayParameters.jpg
5. Fill in parameters on the right panel (required for some overlays)
- OverlayIconPresent.jpg
6. The overlay icon will now appear under the mini map


- Select in the editor '3D World' from the ribbon
- Select 'Overlays' > 'Edit overlays' from the ribbon bar
- Select the desired overlay'*' from the list of active overlays'**' on the left panel
- Select 'remove' from the bottom of the left panel
- Confirm the removal in the pop up confirmation message
1. Select 3D World
- SelectEditOverlay.jpg
2. Select Overlays > Edit overlays
- SelectOverlay.jpg
3. Select desired overlay from the list of active overlays on the left panel
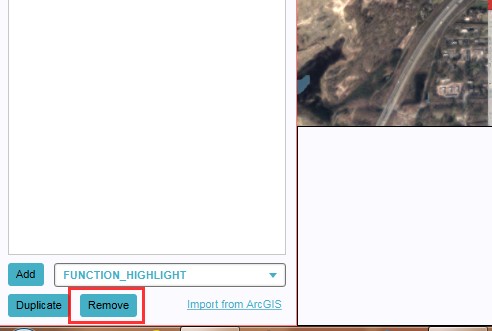
4. Select 'Remove' from the bottom of the left panel
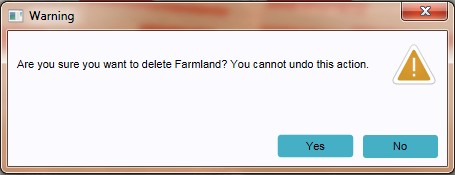
5. Confirm the removal in the pop up confirmation message

Sometimes it can be convenient to duplicate an already existing overlay. To do so, follow the steps for removal, but select 'Duplicate' in stead of 'Remove'.
'*' The default City, Zoning and Property overlays are already present when creating a new project in the editor. However, they can be removed and added again later.