Area Overlay: Difference between revisions
No edit summary |
No edit summary |
||
| Line 2: | Line 2: | ||
{{learned|what the terrains overlay is|what information the terrains overlay displays|how to configure the terrains overlay}} | {{learned|what the terrains overlay is|what information the terrains overlay displays|how to configure the terrains overlay}} | ||
====Areas==== | |||
[[File:Terrains-Overlay.jpg|thumb|left|Areas overlay]] | |||
: ''Main article: [[Areas (Overlay)]]. | |||
: ''The Areas overlay displays a combination of selected active areas. This overlay becomes available for each stakeholder.'' | |||
<br clear=all> | |||
==What is the terrains overlay== | ==What is the terrains overlay== | ||
Revision as of 14:28, 2 April 2019
Areas
- Main article: Areas (Overlay).
- The Areas overlay displays a combination of selected active areas. This overlay becomes available for each stakeholder.
What is the terrains overlay
The terrains overlay is an overlay which is used for displaying multiple terrains in one overlay. When this overlay is added to a project, it can be activated by selecting the corresponding icon on the minimap. When activated, it displays the active terrains as selected in the terrains list. The terrains appear in the color as selected in the Area's properties.
It has 2 properties which can be adjusted.
Name
- The Name of the Overlay
Selected / Unselected Terrains
- Terrains to be displayed. An empty checkbox means that terrain won't be displayed, checked means the terrain is displayed on this overlay.
Configuring the overlay

By default, the overlay does not display anything. The terrains to be displayed must be configured first, by selecting or deselecting terrains.
Name
- The name of the overlay. This is the name that will appear as the title of the overlay, displayed when hovering over the related icon in the minimap. It is also the text in the legend of the overlay. You can change this by altering the text in the "Name" field.
Selecting terrains

- A list of available terrains in the current project. Activating a terrain for display on the terrains overlay is done by selecting the checkbox. Deactivating the terrain is done by deselecting the checkbox.
Adding and removing a Terrain overlay
- Select in the editor '3D World' from the ribbon
- Select 'Overlays' > 'Edit overlays' from the ribbon bar
- Select the Terrain overlay from the drop down menu on the bottom of the left panel
- Select 'Add' from the bottom of the left panel
- Select and configure available terrains on the right panel, to be added to the overlay
- The overlay icon will now appear under the mini map
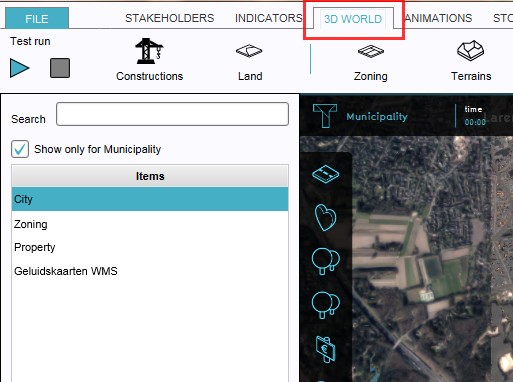
1. Select 3D World
- SelectEditOverlay.jpg
2. Select Overlays > Edit overlays
- SelectDropDown.jpg
3. Select desired overlay from drop down menu on the bottom of the left panel
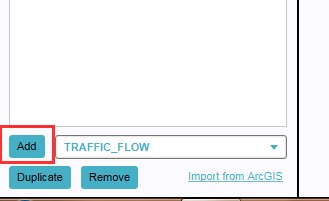
4. Select 'Add' from the bottom of the left panel
- OverlayParameters.jpg
5. Select and configure available terrains on the right panel
- OverlayIconPresent.jpg
6. The overlay icon will now appear under the mini map


- Select in the editor '3D World' from the ribbon
- Select 'Overlays' > 'Edit overlays' from the ribbon bar
- Select the desired overlay from the list of active overlays on the left panel
- Select 'remove' from the bottom of the left panel
- Confirm the removal in the pop up confirmation message
1. Select 3D World
- SelectEditOverlay.jpg
2. Select Overlays > Edit overlays
- SelectOverlay.jpg
3. Select desired overlay from the list of active overlays on the left panel
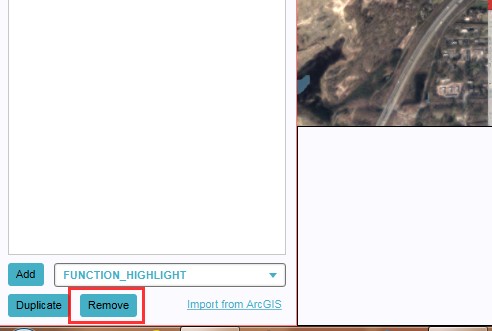
4. Select 'Remove' from the bottom of the left panel
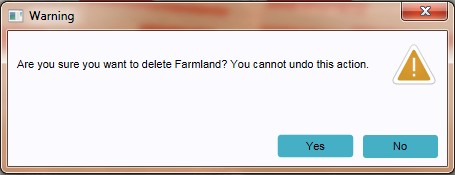
5. Confirm the removal in the pop up confirmation message

Sometimes it can be convenient to duplicate an already existing overlay. To do so, follow the steps for removal, but select 'Duplicate' instead of 'Remove'.