|
|
| (40 intermediate revisions by 8 users not shown) |
| Line 1: |
Line 1: |
| {{learned|how the ribbon relates to the Tygron Engine|the general layout of the ribbon |what options are available through the ribbon header}}
| | The ribbon is located in the top part of the editor. It is a tabbed header, which provides access to tools grouped by categories. Those categories are in organized in tabs. This makes tools accessible in a logical way. |
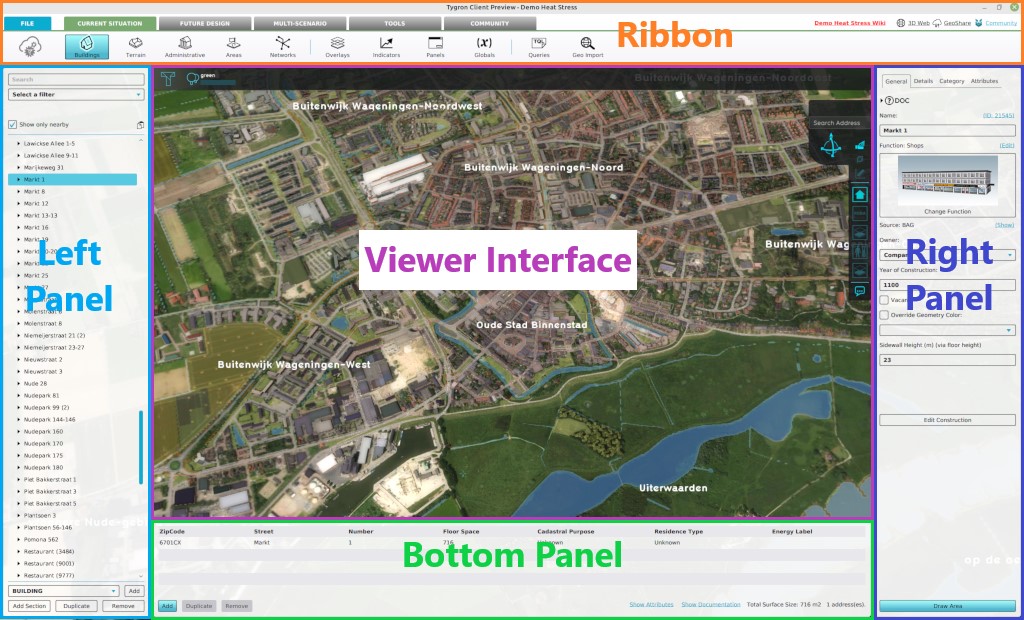
| | | [[File:Q1-2016-EditorPanel.jpg|thumb|400px|left|The editor. The Ribbon at the top of the screen, the Left Panel on the left side of the screen, the User Main Interface in the center of the screen, the Right Panel on the right side of the screen, and the Bottom Panel at the bottom of the screen.]] |
| ==How does the ribbon relate to the Tygron Engine==
| | <br clear=left> |
| The ribbon is located in the top part of the Tygron Editor. It is a tabbed header, which provides access to tools grouped by categories. Those categories are in organized in tabs. This makes tools accessible in a logical way. | |
| {{Editor Image}}
| |
|
| |
|
| ==Ribbon overview== | | ==Ribbon overview== |
| [[File:Editor_ribbon.jpg|850px|thumb|left|]]<br clear=all> | | [[File:Editor_ribbon.jpg|850px|thumb|left|]]<br clear=left> |
| | |
| The ribbon at the top consists of 2 parts, the ribbon header and the ribbon bar. | | The ribbon at the top consists of 2 parts, the ribbon header and the ribbon bar. |
|
| |
|
| ==Ribbon header==
| | The ribbon header provides access to the [[File Menu]] and five other tabs: |
| [[File:Editor_ribbon_header.jpg|850px|The ribbon header]]
| | *[[Current Situation]] |
| | | *[[Future Design]] |
| The ribbon header provides access to a number of tabs: [[File Menu]] and to the tabs [[Stakeholders]], [[Indicators]], [[3D World]], [[Animations]], [[Storyline]], [[Tools]] and [[Help]]. The ribbon header also provides access to the [[Team Chat Box]] by clicking on your username, the ability to Sign in with [https://www.arcgis.com/features ArcGIS] Online and provides access to your [[File_Menu#Details_Panel|project details]]. | | *[[Multi Scenario]] |
| | | *[[Tools]] |
| Activating one of the tabs reveals context-sensitive buttons on the ribbon bar.
| | *[[Community]] |
| | |
| ===Active tabs===
| |
| [[File:Editor_stakeholders_ribbon_header.jpg|Tab: Stakeholders active]]<br clear=all> | |
| Active tabs are indicated by a blue colored text and the tab appearing on the foreground.
| |
| | |
| ===Tabs and buttons===
| |
| [[File:Editor_ribbon_bar_middle.jpg|850px|thumb|left|The ribbon header, with active "Indicators" tab, the ribbon bar with the active "Indicators" Button and several other (inactive) buttons]]<br clear=all> | |
| The ribbon header consists of a number of tabs, which provide access to buttons required to edit your project. The visible buttons are context-sensitive, they depend on the active tab in the ribbon header. The different tabs including buttons will be described below.
| |
| | |
| ==Ribbon bar==
| |
| | |
| [[File:Editor_ribbon_bar.jpg|850px|The ribbon bar]] | |
| | |
| The ribbon bar provides access to the main properties adjustable in the Tygron Engine. The ribbon bar has 3 main functionalities. Starting and stopping the test run, currently active buttons (based on the active tab) and accessing and switching playable stakeholders available in the current project.
| |
|
| |
|
| ===Test run===
| |
| : ''Main article: [[Test_Run|Test run]].
| |
| [[File:Editor_ribbon_bar_testrun_active.jpg|thumb|left|test run Active]] A test run is a convenient way of quickly testing the current state of your project.
| |
| <br clear=all>
| |
|
| |
|
| ===Active buttons===
| | Clicking on one of these five tabs reveals a menu on the ribbon bar corresponding to the selected tab. |
| [[File:Editor_ribbon_header_stakeholders.jpg|850px|thumb|left|]]<br clear=all>
| |
| Contains the options related to stakeholders: [[stakeholders]], [[actions]], [[measures]] and [[messages]].
| |
|
| |
|
| The ribbon bar displays available buttons. Active buttons are indicated by a blue background color. When active, the button provides access to the properties in the left panel. Selecting a different tab in the ribbon header makes different buttons available. | | The tab that is currently active is colored, while the non-active tabs are grey. |
|
| |
|
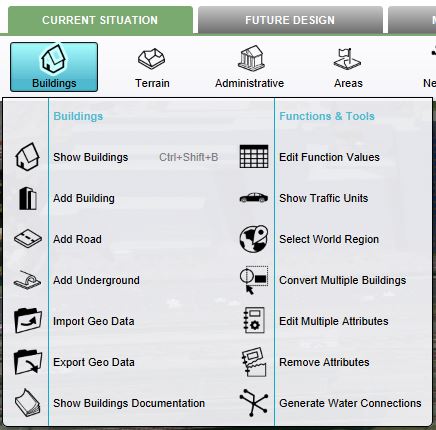
| ===Ribbon bar dropdown menu=== | | ===Ribbon bar dropdown menu=== |
| Line 48: |
Line 25: |
| <br clear=all> | | <br clear=all> |
|
| |
|
| ===Playable stakeholders, switching stakeholders, collaborate=== | | ===Calculation Panel=== |
| [[File:Editor_ribbon_bar_right_stakeholders.jpg|850px|thumb|left|The ribbon bar with all playable Stakeholders, the currently selected Stakeholder: "Gemeente" (Municipality), and another occupied stakeholder "Company".]]<br clear=all> | | The [[Calculation panel]] helps you to manage the calculation time of your project. The Calculation Panel can be found by hovering with your mouse over the 'A' circle-arrow button. |
| On the far right hand side, the ribbon bar displays all playable stakeholders for the current project. The currently active stakeholder is displayed with a blue background. An occupied stakeholder (selected by another user) is indicated with a gray background. Available stakeholders are displayed with a white background. This stakeholder becomes available for selection again when a user switches to a different stakeholder, or logs out of the Tygron Engine.
| | [[File:Recalculate_panel.JPG|750px]] |
| | |
| The stakeholder buttons enable users to switch between stakeholders by selecting the corresponding button. You can only switch to a stakeholder that is not yet selected by another user.
| |
| | |
| The stakeholder buttons are always visible, independently of the tab currently selected in the ribbon header.
| |
| | |
| ===Switching stakeholders===
| |
| | |
| Switching a stakeholder is done by pressing an available stakeholder button (displayed with a white background). Keep in mind that, when switching a stakeholder you will also switch the indicators, budget and actions among others. You will make an identity switch!
| |
| | |
| {{Editor steps|title=switch to an available stakeholder|Hover over an available stakeholder in the ribbon bar.|Select the hovered stakeholder.}}
| |
| | |
| ====Invite a friend====
| |
| Users can also invite others to collaboratively make use of the editor. An invitation can be made by hovering over a stakeholder button and selecting "invite a friend".
| |
| | |
| {{Editor steps|title=invite others to collaboratively make use of the editor.|Hover over an available stakeholder in the ribbon bar, the invite dropdown menu appears|Select "Invite a friend" (below the switch stakeholder text)|The invitation panel will appear| Select a registered person from your organisation or invite someone without an account via email}}
| |
| | |
| <gallery mode="nolines">
| |
| File:Editor_ribbon_bar_invite.jpg|1. Hover over an available stakeholder in the ribbon bar, a dropdown appears
| |
| File:Editor_ribbon_bar_invite.jpg|2. Select "Invite a friend"
| |
| File:Editor_ribbon_bar_invite_popup.jpg|3. The invitation panel will appear | |
| </gallery>
| |
|
| |
|
| ==Ribbon tab overview ==
| |
| This section shows a full overview of available tabs and buttons when using the ribbon bar.
| |
| ===File=== | | ===File=== |
| : ''Main article: [[File Menu|File menu]]. | | : ''Main article: [[File Menu|File menu]]. |
| [[File:Editor_file_ribbon_header.jpg|left|File Pane]] | | [[File:Editor_file_ribbon_header.jpg|thumb|left|File Pane]] <br clear=all> |
|
| |
|
| Selecting the "File" Tab from the ribbon header opens the [[File Menu]].<br clear=all> | | Selecting the "File" Tab from the ribbon header opens the [[File Menu]].<br clear=all> |
|
| |
|
| ===Stakeholders===
| | {{Template:Editor_ui_nav}} |
| [[File:Editor_ribbon_header_stakeholders.jpg|850px|thumb|left|]]<br clear=all>
| |
| Contains the options related to stakeholders: [[stakeholders]], [[actions]], [[measures]] and [[messages]].
| |
| | |
| ===Indicators===
| |
| [[File:Editor_ribbon_header_indicators.jpg|850px|thumb|left|]]<br clear=all>
| |
| Contains the options related to: [[indicators]], the properties of [[functions]], and their [[functions#Changing effects on custom indicators|effects on custom indicators]]. The option [[recalculate indicators]] can also be found here.
| |
| | |
| ===3D World===
| |
| [[File:Editor_ribbon_header_3dworld.jpg|850px|thumb|left|]]<br clear=all>
| |
| Contains all the options with a spatial aspect: [[constructions]], [[land]], [[zoning]], [[terrains]], [[overlays]], [[Dike Types|dike types]] and [[Upgrade_Types|upgrade types]].
| |
| | |
| ===Animations===
| |
| [[File:Editor_ribbon_header_animations.jpg|850px|thumb|left|]]<br clear=all>
| |
| Contains all the options with a moving aspect: [[Cinematic|cinematics]], [[Special Effects|special effects]], [[Units|units]], [[Weather|weather]], [[Environment|environment]].
| |
| | |
| ===Storyline===
| |
| [[File:Editor_ribbon_header_storyline.jpg|850px|thumb|left|]]<br clear=all>
| |
| Contains the options with a storyline related aspect: [[Levels]], [[Timeline]], [[Intro Texts]] and [[Interface]]
| |
| | |
| ===Tools===
| |
| [[File:Editor_ribbon_header_tools.jpg|850px|thumb|left|]]<br clear=all>
| |
| Contains the options with a tool related aspect: [[Event Bundles]], [[Screenshot]], [[Video recording|Video]], [[Free cam|Free Cam]], [[Query Tool]] and the [[Api Overview]]
| |
| | |
| ===Help===
| |
| [[File:Editor_ribbon_header_help.jpg|850px|thumb|left|]]<br clear=all>
| |
| Contains the following help options: [[Team Chat Box]], [[Community]], [[Contact Support]]
| |


