Demo Watershed Project: Difference between revisions
No edit summary |
|||
| (36 intermediate revisions by 3 users not shown) | |||
| Line 1: | Line 1: | ||
__NOTOC__ | __NOTOC__ | ||
{|class="wikitable" style="margin: auto; background-color:#ffffcc;" | |||
| [[Demo_Watershed_Project_Future_Design|Next page>>]] | |||
|} | |||
[[File:Watershed.PNG|thumb|right|300px|The Demo Watershed project]] | |||
The Demo Watershed project is available for all users and can be found in the main menu under Edit projects. This project does not count towards your license. | |||
This project is intended for '''hydrologists and other water experts'''. | |||
This project showcases '''the [[Watershed Module]]'''. | |||
The ''Demo Watershed'' project demonstrates the [[Watersheds result type (Watershed Overlay)|Watershed Overlay]] in a testbed setting. It can serve as a working demo to further explore the details of the available components, the used models and formulas and the configurable parameters. | |||
[[ | |||
==Exploring the project== | |||
====Boundary conditions and input==== | ====Boundary conditions and input==== | ||
# Click on | # Click on the ''Pumping stations'' Overlay in the Overlay bar (see image). Notice the highlighted areas under the grey water tap. These areas are two [[Inlet_(Water_Overlay)|outlets]] which remove water from the project. These areas are marked as [[Discharge areas result type (Watershed Overlay)|discharge areas]] as input for the [[Watershed_Module|Watershed Module]]. | ||
# Select the '' | # Select the ''Water level areas'' Overlay and notice the two water level areas. | ||
# Go to the [[Rainfall_(Overlay)|Rainfall Overlay]] and play the Overlay. This Overlay shows the [[Surface_last_value_result_type_(Water_Overlay)|Surface last value]] result type of a heavy short rainfall. The | # Go to the [[Rainfall_(Overlay)|Rainfall Overlay]] and play the Overlay. This Overlay shows the [[Surface_last_value_result_type_(Water_Overlay)|Surface last value]] result type of a heavy short rainfall. The blue with red lines are [[Culvert_(Water_Overlay)|culverts]], which connect the [[Terrain#Surface|water terrains]]. The blue with orange lines are the [[Inlet_(Water_Overlay)|outlets]]. | ||
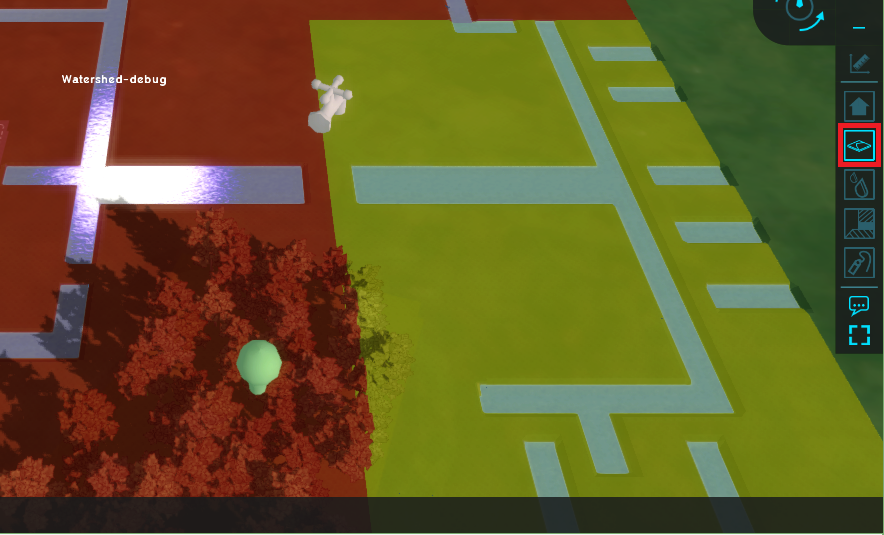
# Select the | # Select the [[Surface_elevation_result_type_(Water_Overlay)|Surface elevation]] result type and notice the forest area is higher than the rest of the project area. | ||
# Take a look at the [[ | # Take a look at the [[Surface_avg_direction_result_type_(Water_Overlay)|Surface avg direction result]] result type. The arrows show the average flow direction of the water. Notice that in the forest area, the arrows point inwards. Zoom out a bit and play the Surface average direction result type and notice that around timeframe 25 the direction of the arrows stay the same. This result type is used as input for the [[Watershed_Module|Watershed Module]] for the direction of the [[Watershed_Module#Calculation|rainwater flow]] on the terrain. | ||
<gallery mode=nolines> | |||
File:Pumping_stations.PNG|Step 1. Click on the Pumping station Overlay and notice the highlighted areas. | |||
File:Waterlevel_areas.PNG|Step 2. Click on te Water level areas Overlay. | |||
File:Play_rainfall.PNG|Step 3. Play the Rainfall Overlay. | |||
File:Surface_elevation_forest.PNG|Step 4. Click on the Surface Elevation Overlay. | |||
File:Surface_avg_watershed.PNG|Step 5. Select the Surface average direction result type. | |||
</gallery> | |||
====Results==== | ====Results==== | ||
# Take a look at the [[ | # Take a look at the [[Watersheds result type (Watershed Overlay)|Watershed Overlay]]. This overlay shows the calculated [[Watershed_Module#Concept|watershed areas]]. For example: rainfall water that falls on the terrain in the red watershed area, flows to the water terrains in the red watershed area. Notice that the colors of the watershed areas are the same as their corresponding discharge areas. (see ''Pumping stations'' Overlay) Notice that the forest area is not part of a watershed area, since the forest retains the water. Also check out the [[Surface_avg_direction_result_type_(Water_Overlay)|Surface Average Direction result]] result type for this forest area. | ||
# Select the ''[[ | # Select the ''[[Discharge areas result type_(Watershed Overlay)|Discharge areas]]'' result type and notice that the initial discharge areas (see ''Pumping stations'' Overlay) are propagated with much more water terrains by the culverts (water connections). Zoom in to the yellow arrow on the edge of the two discharge areas and notice that the flow in the two culverts on either side of the arrow is opposite. This is an option in the Watershed configuration wizard, to use the culvert flow direction for propagating the discharge areas. | ||
# To highlight this, go to the ''[[ | # To highlight this, go to the ''[[Base types result type (Watershed Overlay)|Base types]]'' result type and see the Blue Entry and Green Exit point of this culvert. The entry and exit points represent where water flows in and out of the culvert. | ||
# Click again on the [[Watersheds result type (Watershed Overlay)|Watershed Overlay]] and notice that the road area depicted with the question mark icon is also not part of a watershed area. Since there are no culverts that connect the water terrains parallel with the road with the other water terrains, the water terrains next to the road are not included in the watershed calculations. | |||
# Click on the Watershed indicator in the top bar. This indicator shows the surface area of the watershed areas and of the land that does not belong to a watershed area. This indicator is created by using [[Tygron_Query_Language|the Tygron Query Language]] in an [[Excel_(Indicator)|Excel]]. | |||
<gallery mode=nolines> | |||
File:Watershed_areas.PNG|Step 1. See the calculated watershed areas by clicking on the Watershed overlay. | |||
File:Discharge_areas.PNG|Step 2.Click on the Discharge areas result type. | |||
File:Yellow_arrow.PNG|Step 2. Zoom to the yellow area and notice the flow direction in the culverts. | |||
File:Base_types_yellow_arrow.PNG|Step 3. Click on the Base types result type and notice the Entry and Exit points of the culverts. | |||
File:Road_watershed_areas.PNG|Step 4. Click on the Watershed Overlay and zoom to the road area. | |||
File:Watershed_indicator.PNG|Step 5. Click on the Watershed indicator to see more information about the watershed areas. | |||
</gallery> | |||
=== | ===Analyze=== | ||
# | '''Remaining water''' <br> | ||
Go back to the configuration wizard and uncheck the [[ | ''To calculate watersheds in the remaining water terrains, such as the water terrains near the question mark icon, take the following steps:'' | ||
# Go to the culvert, highlighted by the | # In the [[Current_Situation|Current situation tab]], click on the Overlay button. Select in the Left menu the [[Watershed_(Overlay)|Watershed Overlay]] and open the Configuration wizard in the right panel. | ||
# Click Next until you reach step 2. In step 2, check the option [[Discharge method (Watershed Overlay)|Discharge remaining water]] and take note of the min area m2 option in the wizard. With this option checked, water terrains that are larger than the set minimal area size are now also taken into account as unique [[Discharge area (Watershed Overlay)|discharge areas]]. | |||
# Click several times on Next in the wizard, until you can Finish the wizard. | |||
# After finishing the wizard, the overlays will be recalculated. Notice the area near the question mark is now also included in the [[Watershed_(Overlay)|Watershed Overlay]]. | |||
# Open the Watershed indicator and notice that the area size that is not assigned to a watershed area is much smaller. Go back to the configuration wizard and uncheck the [[Discharge method (Watershed Overlay)|Discharge remaining water]] option for the next steps. | |||
<gallery mode=nolines> | |||
File:Wizard_watershed.PNG|Step 1. Open the Watershed configuration wizard. | |||
File:Discharge_areas_wizard.PNG|Step 2.Check the Discharge remaining water option in the wizard. | |||
File:Watershed_update.PNG|Step 4. The calculated watershed areas. | |||
File:Changed_watershed_indicator.PNG|Step 5. Open the Watershed indicator and notice the difference. | |||
</gallery> | |||
'''Water connections''' <br> | |||
''To analyse the effect of the water connections and the configurable parameters, follow the next steps:'' | |||
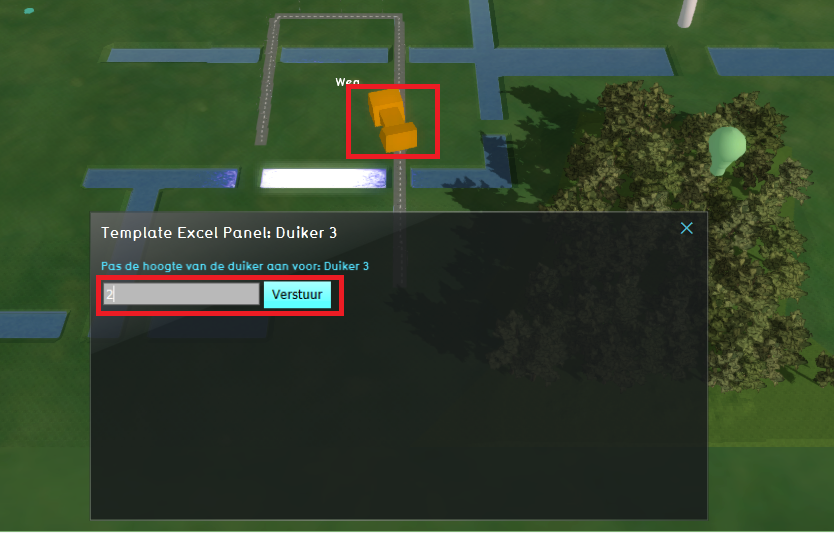
# Go to the culvert, highlighted by the orange culvert icon and click on this icon. Set the [[Culvert_threshold_(Water_Overlay)|Culvert threshold]] on 2m, so this culvert does not connect the water terrains anymore. Click on Send to adjust the value. | |||
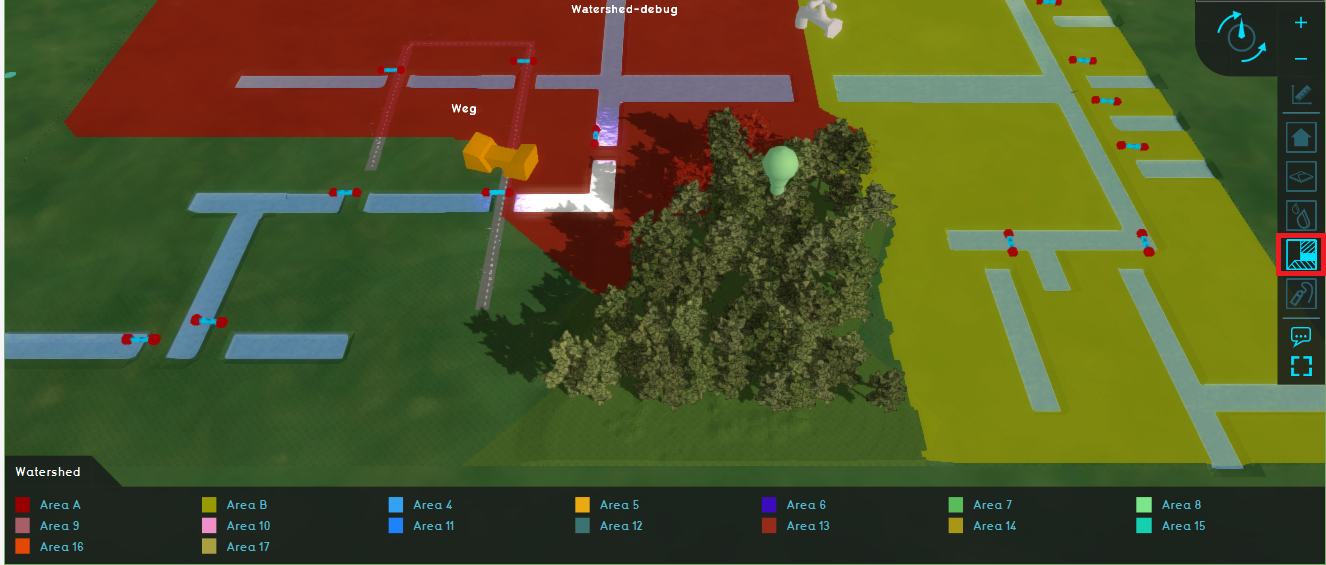
# When the overlays are done calculating, go to the [[Watershed_(Overlay)|Watershed Overlay]] and notice how the watershed areas have changed. Since the water cannot flow through the culvert to the other water terrains, part of the water terrains are not included in a watershed area anymore. | |||
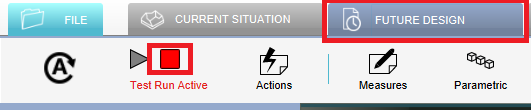
# Click on the [[Future_Design|Future design tab]] and stop the [[Test_Run|test run]] by clicking on the stop button. Go back to the Current situation tab and open the Watershed configuration wizard. | |||
# In the wizard, click Next until you reach step 4. Uncheck the [[Culvert flow direction (Watershed Overlay)|culvert flow direction]] option and click on Finish. | |||
# Repeat step 1 and notice that the watershed areas stay the same. Since the [[Culvert flow direction (Watershed Overlay)|culvert flow direction]] is not taken into account, the presence of the culvert connects the water terrains and are therefore taken into account in the [[Watershed_(Overlay)|Watershed Overlay]]. | |||
<gallery mode=nolines> | |||
File:Adjust_culvert.PNG|Step 1. Click on the orange culvert icon, fill in 2m and click on Send. | |||
File:Watershed_culvert.PNG|Step 2.See the resulting calcualted Watershed areas. | |||
File:Stop_test_run.PNG|Step 3. Stop the test run in the Future design tab. | |||
File:Watershed_areas.PNG| Step 4. The calculated Watershed areas. | |||
</gallery> | |||
{|class="wikitable" style="margin: auto; background-color:#ffffcc;" | |||
| [[Demo_Watershed_Project_Future_Design|Next page>>]] | |||
|} | |||
{{article end | |||
|seealso= | |||
* [[List of Demo Projects]] | |||
}} | |||
[[Category:Demo projects]] | |||
{{WatershedOverlay_demo_nav}} | |||
Latest revision as of 13:44, 2 February 2024
| Next page>> |

The Demo Watershed project is available for all users and can be found in the main menu under Edit projects. This project does not count towards your license.
This project is intended for hydrologists and other water experts.
This project showcases the Watershed Module.
The Demo Watershed project demonstrates the Watershed Overlay in a testbed setting. It can serve as a working demo to further explore the details of the available components, the used models and formulas and the configurable parameters.
Exploring the project
Boundary conditions and input
- Click on the Pumping stations Overlay in the Overlay bar (see image). Notice the highlighted areas under the grey water tap. These areas are two outlets which remove water from the project. These areas are marked as discharge areas as input for the Watershed Module.
- Select the Water level areas Overlay and notice the two water level areas.
- Go to the Rainfall Overlay and play the Overlay. This Overlay shows the Surface last value result type of a heavy short rainfall. The blue with red lines are culverts, which connect the water terrains. The blue with orange lines are the outlets.
- Select the Surface elevation result type and notice the forest area is higher than the rest of the project area.
- Take a look at the Surface avg direction result result type. The arrows show the average flow direction of the water. Notice that in the forest area, the arrows point inwards. Zoom out a bit and play the Surface average direction result type and notice that around timeframe 25 the direction of the arrows stay the same. This result type is used as input for the Watershed Module for the direction of the rainwater flow on the terrain.
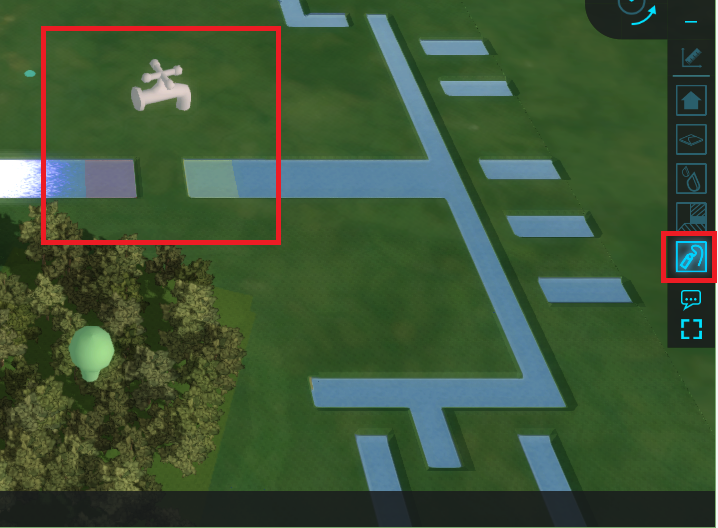
Step 1. Click on the Pumping station Overlay and notice the highlighted areas.
Step 2. Click on te Water level areas Overlay.
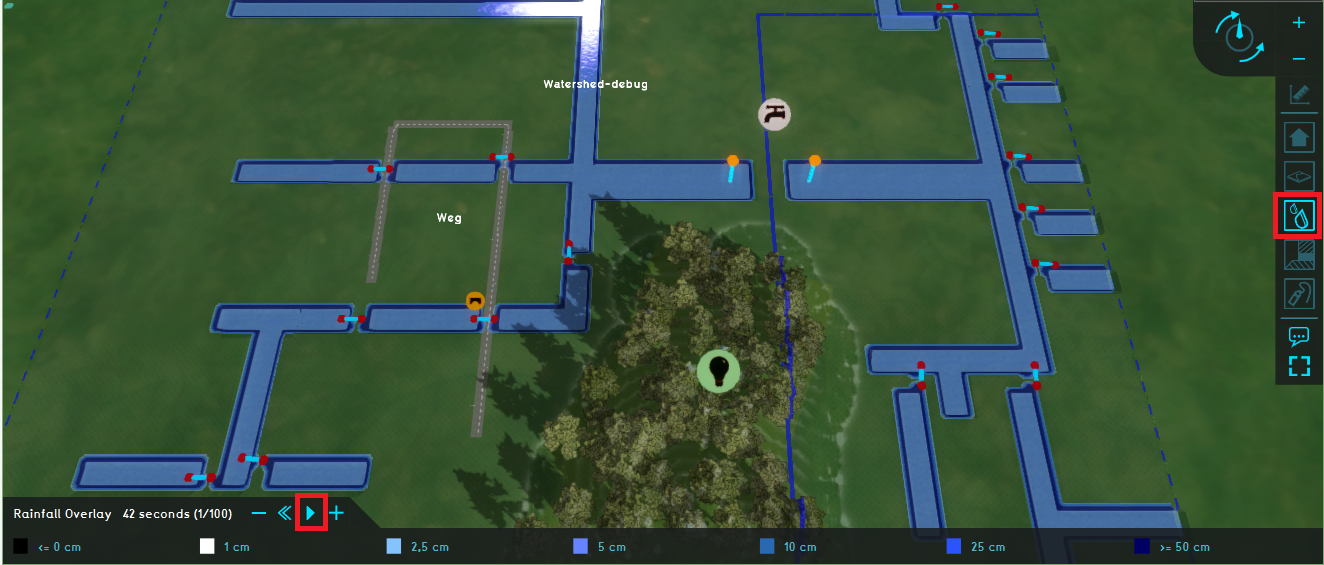
Step 3. Play the Rainfall Overlay.
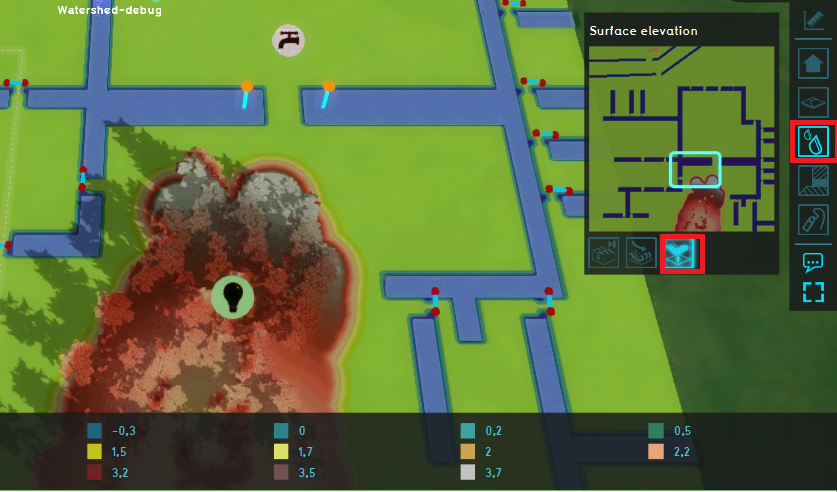
Step 4. Click on the Surface Elevation Overlay.

Step 5. Select the Surface average direction result type.


Results
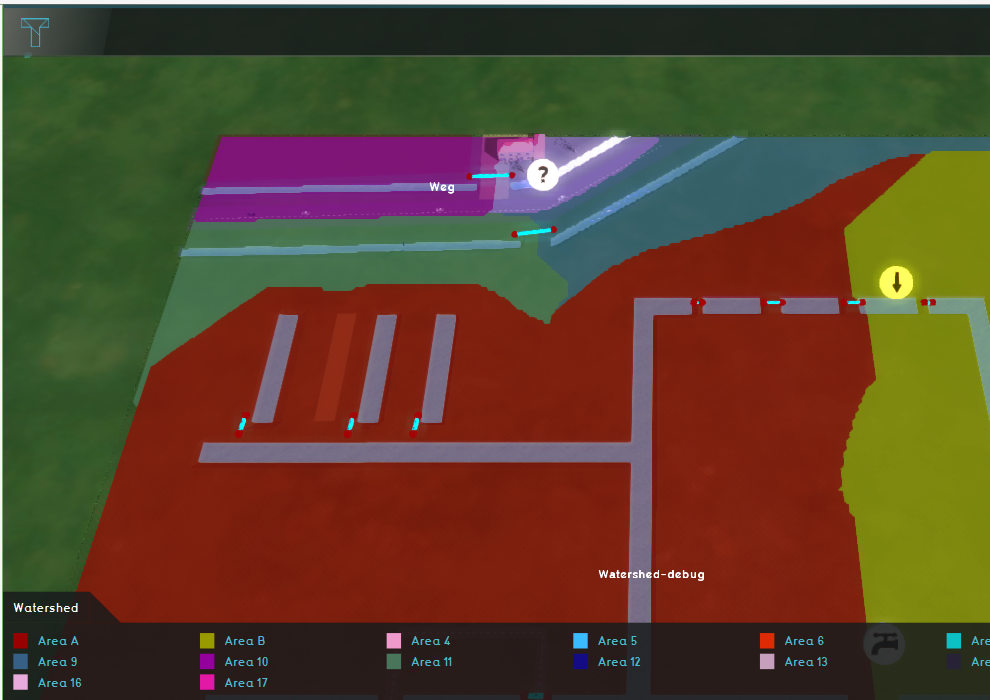
- Take a look at the Watershed Overlay. This overlay shows the calculated watershed areas. For example: rainfall water that falls on the terrain in the red watershed area, flows to the water terrains in the red watershed area. Notice that the colors of the watershed areas are the same as their corresponding discharge areas. (see Pumping stations Overlay) Notice that the forest area is not part of a watershed area, since the forest retains the water. Also check out the Surface Average Direction result result type for this forest area.
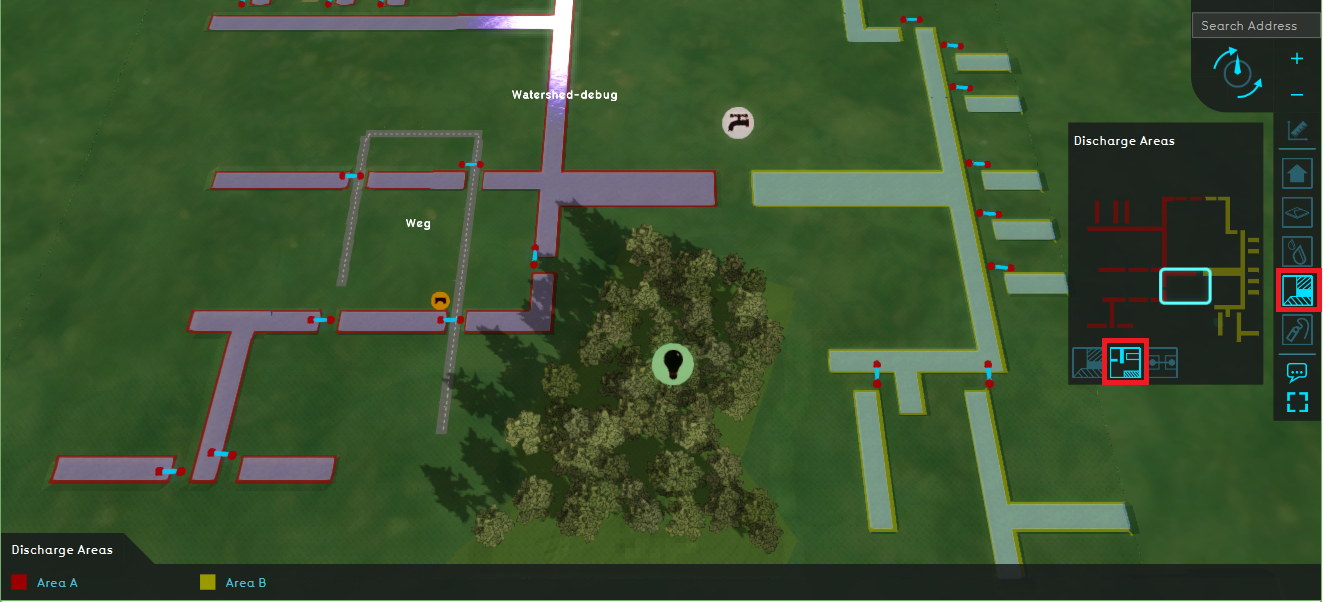
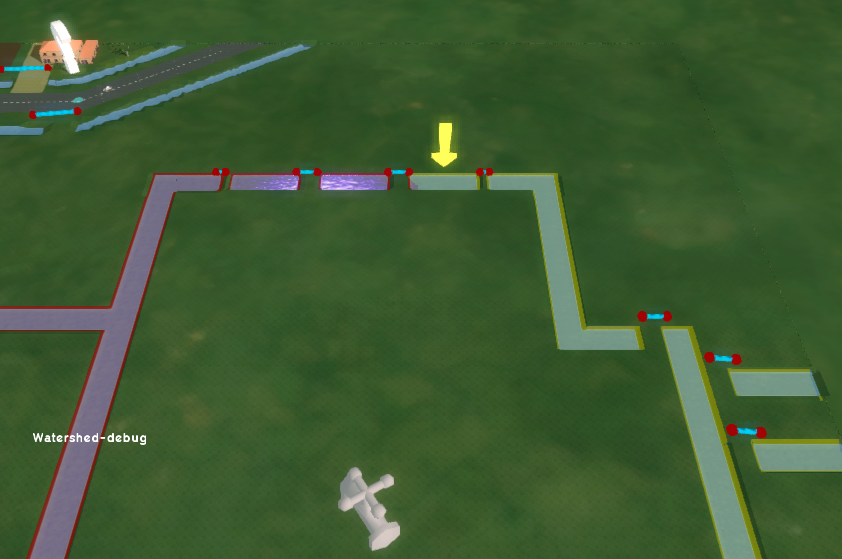
- Select the Discharge areas result type and notice that the initial discharge areas (see Pumping stations Overlay) are propagated with much more water terrains by the culverts (water connections). Zoom in to the yellow arrow on the edge of the two discharge areas and notice that the flow in the two culverts on either side of the arrow is opposite. This is an option in the Watershed configuration wizard, to use the culvert flow direction for propagating the discharge areas.
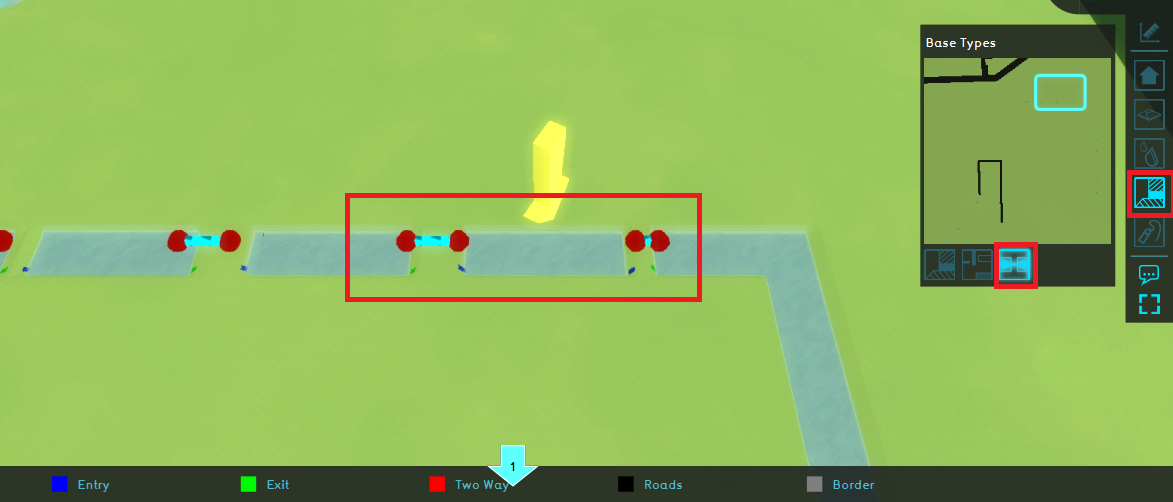
- To highlight this, go to the Base types result type and see the Blue Entry and Green Exit point of this culvert. The entry and exit points represent where water flows in and out of the culvert.
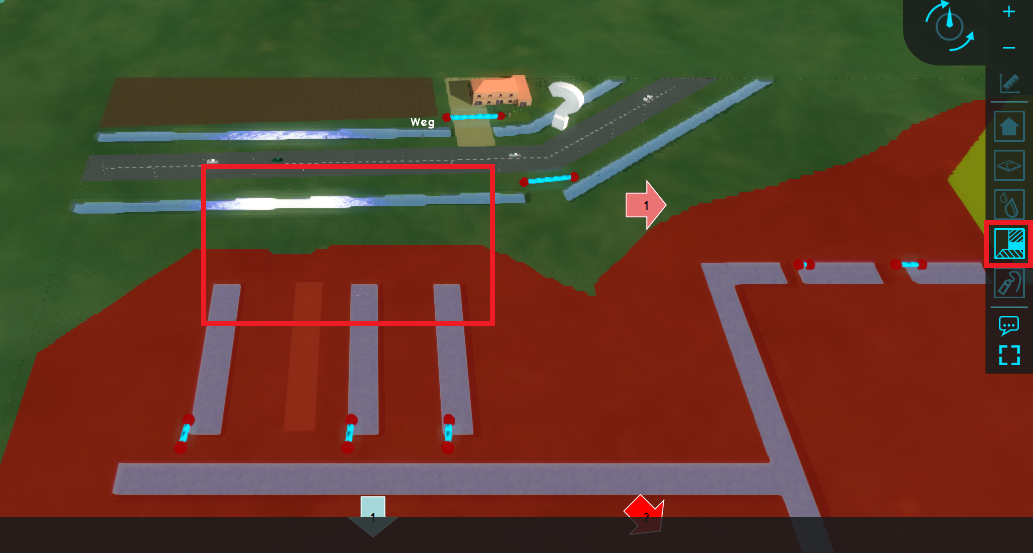
- Click again on the Watershed Overlay and notice that the road area depicted with the question mark icon is also not part of a watershed area. Since there are no culverts that connect the water terrains parallel with the road with the other water terrains, the water terrains next to the road are not included in the watershed calculations.
- Click on the Watershed indicator in the top bar. This indicator shows the surface area of the watershed areas and of the land that does not belong to a watershed area. This indicator is created by using the Tygron Query Language in an Excel.

Step 1. See the calculated watershed areas by clicking on the Watershed overlay.
Step 2.Click on the Discharge areas result type.
Step 2. Zoom to the yellow area and notice the flow direction in the culverts.
Step 3. Click on the Base types result type and notice the Entry and Exit points of the culverts.
Step 4. Click on the Watershed Overlay and zoom to the road area.
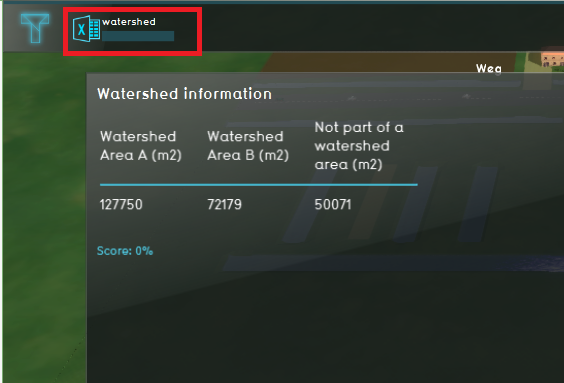
Step 5. Click on the Watershed indicator to see more information about the watershed areas.


Analyze
Remaining water
To calculate watersheds in the remaining water terrains, such as the water terrains near the question mark icon, take the following steps:
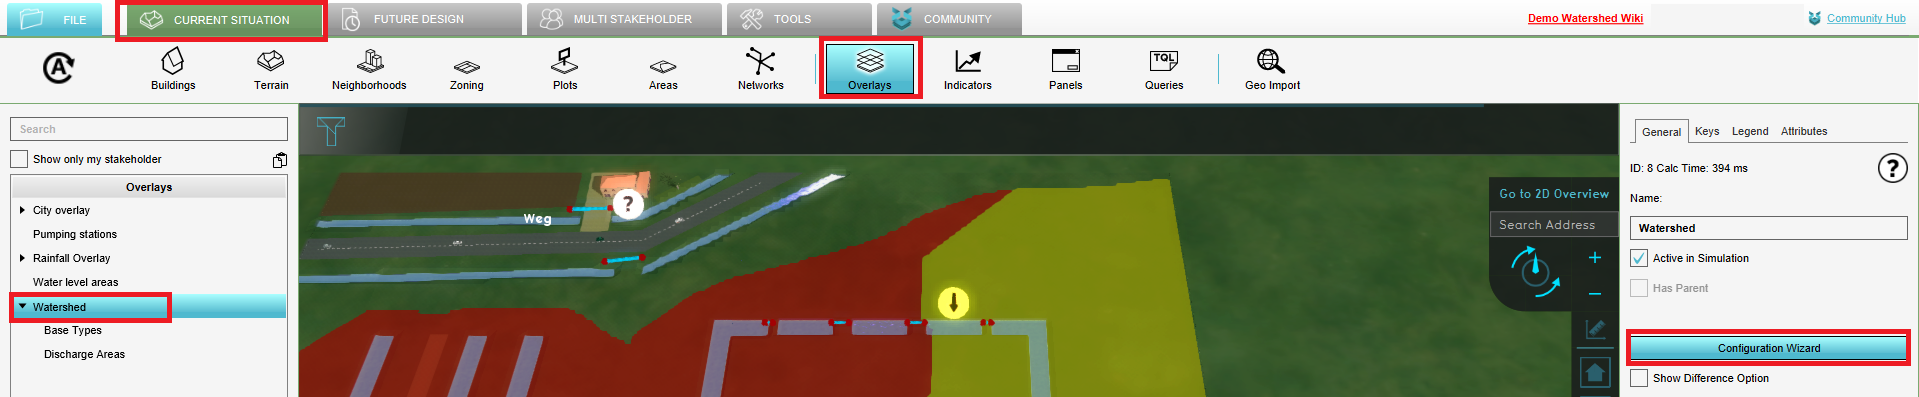
- In the Current situation tab, click on the Overlay button. Select in the Left menu the Watershed Overlay and open the Configuration wizard in the right panel.
- Click Next until you reach step 2. In step 2, check the option Discharge remaining water and take note of the min area m2 option in the wizard. With this option checked, water terrains that are larger than the set minimal area size are now also taken into account as unique discharge areas.
- Click several times on Next in the wizard, until you can Finish the wizard.
- After finishing the wizard, the overlays will be recalculated. Notice the area near the question mark is now also included in the Watershed Overlay.
- Open the Watershed indicator and notice that the area size that is not assigned to a watershed area is much smaller. Go back to the configuration wizard and uncheck the Discharge remaining water option for the next steps.
Step 1. Open the Watershed configuration wizard.

Step 2.Check the Discharge remaining water option in the wizard.
Step 4. The calculated watershed areas.
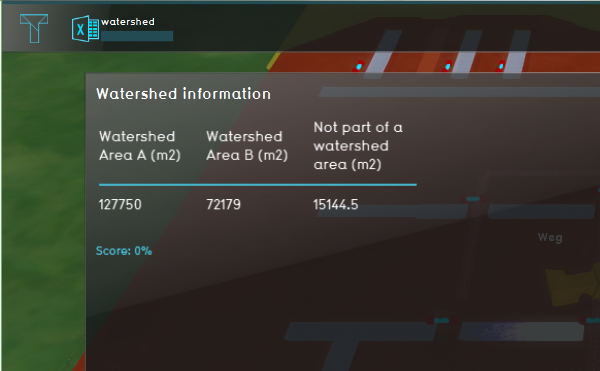
Step 5. Open the Watershed indicator and notice the difference.


Water connections
To analyse the effect of the water connections and the configurable parameters, follow the next steps:
- Go to the culvert, highlighted by the orange culvert icon and click on this icon. Set the Culvert threshold on 2m, so this culvert does not connect the water terrains anymore. Click on Send to adjust the value.
- When the overlays are done calculating, go to the Watershed Overlay and notice how the watershed areas have changed. Since the water cannot flow through the culvert to the other water terrains, part of the water terrains are not included in a watershed area anymore.
- Click on the Future design tab and stop the test run by clicking on the stop button. Go back to the Current situation tab and open the Watershed configuration wizard.
- In the wizard, click Next until you reach step 4. Uncheck the culvert flow direction option and click on Finish.
- Repeat step 1 and notice that the watershed areas stay the same. Since the culvert flow direction is not taken into account, the presence of the culvert connects the water terrains and are therefore taken into account in the Watershed Overlay.
Step 1. Click on the orange culvert icon, fill in 2m and click on Send.
Step 2.See the resulting calcualted Watershed areas.
Step 3. Stop the test run in the Future design tab.
Step 4. The calculated Watershed areas.


| Next page>> |
See also


