|
|
| (41 intermediate revisions by 4 users not shown) |
| Line 1: |
Line 1: |
| {{learned|what a cinematic is|how a cinematic relates to the {{software}}|when to use cinematics|how to create a cinematic|how to show a cinematic to a stakeholder}}
| | [[File:Api_tools_visual.png|thumb|right|400px|[[Cinematic Data]]s in relation to [[Special Effect]]s and [[Environment]]al effects]] |
| ==Cinematic==
| | In the {{software}}, a cinematic is an automated movement of the viewport-camera in the [[3D Visualization]] along predefined [[Key Point]]s. While watching a cinematic, a [[Stakeholder]] is unable to take any [[actions]]. When the cinematic ends, the [[Cinematic camera]] switches to the [[Camera|last selected camera mode]], directing its view based on the last [[Key Point]]. |
| Cinematic refers to something which relates to, or is itself, an animation or movie. Something which is cinematic is generally non-interactive.
| |
|
| |
|
| ==How do cinematics relate to the {{software}}==
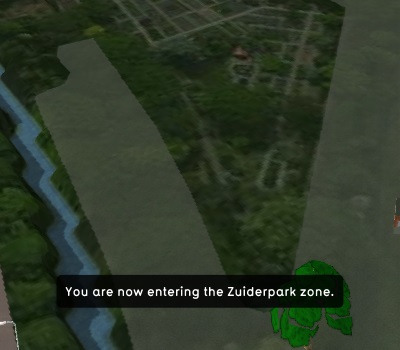
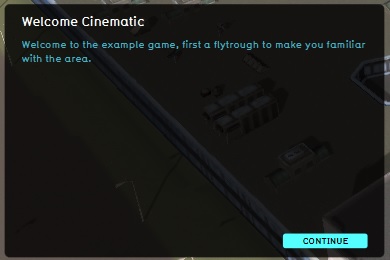
| | A Cinematic can display text to a [[Stakeholder]] when necessary. This can happen in two ways. The text can be displayed as a subtitle, while the camera continues to move in the cinematic. Alternatively, displaying the text can pause the cinematic, until the user confirms they wish to continue. |
| In the {{software}}, a cinematic is an animation through the [[3D world]]. During a cinematic, the [[user]] is no longer in control of their camera. Instead, the camera moves automatically between key locations. The user is also unable to take any [[actions]], until the cinematic is ended. When the cinematic ends, the camera is places back into a normal position, directed at the last key location's camera direction.
| |
|
| |
|
| The cinematic also displays text to the user when necessary. This can happen in two ways. The text can be displayed as a subtitle, while the camera continues to move in the cinematic. Alternatively, displaying the text can pause the cinematic, until the user confirms they wish to continue.
| | Finally, [[Event Bundle]]s can also be fired at [[Key Point]] which can affect the [[3D Visualization]], such as: |
| | * Activate an [[Overlay]] |
| | * Start [[Weather]] effects |
| | * Activate [[Special Effect]]s |
| | * Plan a [[Measure]] |
|
| |
|
| <gallery mode="nolines"> | | <gallery heights=200px widths=300px> |
| Image:cinematics-subtitle.jpg|Text without pausing the cinematic | | Image:cinematics-subtitle.jpg|Text without pausing the cinematic |
| Image:cinematics-text.jpg|Text during a pause in the cinematic | | Image:cinematics-text.jpg|Text during a pause in the cinematic |
| Line 14: |
Line 16: |
|
| |
|
| ==When to use cinematics== | | ==When to use cinematics== |
| Cinematics are generally used for exposition to the user. When it is necessary to provide information to a user, or to direct their attention to a specific predefined location in the 3D world, this can be done using a cinematic. Because a cinematic takes away the user's ability to move the camera themselves, and to take actions, a cinematic is best used for vital information which only has to be provided once. An example of this is an introduction to the area at the start of the [[Project Session]]. | | Cinematics are generally used for exposition to the user. When it is necessary to provide information to a user, or to direct their attention to a specific predefined location in the 3D Visualization, this can be done using a cinematic. Because a cinematic takes away the user's ability to move the camera themselves, and to take actions, a cinematic is best used for vital information which only has to be provided once. An example of this is an introduction to the area at the start of a [[Planning Session]]. |
|
| |
|
| By default, a welcome cinematic is present in each project, automatically generated when the project is created. This cinematic is displayed to all stakeholders at the start of the project session, and is a brief introduction of the zones present in the 3D world. | | By default, a welcome cinematic is present in each project, automatically generated when the project is created. This cinematic is displayed to all stakeholders at the start of the planning session, and is a brief introduction of the zones present in the 3D Visualization. |
|
| |
|
| ==Creating and editing cinematics== | | ==Creating and editing cinematics== |
| {{editor location|Cinematics}} | | {{editor location|Cinematics}} |
| In the [[editor]], it is possible to create, duplicate, edit and delete cinematics in a project. It is also possible to create keypoints, or remove keypoints from a cinematic. | | In the [[editor]], it is possible to create, duplicate, edit and delete cinematics in a project. It is also possible to create Key Points, or remove Key Points from a cinematic. |
| | In the following how to's these functions are explained. |
|
| |
|
| ===Creating or removing cinematics===
| |
| {{editor location|Cinematics}}
| |
| When you create a new cinematic, it will serve as an "empty slot". Before a cinematic can be used, it is important to [[#Creating_and_removing_keypoints|add key points]] to the cinematic, and to [[#Editing_Camera_Position|adjust their location]].
| |
| [[File:Cinematics-left.jpg|frame|left|The left panel allows you to select cinematics.]]
| |
| {{Editor steps|title=create a new cinematic|Select "Visuals" in the ribbon header.|Select "Cinematics" in the ribbon bar.|Select "Add cinematic" in the [[editor#Left_Panel|left panel]].}}
| |
| {{Editor steps|title=duplicate an existing cinematic|Select "Visuals" in the ribbon header.|Select "Cinematics" in the ribbon bar.|Select the existing cinematic you wish to duplicate.|Select "Duplicate" in the [[editor#Left_Panel|left panel]].}}
| |
| {{Editor steps|title=remove an existing cinematic|Select "Visuals" in the ribbon header.|Select "Cinematics" in the ribbon bar.|Select the cinematic you wish to remove.|Select "Remove" in the [[editor#Left_Panel|left panel]].}}
| |
| <br clear=all>
| |
|
| |
| ===Editing cinematics===
| |
| {{editor location|Cinematics}}
| |
| [[File:Cinematics-right.jpg|frame|left|The right panel allows you to edit the properties of cinematics.]]
| |
| There is only one property directly related to cinematics, but the right panel offers access to several other functions as well. Cinematics also contain keypoints, which define the path the cinematic takes through the 3D world.
| |
| <br clear=right>
| |
|
| |
| ====Name====
| |
| [[File:Cinematics-right-name.jpg|frame|right|The field for the "name".]]
| |
| : ''The name of the cinematic. This is also the name that will appear in the text panel if the cinematic pauses while displaying texts. Otherwise, the name only assists in differentiating between cinematics when selecting them in the editor. You can change this by altering the text in the text field.''
| |
|
| |
| <br clear=right>
| |
| ====Video recording====
| |
| [[File:Cinematics-right-video.jpg|frame|right|A link to the video recording panel.]]
| |
| : ''A link to the Video Recording panel. Cinematics and video recording can be used in conjunction with each other. This is not an editable property.''
| |
| <br clear=right>
| |
|
| |
| ====Start cinematic====
| |
| [[File:Cinematics-right-start.jpg|frame|right|A button to start the cinematic.]]
| |
| : ''This button starts the selected cinematic for the user that presses it. This is useful to test the cinematic. Note that this also starts a [[Test Run|test run]]. This is not an editable property.''
| |
| <br clear=right>
| |
|
| |
| ===Editing Keypoints===
| |
| {{editor location|cinematics|left panel=The Cinematic to edit}}
| |
| The most important property of a cinematic is the keypoints. These determine the path that the cinematic takes. Additionally, a keypoint can also determine what happens when that point is reached, such as the activation of [[event]]s or the display of text. A cinematic should have at least 1 keypoint.
| |
|
| |
| ====Creating and removing keypoints====
| |
| [[File:Cinematics-keypoint-left.jpg|frame|left|The left panel also allows you to select keypoints of cinematics.]]
| |
| {{Editor steps|title=add a new keypoint|Select "Visuals" in the ribbon header.|Select "Cinematics" in the ribbon bar.|Select the cinematic you want to add the keypoint to in the [[editor#Left_Panel|left panel]].|If there is already at least one keypoint present, select the keypoint you want the new keypoint to be added after.|Select "Add Key Point".}}
| |
| {{Editor steps|title=remove an existing keypoint|Select "Visuals" in the ribbon header.|Select "Cinematics" in the ribbon bar.|Select the cinematic from which you wish to remove a keypoint.|Select the keypoint you wish to remove.|Select "Remove".}}<br clear=all>
| |
|
| |
| ====Changing keypoint properties====
| |
| {{editor location|cinematic keypoint}}
| |
| [[File:Cinematics-keypoint-right.jpg|frame|left|The right panel allows you to edit the properties of keypoints.]]
| |
| When a specific keypoint is selected, you are able to edit its properties in the [[Editor#Right_Panel|right panel]]. Upon selecting a keypoint, the camera will also orient itself to that keypoint, by assuming its location and direction. The camera will match the exact orientation the camera will have as it passes this keypoint when the cinematic is played.
| |
|
| |
| =====Description=====
| |
| [[File:Cinematics-keypoint-right-description.jpg|frame|right|The field for the "description".]]
| |
| : ''The description of the keypoint. This is the text that will be displayed to the user when the cinematic reaches this point. You can change this by altering the text in the text area.''
| |
| <br clear=right>
| |
|
| |
| =====Paused=====
| |
| [[File:Cinematics-keypoint-right-paused.jpg|frame|right|The checkbox for pausing at this keypoint.]]
| |
| : ''The pausing property of the keypoint. When this checkbox is checked, the cinematic will pause when it reaches this point, until the user chooses to continue. You can change this setting by checking or unchecking the checkbox.''
| |
| <br clear=right>
| |
|
| |
| =====Time=====
| |
| [[File:Cinematics-keypoint-right-time.jpg|frame|right|The field for the "time".]]
| |
| : ''The time in seconds to travel between this keypoint and the next keypoint. A lower number means the camera will travel faster between the two key points. You can change the time by altering the number in the text field. Note that if the provided time would cause the camera to move too quickly, the time is automatically adjusted to a higher number so that the camera travels with a lower speed.''
| |
| <br clear=right>
| |
|
| |
| =====Time Slider=====
| |
| [[File:Cinematics-keypoint-right-slider.jpg|frame|right|The slider for setting the camera's time for the current keypoint.]]
| |
| : ''This slider allows you to see the orientation and location of the camera at any time between this keypoint and the next. By moving the slider, you move the camera between the selected keypoint and the next by the same relative amount. This is not an editable property.''
| |
| <br clear=right>
| |
|
| |
| =====Fired Events=====
| |
| [[File:Cinematics-keypoint-right-events.jpg|frame|right|The list of event bundles fired by the keypoint.]]
| |
| : ''Main article: [[Event]]s
| |
| : ''The [[Event Bundle|event bundle]]s which will be fired when this keypoint is reached. This allows [[event]]s to take place at given points during a cinematic. Event bundles can be added by selecting an event bundle from the dropdown box and selecting "Add". An event bundle can be removed by selecting the event bundle in the list, and selecting "Remove Event Bundle".''
| |
| <br clear=right>
| |
|
| |
| =====Edit Camera Position=====
| |
| [[File:Cinematics-keypoint-right-edit.jpg|frame|right|The button to edit the camera position.]]
| |
| : ''This button activates the camera editing mode. In this mode, it is possible to move the camera, and orient it in any direction. The camera's location and orientation can then be stored as the orientation for the camera when the cinematic reaches the selected keypoint.''
| |
| <br clear=right>
| |
|
| |
| ===Editing Camera Position===
| |
|
| |
| [[File:Cinematics-keypoint-right-edit-buttons.jpg|frame|right|The buttons in camera editing mode.]]
| |
| When the "Edit Camera Position" button is selected, you enter camera editing mode. This mode allows you to edit the camera location and orientation for the selected keypoint. In place of the "Edit Camera Position" button, new buttons will have appeared in the right panel to store the current camera position. In the 3D world, an object will be visible to help orient the camera.
| |
| <br clear=all>
| |
|
| |
| ====Moving the Camera====
| |
| [[File:Cinematics-keypoint-edit-target.jpg|frame|right|This object indicates where the camera is currently aimed at.]]
| |
| While editing the camera position for a cinematic, you have more exact control over the camera. This also means the controls are different from moving the camera normally.
| |
|
| |
| {{Editor steps|preamble=|form=:* |title=Editing the camera position|To move the camera, use the left mouse button.|To move the camera up and down, use both mouse buttons at the same time.|To change the direction the camera is pointed at, use the right mouse button.|To rotate the camera around its axis, scroll up or down with the scroll wheel.}}
| |
| <br clear=all>
| |
|
| |
| ====Store Camera Position====
| |
| [[File:Cinematics-keypoint-right-edit-store.jpg|frame|right|The button to store camera position.]]
| |
| When the camera is in the position you want for this keypoint, you can press "Store Camera Position" to store the current location and orientation of the camera for this keypoint.
| |
| <br clear=right>
| |
|
| |
| ====Stop Editing Camera Position====
| |
| [[File:Cinematics-keypoint-right-edit-stop.jpg|frame|right|The button stop editing the camera position.]]
| |
| When you are done editing the camera position for this keypoint, you can press "Stop Editing Camera Position" to leave the camera editing mode. The camera will reset to the camera position set for this keypoint. If you store your current camera position right before stopping camera editing mode, you will not see the camera move.
| |
| <br clear=all>
| |
|
| |
| ==Creating a HD Movie or Video Recording from the cinematic==
| |
| There exists a possibility to create a video of a cinematic in the {{software}}. The editor offers the ability to render this video automatically, based on the rendering which occurs in the editor.<br>
| |
| This will allow you to show specific scenes from the project in a non-interactive form outside of the {{software}}.<br>
| |
| <br>
| |
| [[File:render_movie.png|thumb|left|300px|Configuration window]]<br>
| |
| ====Quality====
| |
| ''The Quality option indicates at which quality level the video will be rendered. The available options are Full HD 1920x1080 and HD Ready 1280x720. ''
| |
| ====Output Directory====
| |
| ''The Output directory is the directory where the rendered video will be stored.''<br>
| |
| ====Image Quality====
| |
| ''From Wikipedia, the free encyclopedia''<br>
| |
| <br>
| |
| ''The Image quality is the level of accuracy at which the signals that form an image are captured, stored, processed and displayed.''
| |
| ====Framerate====
| |
| ''From Wikipedia, the free encyclopedia''<br>
| |
| <br>
| |
| ''The framerate indicates the frequency at which the images appear consecutively on the screen when a video is recorded.''
| |
| <br clear=all>
| |
| ===Creating a HD Movie===
| |
| It is possible to create a HD Movie from the cinematic.<br>
| |
| In the configuration menu the following configuration options can be edited: quality of the movie, the frame rate, the image quality and the output directory can be specified.<br>
| |
| <br>
| |
| {{Editor steps|title=create a HD Movie|Select "Visuals" in the ribbon header.|Select "Cinematics" in the ribbon bar.|Select the cinematic for which you wish to make a HD Movie.|Select the "Render as HD Movie" button from the bottom of the [[left panel]].|Notice that a new configuration window will appear|Select the desired configuration in the configuration menu|Select the "Start Recording" button|The recorded movie can be found in the specified directory.}}
| |
| <gallery>
| |
| Image:Select_visuals.jpg |1. Select visuals
| |
| Image:Select_cinematics.jpg |2. Select cinematics
| |
| Image:Select_the_desired_cinematic.jpg|3. Select the desired cinematic
| |
| Image:render_as_HD_movie.jpg |4. Render as HD Movie
| |
| Image:Render_movie_option_menu.jpg |5. Configuration menu
| |
| Image:Start_recording_hd_movie.jpg |6. Start recording the movie
| |
| </gallery>
| |
| <br clear=all>
| |
| === Creating a Video Recording===
| |
| It is also possible to create a video recording. The video recording can be started and ended at any desired moment (it is not tied to the start and end time of the cinematic).<br>
| |
| In the configuration menu the following configuration options can be edited: quality of the movie, the frame rate, the image quality and the output directory can be specified. <br>
| |
| <br>
| |
| {{Editor steps|title=create a Video Recording|Select "Visuals" in the ribbon header.|Select "Cinematics" in the ribbon bar.|Select the cinematic for which you wish to make a Video Recording.|Select the "Click here for a video recording panel" link from the top of the [[left panel]].|Notice that a new configuration panel will appear at the bottom of the screen|Select the desired configuration in the configuration panel|Select the "Start Recording" button|The recorded video can be found in the specified directory.}}
| |
| <gallery>
| |
| Image:Select_visuals.jpg |1. Select visuals
| |
| Image:Select_cinematics.jpg |2. Select cinematics
| |
| Image:Select_the_desired_cinematic.jpg|3. Select the desired cinematic
| |
| Image:Video_recording_panel_button.jpg|4. Video Recording Panel link
| |
| Image:Video_recording_panel.jpg |5. Video Recording configuration panel
| |
| Image:Start_recording_video.jpg |6. Start recording the video
| |
| </gallery>
| |
|
| |
| ==Coupling cinematics to stakeholders==
| |
|
| |
|
| : '' Main article: [[Levels|Level]].''
| | {{article end |
| | |howtos= |
| | * [[How to create a Cinematic]] |
| | * [[How to create or remove Cinematics]] |
| | * [[How to edit Cinematics]] |
| | * [[How to edit Key Points]] |
| | * [[How to edit the Camera Position]] |
| | * [[How to couple Cinematics to Stakeholders]] |
| | * [[How to create an HD Movie or Video Recording from the cinematic]] |
| | * [[How to set a Cinematic to play when a Measure is enacted]] |
| | * [[How to create an Action to show a Cinematic]] |
| | * [[How to set a Cinematic to play at the start of a Level]] |
| | |seealso= |
| | * [[Cinematic camera]] |
| | * [[Cinematic edit camera]] |
|
| |
|
| If desirable, it is possible to attach a cinematic to a [[stakeholder]] for a specific [[levels]]. This means that when the level starts, the user in the role of that stakeholder will see the provided cinematic. A cinematic can be viewed by multiple stakeholders, at the same time or at different moments for each.
| | }} |
|
| |
|
| {{editor steps|title=couple a cinematic to a stakeholder|Open the levels editing panel.|Select the level in which you want to show a stakeholder a cinematic.|Select the "Stakeholders" sub-item.|Select the stakeholder to whom you wish to show the cinematic.|In the right panel, make sure the "Start with Cinematic" checkbox is checked.|Using the dropbow below the checkbox, select the cinematic you wish to show.}} | | {{Editor tools nav}} |