Cinematic: Difference between revisions
No edit summary |
No edit summary |
||
| Line 21: | Line 21: | ||
{{editor location|Cinematics}} | {{editor location|Cinematics}} | ||
In the [[editor]], it is possible to create, duplicate, edit and delete cinematics in a project. It is also possible to create keypoints, or remove keypoints from a cinematic. | In the [[editor]], it is possible to create, duplicate, edit and delete cinematics in a project. It is also possible to create keypoints, or remove keypoints from a cinematic. | ||
This is explained in the following how to's | |||
* [[How to create a Cinematic]] | |||
* [[How to create or remove Cinematics]] | |||
* [[How to edit Cinematics]] | |||
* [[How to edit Keypoints]] | |||
* [[How to edit the Camera Position]] | |||
==Coupling cinematics to stakeholders== | ==Coupling cinematics to stakeholders== | ||
| Line 79: | Line 41: | ||
==How to's== | ==How to's== | ||
* [[How to create an HD Movie or Video Recording from the cinematic]] | * [[How to create an HD Movie or Video Recording from the cinematic]] | ||
Revision as of 12:28, 9 February 2021
Cinematic
Cinematic refers to something which relates to, or is itself, an animation or movie. Something which is cinematic is generally non-interactive.
How do cinematics relate to the Tygron Platform
In the Tygron Platform, a cinematic is an animation through the 3D world. During a cinematic, the user is no longer in control of their camera. Instead, the camera moves automatically between key locations. The user is also unable to take any actions, until the cinematic is ended. When the cinematic ends, the camera is places back into a normal position, directed at the last key location's camera direction.
The cinematic also displays text to the user when necessary. This can happen in two ways. The text can be displayed as a subtitle, while the camera continues to move in the cinematic. Alternatively, displaying the text can pause the cinematic, until the user confirms they wish to continue.
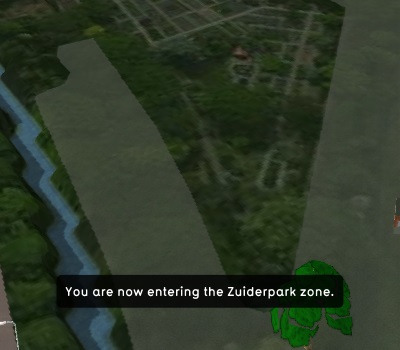
Text without pausing the cinematic
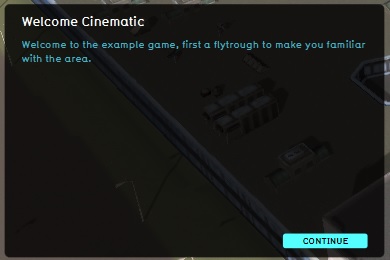
Text during a pause in the cinematic


When to use cinematics
Cinematics are generally used for exposition to the user. When it is necessary to provide information to a user, or to direct their attention to a specific predefined location in the 3D world, this can be done using a cinematic. Because a cinematic takes away the user's ability to move the camera themselves, and to take actions, a cinematic is best used for vital information which only has to be provided once. An example of this is an introduction to the area at the start of the Project Session.
By default, a welcome cinematic is present in each project, automatically generated when the project is created. This cinematic is displayed to all stakeholders at the start of the project session, and is a brief introduction of the zones present in the 3D world.
Creating and editing cinematics
In the editor, it is possible to create, duplicate, edit and delete cinematics in a project. It is also possible to create keypoints, or remove keypoints from a cinematic. This is explained in the following how to's
- How to create a Cinematic
- How to create or remove Cinematics
- How to edit Cinematics
- How to edit Keypoints
- How to edit the Camera Position
Coupling cinematics to stakeholders
- Main article: Level.
If desirable, it is possible to attach a cinematic to a stakeholder for a specific levels. This means that when the level starts, the user in the role of that stakeholder will see the provided cinematic. A cinematic can be viewed by multiple stakeholders, at the same time or at different moments for each.
- Open the levels editing panel.
- Select the level in which you want to show a stakeholder a cinematic.
- Select the "Stakeholders" sub-item.
- Select the stakeholder to whom you wish to show the cinematic.
- In the right panel, make sure the "Start with Cinematic" checkbox is checked.
- Using the dropbow below the checkbox, select the cinematic you wish to show.