Screenshot: Difference between revisions
mNo edit summary |
No edit summary |
||
| Line 8: | Line 8: | ||
==How to take a Screenshot== | ==How to take a Screenshot== | ||
{{Editor location|Screenshot}} | {{Editor location|Screenshot}} | ||
{{Editor steps|title=take a Screenshot|Select in the editor 'Tools' from the ribbon|Select 'Screenshot' from the ribbon bar|Select the 'Take a Screenshot now' option| Notice that a screenshot has been taken}} | {{Editor steps|title=take a Screenshot | ||
| Select in the editor 'Tools' from the ribbon | |||
| Select 'Screenshot' from the ribbon bar | |||
| Select the 'Take a Screenshot now' option | |||
| Notice that a screenshot has been taken | |||
}} | |||
<gallery> | <gallery> | ||
File:Tools_bar.jpg|200px|Select the Tools header in the Editor | File:Tools_bar.jpg|200px|Select the Tools header in the Editor | ||
| Line 14: | Line 19: | ||
File:Take_screenshot.jpg|200px|Select the 'Take a Screenshot Now' option | File:Take_screenshot.jpg|200px|Select the 'Take a Screenshot Now' option | ||
</gallery> | </gallery> | ||
[[File:Change_dir.jpg|thumb|200px|left| Change the storage directory]] | |||
[[File:Change_dir.jpg|thumb|200px|left| Change the storage directory]] | |||
The directory where the screenshot is saved is displayed in the bottom panel of the screen. This directroy can be changed by selecting the 'Change Storage Directory' option in the Screenshot ribbon bar. | The directory where the screenshot is saved is displayed in the bottom panel of the screen. This directroy can be changed by selecting the 'Change Storage Directory' option in the Screenshot ribbon bar. | ||
{{clear}} | {{clear}} | ||
[[File:3d_graphics.jpg|thumb|200px|left| Modify the 3D Graphics]] | [[File:3d_graphics.jpg|thumb|200px|left| Modify the 3D Graphics]] | ||
The 3D Graphics can also be modified in the {{software}}. To modify the 3D Graphics the 'Switch to Highest 3D Graphics' option should be selected that can also be found in the Screenshot ribbon bar. | The 3D Graphics can also be modified in the {{software}}. To modify the 3D Graphics the 'Switch to Highest 3D Graphics' option should be selected that can also be found in the Screenshot ribbon bar. | ||
{{clear}} | {{clear}} | ||
| Line 27: | Line 33: | ||
{{article end | {{article end | ||
|notes= | |notes= | ||
* After taking a screenshot or recording a [[GIF animation]], it can be saved directly to the Geo Share. | * After taking a screenshot or recording a [[GIF animation]], it can be saved directly to the [[Geo Share]]. | ||
}} | }} | ||
{{editor tools nav}} | {{editor tools nav}} | ||
Revision as of 13:26, 23 December 2021
What a Screenshot is
A screenshot is an image of the current content on the screen or monitor.
The Tygron Platform offers an option to take a screenshot of the content that is displayed on the screen in the Tygron Platform.
How to take a Screenshot
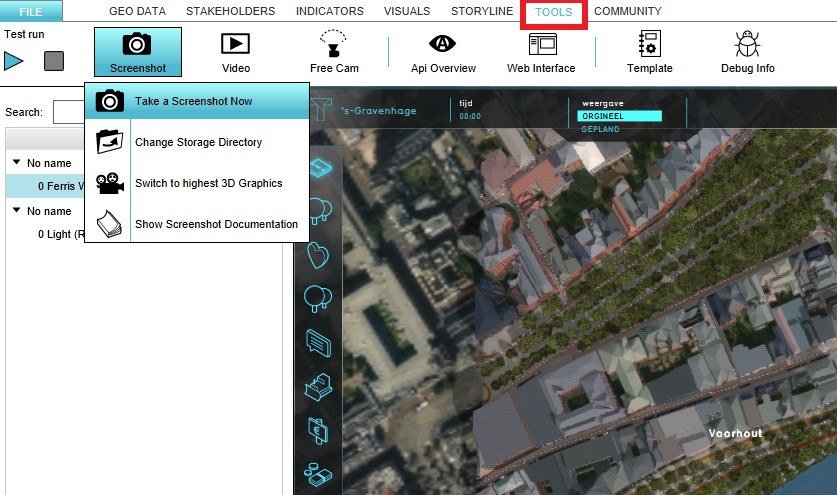
- Select in the editor 'Tools' from the ribbon
- Select 'Screenshot' from the ribbon bar
- Select the 'Take a Screenshot now' option
- Notice that a screenshot has been taken
Select the Tools header in the Editor
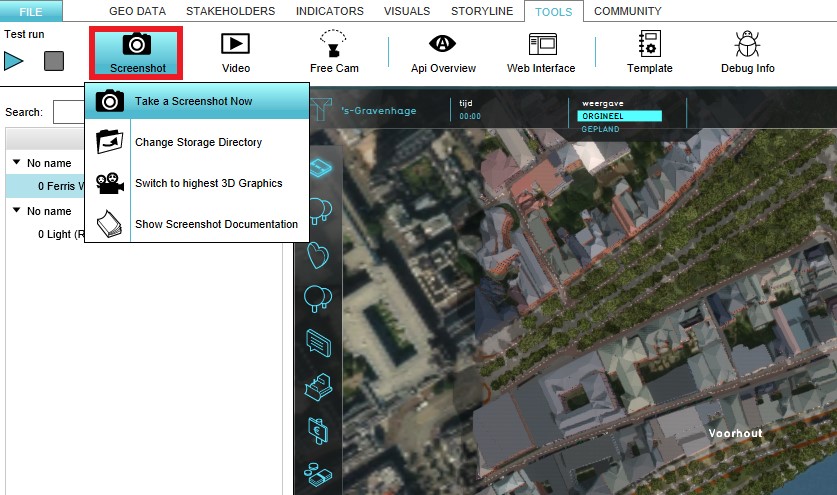
Select the Screenshot ribbon bar
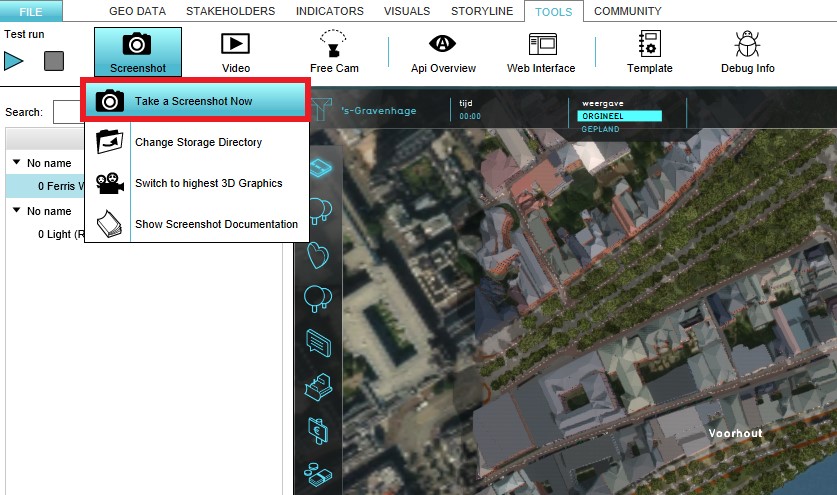
Select the 'Take a Screenshot Now' option


The directory where the screenshot is saved is displayed in the bottom panel of the screen. This directroy can be changed by selecting the 'Change Storage Directory' option in the Screenshot ribbon bar.

The 3D Graphics can also be modified in the Tygron Platform. To modify the 3D Graphics the 'Switch to Highest 3D Graphics' option should be selected that can also be found in the Screenshot ribbon bar.
Screenshot mode
It is possible to enter a special "screenshot mode" by pressing ctrl-alt-G on your keyboard. The session interface will be replaced with a complete view of the 3D world and software watermark. Use the same key combination again to leave screenshot mode, restoring the normal interface.
Notes
- After taking a screenshot or recording a GIF animation, it can be saved directly to the Geo Share.