Viewer: Difference between revisions
Jump to navigation
Jump to search
No edit summary |
|||
| (23 intermediate revisions by 2 users not shown) | |||
| Line 1: | Line 1: | ||
The main | The '''Viewer''' is the main interface that allows users to interact with the project [[session]] and [[3D Visualization]] from the perspective of a [[stakeholder]]. It is rendered on top of the [[3D Visualization]] and displays panels to inspect the [[Current Situation]] and [[Future Design]]ed state of a [[project]]. It also contains panels that allow [[stakeholder]]s to plan [[action]]s that will change the [[Planned situation]]. | ||
To change the current situation of a project, users will have to user the [[Editor]]. The editor panels are added around the | To change the current situation of a project, users will have to user the [[Editor]]. The editor panels are added around the viewer interface, as shown in the image below. | ||
<gallery mode=nolines> | <gallery mode=nolines heights=300px widths=400px> | ||
File:Q1-2016-End_User_Interface-b.jpg| | File:Q1-2016-End_User_Interface-b.jpg|[[Viewer ]]interface | ||
File:Q1-2016-EditorPanel.jpg|Editor | File:Q1-2016-EditorPanel.jpg|[[Editor ]]interface | ||
</gallery> | </gallery> | ||
==Main interface elements== | ==Main interface elements== | ||
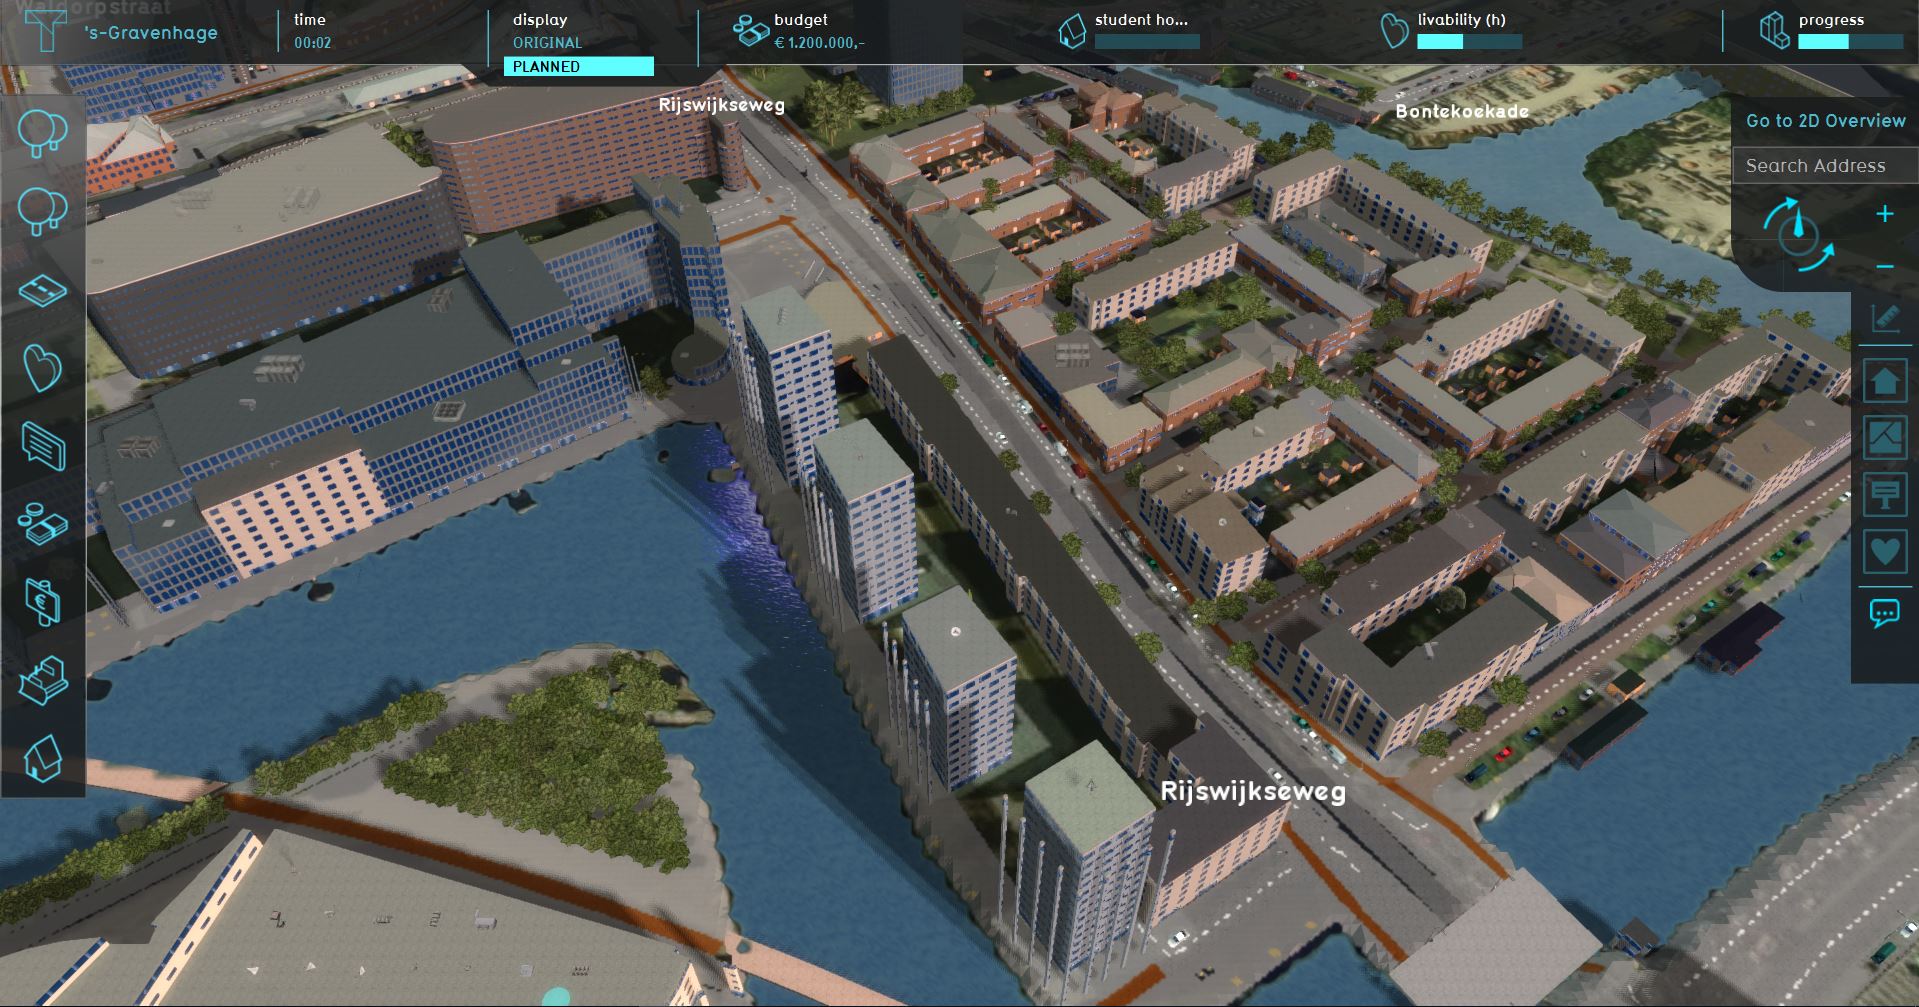
[[File:Q1-2016-End_User_Interface-b.jpg|thumb|400px|right|The main interface, showing the [[Top bar]] (top), [[Action menu panel]] (left) and the [[navigation panel]] (right).]] | |||
The Main Interface consists of the following main elements: | The Main Interface consists of the following main elements: | ||
* [[Top bar]]: Top part of the screen; Displays [[Indicators]] and buttons to switch between the [[Current]] and [[Planned situation]]. | * [[Top bar]]: Top part of the screen; Displays [[Indicators]] and buttons to switch between the [[Current situation|Current]] and [[Planned situation]]. | ||
* [[Action menu panel]]: Left part of the screen; Displays the [[Action Menu]]s containing the [[Action]]s available to the selected [[Stakeholder]]. | * [[Action menu panel]]: Left part of the screen; Displays the [[Action Menu]]s containing the [[Action]]s available to the selected [[Stakeholder]]. | ||
* [[Navigation panel]]: Right part of the screen; Displays multiple things: | * [[Navigation panel]]: Right part of the screen; Displays multiple things: | ||
| Line 17: | Line 18: | ||
** the [[Measuring tool]] button; | ** the [[Measuring tool]] button; | ||
** the available [[overlay]]s (sometimes grouped together); | ** the available [[overlay]]s (sometimes grouped together); | ||
** the [[ | ** the [[Log panel]]; | ||
* [[Legend panel]]: Bottom part of the screen; Displays a legend of the selected [[Overlay]] or for [[Drawing]]. | * [[Legend panel]]: Bottom part of the screen; Displays a legend of the selected [[Overlay]] or for [[Drawing]]. | ||
These elements can | These elements can open and show other panels in the interface. | ||
{{article end | {{article end | ||
|seealso= | |seealso= | ||
*[[Editor]] | *[[Editor]] | ||
*[[ | *[[3D Visualization]] | ||
*[[Camera]] | |||
*[[List of Keyboard Shortcuts]] | |||
}} | }} | ||
{{ | |||
{{viewer nav}} | |||
[[Category:Interface]] | [[Category:Interface]] | ||
Latest revision as of 06:47, 5 October 2023
The Viewer is the main interface that allows users to interact with the project session and 3D Visualization from the perspective of a stakeholder. It is rendered on top of the 3D Visualization and displays panels to inspect the Current Situation and Future Designed state of a project. It also contains panels that allow stakeholders to plan actions that will change the Planned situation.
To change the current situation of a project, users will have to user the Editor. The editor panels are added around the viewer interface, as shown in the image below.

Main interface elements

The main interface, showing the Top bar (top), Action menu panel (left) and the navigation panel (right).
The Main Interface consists of the following main elements:
- Top bar: Top part of the screen; Displays Indicators and buttons to switch between the Current and Planned situation.
- Action menu panel: Left part of the screen; Displays the Action Menus containing the Actions available to the selected Stakeholder.
- Navigation panel: Right part of the screen; Displays multiple things:
- Legend panel: Bottom part of the screen; Displays a legend of the selected Overlay or for Drawing.
These elements can open and show other panels in the interface.