New Project Wizard: Difference between revisions
No edit summary |
|||
| (28 intermediate revisions by 3 users not shown) | |||
| Line 1: | Line 1: | ||
The New Project Wizard guides a user through the creation of a new [[Project]]. It allows for the setting of a [[Project]]'s | The New Project Wizard guides a user through the creation of a new [[Project]] in the {{software|client}}. It allows for the setting of a [[Project]]'s name, localization and geographical properties. Next, in order to determine where your new project will be situated and how large it will be, a rectangular area has to be selected in a 2D map viewer of the world. Depending on the location of the project, the user can determine which [[Project Source]]s the project should be based on. Geographical data will be requested from these [[Project Source]]s to build up and populate your new project. | ||
The New Project Wizard can be started directly from the [[main menu]]. After the New Project Wizard is completed, the [[Editor]] is automatically opened. | The New Project Wizard can be started directly from the [[main menu]]. After the New Project Wizard is completed, the [[Editor]] is automatically opened. | ||
Optionally, a new project can be based on certain other projects; [[Template Project]]s. These provide the new Project with previous created [[indicator]]s, [[overlay]]s, [[function]]s and other [[item]]s that are not specifically bound to a geographical location. | |||
{{clear}} | {{clear}} | ||
==Project properties== | ==Project properties== | ||
[[File:new project wizard - project properties.jpg|thumb|left|New Project Wizard, selecting a [[Project | [[File:new project wizard - project properties.jpg|thumb|left|New Project Wizard, selecting a [[Template Project]].]] | ||
Creating a new [[Project]] begins with | Creating a new [[Project]] begins with the configuration of the [[Project Metadata|general information]] for the new [[Project]]. These include the following: | ||
* The name of the [[Project]] | * The name of the [[Project]]. This name must be unique. | ||
* The [[currency]] of the [[Project]] | * The [[currency]] of the [[Project]]. | ||
* The [[unit system]] of the [[Project]] | * The [[unit system]] of the [[Project]]. | ||
* The language of the [[Project]] | * The language of the [[Project]]. | ||
* The [[Project Type]] | * The [[Project Type]]. | ||
After setting these details, progressing through the New Project Wizard starts a [[Session]] for the new [[Project]], in which all additional configuration is effected. | After setting these details, progressing through the New Project Wizard starts a [[Session]] for the new [[Project]], in which all additional configuration is effected. | ||
{{clear}} | {{clear}} | ||
===Using a | ===Using a Template=== | ||
[[File:new project wizard - project template.jpg|thumb|left|New Project Wizard, to set the new [[Project]]'s properties.]] | [[File:new project wizard - project template.jpg|thumb|left|New Project Wizard, to set the new [[Project]]'s properties.]] | ||
After setting a name for the [[Project]], rather than create a new [[Project]] from scratch, it is possible to base the new [[Project]] on an existing [[Project | After setting a name for the [[Project]], rather than create a new [[Project]] from scratch, it is possible to base the new [[Project]] on an existing [[Template Project]]. Any [[Project]] which is marked as a [[Template Project]], and which can be accessed in the [[Editor]] by a user, can also be used as a Template. | ||
Using a [[Project | Using a [[Template Project]] allows for the selection of a language, but only a language which is also available for the [[Template Project]] itself. Other properties, such as the currency, unit system, and [[Project Type]], cannot be changed. | ||
After selecting a [[Project | After selecting a [[Template Project]] to use, progressing through the New Project Wizard starts a [[Session]] of the selected [[Template Project]], and then saves a copy under the provided name for the new [[Project]]. The copy is cleared of all geographical data. The running [[Session]] is then used to effect additional configurations. | ||
{{clear}} | {{clear}} | ||
==Project | ==Project Area== | ||
[[File:new project wizard - location selection.jpg|thumb|left|New Project Wizard, selecting a location for the new [[Project]].]] | [[File:new project wizard - location selection.jpg|thumb|left|New Project Wizard, selecting a location for the new [[Project]].]] | ||
A new [[Project]] will require geographical properties to be set. This includes the size of the [[Project]] and its geographical location. | A new [[Project]] will require geographical properties to be set, known as the [[project area]]. This includes the size of the [[Project]] and its geographical location. | ||
The size of the project can be set by using a slider to set the desired size. By default, a [[Project]] is square with an equal with and height. However, it is also possible to opt for a rectangular [[Project]], allowing the width and height of the [[Project]] to be set independently from one another. However, the ratio between width and height can at most be 1:4. A [[Project]] is always cardinally aligned and cannot be rotated. | The size of the project can be set by using a slider to set the desired size. By default, a [[Project]] is square with an equal with and height. However, it is also possible to opt for a rectangular [[Project]], allowing the width and height of the [[Project]] to be set independently from one another. However, the ratio between width and height can at most be 1:4. A [[Project]] is always cardinally aligned and cannot be rotated. | ||
| Line 33: | Line 35: | ||
A location can be selected by moving the viewport with the right mouse button, and placing the center of the extent of the [[Project]] with the left mouse button. | A location can be selected by moving the viewport with the right mouse button, and placing the center of the extent of the [[Project]] with the left mouse button. | ||
It is also possible to [[drag-and-drop]] a [[ | It is also possible to [[drag-and-drop]] a [[GeoJSON]] file onto the map. Based on the polygons in the file, the center and size of the project is recalculated to precisely fit the polygons provided. After doing so, the location and size of the [[Project]] can be adjusted further. See [[How to create an interest area GeoJSON]] to learn more on how to create such a file. | ||
{{clear}} | {{clear}} | ||
| Line 47: | Line 49: | ||
: The resolution of the [[elevation model|digital elevation model]] and the background satellite map can be set, in addition to setting the source for the elevation data and providing parameters for determining the difference between DSM and DTM. | : The resolution of the [[elevation model|digital elevation model]] and the background satellite map can be set, in addition to setting the source for the elevation data and providing parameters for determining the difference between DSM and DTM. | ||
; Water | ; Water | ||
: The generation of water and water-related [[ | : The generation of water and water-related [[Building]]s can be entirely (de)activated. | ||
; Roads | ; Roads | ||
: The enrichment of [[road]] | : The enrichment of the [[road system]] with more accurate traffic data can be (de)activated, by opting to use or not use various sources for [[traffic model|traffic data]]. | ||
; Custom data sources | ; Custom data sources | ||
: If a [[Project | : If a [[Template Project]] is used, and that [[Template Project]] has [[Geo Plugin]]s defined for additional data, it's possible to (de)activate those as desired as well. | ||
===Empty map=== | ===Empty map=== | ||
Rather than creating a new [[Project]] based on real data, it is also possible to create an empty map. The configured size will still be taken into account for the [[Project]], but the [[Project]] will not be given a geographical location or data from any data sources. This results in a project conceptually located at coordinates [https://en.wikipedia.org/wiki/Null_Island 0, 0], which consists entirely of [[open land]], and has no data from any data sources. | Rather than creating a new [[Project]] based on real data, it is also possible to create an empty map. The configured size will still be taken into account for the [[Project]], but the [[Project]] will not be given a geographical location or data from any data sources. This results in a project conceptually located at coordinates [https://en.wikipedia.org/wiki/Null_Island 0, 0], which consists entirely of [[open land]], and has no data from any data sources. | ||
===Generate for Polygons only=== | |||
When using the [[drag-and-drop]] function to select a location for a [[Project]], the following apply: | |||
* The newly calculated extent is buffered 10 meters in each direction. This means the [[Project]] will be slightly larger than the provided polygons. | |||
* The sliders for the [[Project]] size are automatically updated to reflect the new extent's size, but will display a value which is rounded to the nearest valid step in size. | |||
* The option ''Generate polygons only'' is made available. Opting for this will still create a [[Project]] extent of the configured size, but geo-data of the {{inlink|default data sources}} will only be obtained for the provided polygons. However, general geo-data, used for visualization around the project area, is always obtained. These include [[terrain type]]s, such as water, [[satellite image]]s and [[elevation model|terrain elevation]]. | |||
<gallery> | |||
File:New_project_wizard_select_area.png|thumb|400px|A new project is selected by dragging a [[geojson]] file onto the map viewer. The file contains two neighborhoods. | |||
File:New_project_wizard_polygon_checkbox.png|thumb|400px|The ''Generate polygons only'' option can be selected. The geo-data will only be obtained for those polygons, and not the project rectangle. | |||
File:New_project_wizard_generated_neigbhorhoods.png|thumb|400px|The generated project with [[Neighborhood]]s for the supplied polygons only. Notice that geo-data for [[terrain type]]s, such as water, [[satellite image]]s and [[elevation model|terrain elevation]] is always obtained. | |||
File:New_project_wizard_generated_buildings.png|thumb|400px|Overlay showing the [[Building]]s that were obtained, only for the supplied polygons only. | |||
</gallery> | |||
==The resulting Project== | ==The resulting Project== | ||
| Line 63: | Line 77: | ||
{{article end | {{article end | ||
|notes= | |notes= | ||
* The minimum size for a [[Project]] is 500m by 500m. The maximum size for a [[Project]] depends on the [[License]] of the user's [[domain]], and the sizes of [[Project]]s which already exist in the user's [[domain]]. | * The minimum size for a [[Project]] is 500m by 500m. The maximum size for a [[Project]] depends on the [[License]] of the user's [[domain]], and the sizes of [[Project]]s which already exist in the user's [[domain]]. | ||
** Even if the user does not intend to save the [[Project]], thus discarding the [[Project]] after the [[session]] is closed, sufficient room must exist in the [[domain]]'s [[license]] to do so. | ** Even if the user does not intend to save the [[Project]], thus discarding the [[Project]] after the [[session]] is closed, sufficient room must exist in the [[domain]]'s [[license]] to do so. | ||
| Line 74: | Line 84: | ||
|howtos= | |howtos= | ||
* [[How to create a new Project]] | * [[How to create a new Project]] | ||
* [[How to base a new Project on a Template Project]] | |||
|seealso= | |seealso= | ||
* [[Project]] | * [[Project]] | ||
* [[Project | * [[Template Project]] | ||
|videos= | |videos= | ||
{{video|gallery= | |||
{{video|link=https://www.youtube.com/watch?v=NxJdU8Qgyw8|description=Video tutorial on creating a new [[Project]].}} | |||
}} | |||
}} | }} | ||
[[Category:Wizards]] | [[Category:Wizards]][[Category:Start]] | ||
Latest revision as of 11:45, 28 September 2023
The New Project Wizard guides a user through the creation of a new Project in the Tygron Client. It allows for the setting of a Project's name, localization and geographical properties. Next, in order to determine where your new project will be situated and how large it will be, a rectangular area has to be selected in a 2D map viewer of the world. Depending on the location of the project, the user can determine which Project Sources the project should be based on. Geographical data will be requested from these Project Sources to build up and populate your new project.
The New Project Wizard can be started directly from the main menu. After the New Project Wizard is completed, the Editor is automatically opened.
Optionally, a new project can be based on certain other projects; Template Projects. These provide the new Project with previous created indicators, overlays, functions and other items that are not specifically bound to a geographical location.
Project properties

Creating a new Project begins with the configuration of the general information for the new Project. These include the following:
- The name of the Project. This name must be unique.
- The currency of the Project.
- The unit system of the Project.
- The language of the Project.
- The Project Type.
After setting these details, progressing through the New Project Wizard starts a Session for the new Project, in which all additional configuration is effected.
Using a Template

After setting a name for the Project, rather than create a new Project from scratch, it is possible to base the new Project on an existing Template Project. Any Project which is marked as a Template Project, and which can be accessed in the Editor by a user, can also be used as a Template.
Using a Template Project allows for the selection of a language, but only a language which is also available for the Template Project itself. Other properties, such as the currency, unit system, and Project Type, cannot be changed.
After selecting a Template Project to use, progressing through the New Project Wizard starts a Session of the selected Template Project, and then saves a copy under the provided name for the new Project. The copy is cleared of all geographical data. The running Session is then used to effect additional configurations.
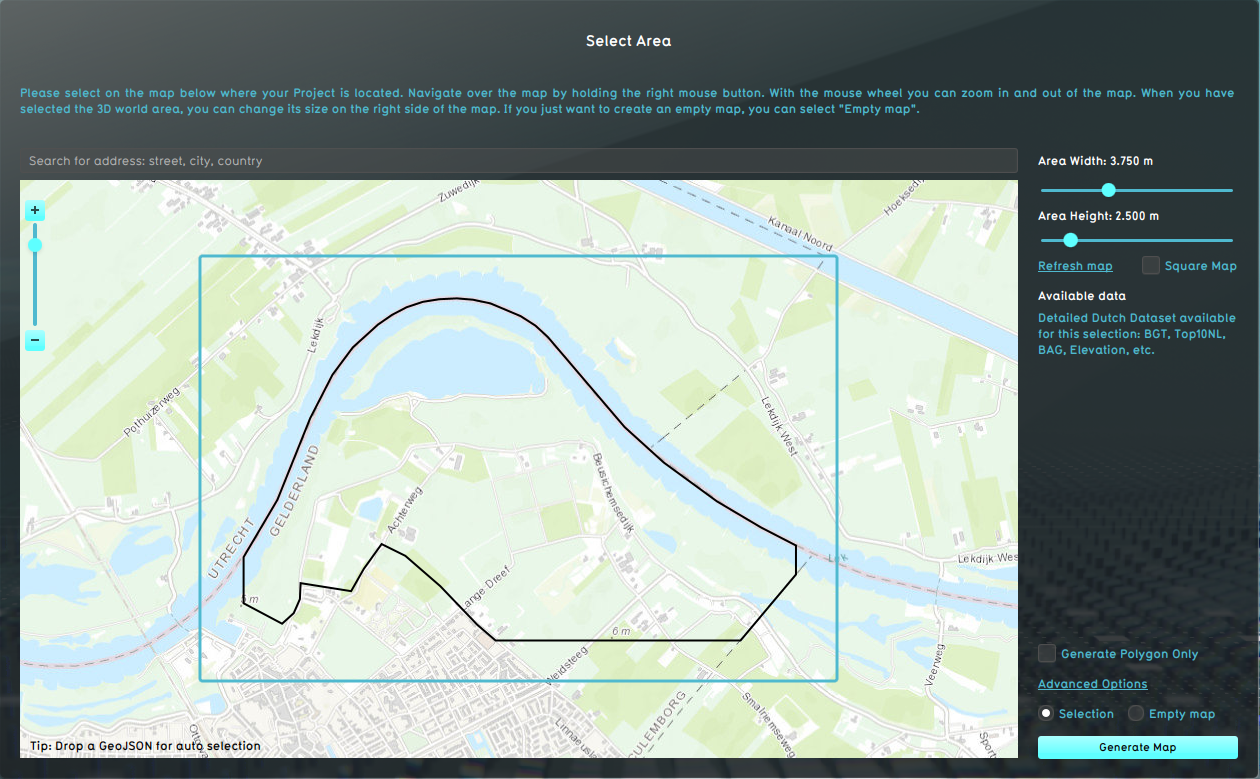
Project Area

A new Project will require geographical properties to be set, known as the project area. This includes the size of the Project and its geographical location.
The size of the project can be set by using a slider to set the desired size. By default, a Project is square with an equal with and height. However, it is also possible to opt for a rectangular Project, allowing the width and height of the Project to be set independently from one another. However, the ratio between width and height can at most be 1:4. A Project is always cardinally aligned and cannot be rotated.
A location can be selected by moving the viewport with the right mouse button, and placing the center of the extent of the Project with the left mouse button.
It is also possible to drag-and-drop a GeoJSON file onto the map. Based on the polygons in the file, the center and size of the project is recalculated to precisely fit the polygons provided. After doing so, the location and size of the Project can be adjusted further. See How to create an interest area GeoJSON to learn more on how to create such a file.
Advanced Options
- Main article: Advanced options (New Project Wizard)
While setting the size and location for the new Project, advanced options are available to further tune how the Project's geographical data is generated. This includes the following options, although the exact options can differ based on the prospective location for the Project, as not all data sources have world coverage.
- Default data sources
- A number of Project Sources can be (de)activated as desired. This can include data for complete geographical features, or for data associated with them, More information about each data source is available.
- Digital elevation model
- The resolution of the digital elevation model and the background satellite map can be set, in addition to setting the source for the elevation data and providing parameters for determining the difference between DSM and DTM.
- Water
- The generation of water and water-related Buildings can be entirely (de)activated.
- Roads
- The enrichment of the road system with more accurate traffic data can be (de)activated, by opting to use or not use various sources for traffic data.
- Custom data sources
- If a Template Project is used, and that Template Project has Geo Plugins defined for additional data, it's possible to (de)activate those as desired as well.
Empty map
Rather than creating a new Project based on real data, it is also possible to create an empty map. The configured size will still be taken into account for the Project, but the Project will not be given a geographical location or data from any data sources. This results in a project conceptually located at coordinates 0, 0, which consists entirely of open land, and has no data from any data sources.
Generate for Polygons only
When using the drag-and-drop function to select a location for a Project, the following apply:
- The newly calculated extent is buffered 10 meters in each direction. This means the Project will be slightly larger than the provided polygons.
- The sliders for the Project size are automatically updated to reflect the new extent's size, but will display a value which is rounded to the nearest valid step in size.
- The option Generate polygons only is made available. Opting for this will still create a Project extent of the configured size, but geo-data of the default data sources will only be obtained for the provided polygons. However, general geo-data, used for visualization around the project area, is always obtained. These include terrain types, such as water, satellite images and terrain elevation.
A new project is selected by dragging a geojson file onto the map viewer. The file contains two neighborhoods.

The Generate polygons only option can be selected. The geo-data will only be obtained for those polygons, and not the project rectangle.
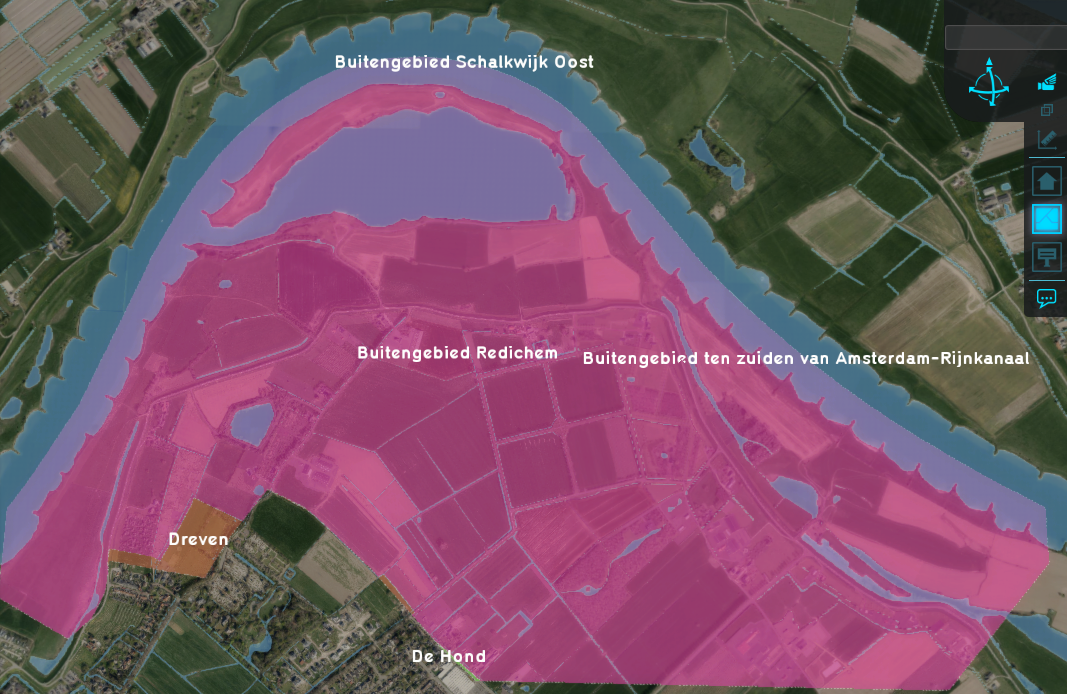
The generated project with Neighborhoods for the supplied polygons only. Notice that geo-data for terrain types, such as water, satellite images and terrain elevation is always obtained.
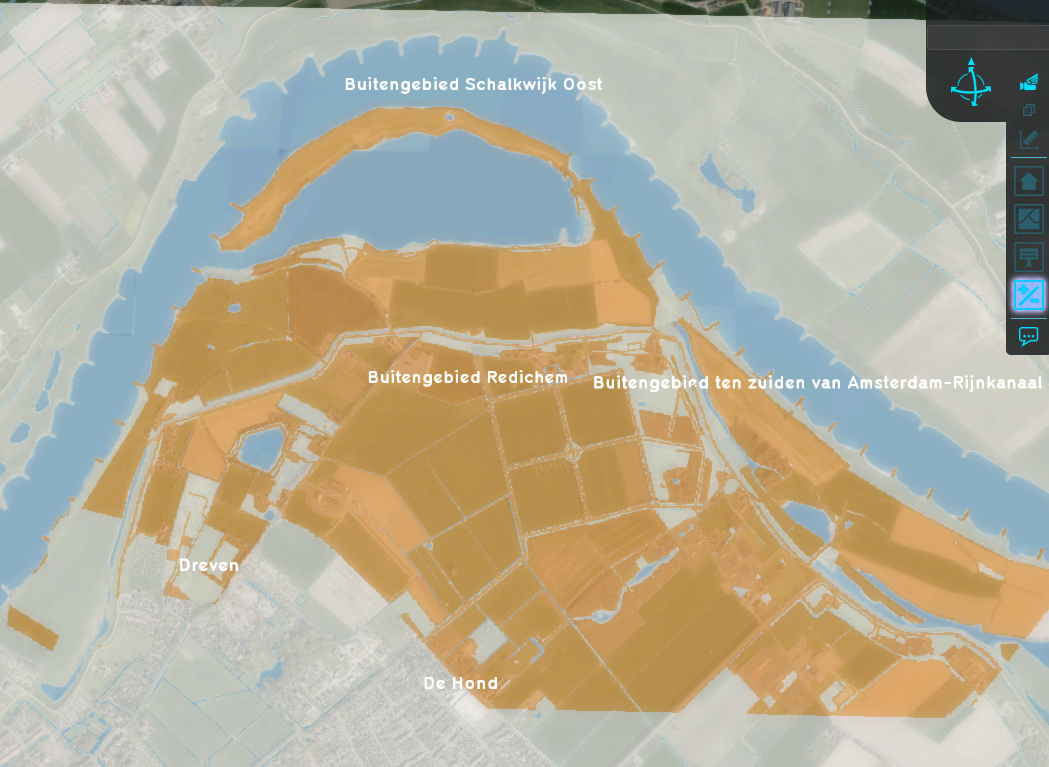
Overlay showing the Buildings that were obtained, only for the supplied polygons only.


The resulting Project
The resulting Project is automatically opened in a running Session.
If the Project should be saved, it is important to save the Project before closing the Session. Otherwise, the Project will be discarded when the Session is closed. If the Session is closed without saving the Project and the Project's data is thus discarded, the space it took up within the domain's license is freed up for new Projects.
Notes
- The minimum size for a Project is 500m by 500m. The maximum size for a Project depends on the License of the user's domain, and the sizes of Projects which already exist in the user's domain.
- When generating a very large Project, it is possible to close the Tygron Platform by clicking the close button of the Tygron Platform's window. The user will be prompted whether to set the Session to Keep Alive. This allows the Tygron Platform to be closed locally while the generation process continues, so that the Session can be joined at a later time when the process has completed.
- Progress Items are only available in the Session in which the Project was generated. When the Session is closed, Progress Items are discarded. This only affects the record of the progress of project data generation, and not the generated data itself..
How-to's
Videos