How to create a Rain area: Difference between revisions
Jump to navigation
Jump to search
No edit summary |
No edit summary |
||
| (5 intermediate revisions by 2 users not shown) | |||
| Line 1: | Line 1: | ||
When using the [[Water Overlay]] | When using the [[Water Overlay]], you can add one or more [[Rain area (Water Overlay)|Rain areas]] to define specific amounts of rainfall for different regions of the Project area. | ||
{{howto|title=create a Rain area for the Water Overlay | {{howto|title=create a Rain area for the Water Overlay | ||
| Line 7: | Line 7: | ||
| Ensure in the step regarding [[Weather]], that the [[Limit rain (Water Overlay)|rain mode]] is set to allow [[Area]]s to override the [[Weather]]'s [[Weather rain m (Water Overlay)|Rain]]. | | Ensure in the step regarding [[Weather]], that the [[Limit rain (Water Overlay)|rain mode]] is set to allow [[Area]]s to override the [[Weather]]'s [[Weather rain m (Water Overlay)|Rain]]. | ||
| In the step to override rain with areas, select the [[Area]] you created or imported. | | In the step to override rain with areas, select the [[Area]] you created or imported. | ||
| To set a | | To set a constant amount of rainfall for the entire simulation period, select "Fixed" and enter the total value for the [[Rain area (Water Overlay)|Rain area]]. | ||
| To set | | To set varying rainfall intensity over time, select "dynamic" and [[How to import a time sequence with a CSV|import a CSV]] to define the values. | ||
}} | }} | ||
| Line 21: | Line 21: | ||
| notes= | | notes= | ||
* When importing one or more [[Area]]s, the imported data can have [[Rain m (Water Overlay)|RAIN_M]] Attributes predefined, skipping the need to configure or load in individual time sequences per [[Area]] afterwards. The array should consist of a time sequence({{Time sequence end}}), and should be pairs of values indicating times in seconds and amounts of rainfall in meters. | * When importing one or more [[Area]]s, the imported data can have [[Rain m (Water Overlay)|RAIN_M]] Attributes predefined, skipping the need to configure or load in individual time sequences per [[Area]] afterwards. The array should consist of a time sequence({{Time sequence end}}), and should be pairs of values indicating times in seconds and amounts of rainfall in meters. | ||
* | * The [[Rain m (Water Overlay)|RAIN_M]] [[Attribute]] can be configured manually via the [[Editor]], although using the Water Overlay Wizard or importing data is recommended for better efficiency. | ||
* A CSV for dynamic rainfall defines a time sequence({{Time sequence end}}), and should be structured as follows: | * A CSV for dynamic rainfall defines a time sequence({{Time sequence end}}), and should be structured as follows: | ||
{{code|1= | {{code|1= | ||
| Line 30: | Line 30: | ||
10800, 0.06 | 10800, 0.06 | ||
}} | }} | ||
The first number indicates time, the second number the amount of rain in | The first number indicates time, the second number the amount of rain in meters. During import, you are prompted to specify the unit of time (seconds, minutes, days), and whether the separator is a comma or a semicolon. | ||
*It is possible to eventually create a dynamic rainfall situation using multiple rain areas: | *It is possible to eventually create a dynamic rainfall situation using multiple rain areas: | ||
[[File:Wateroverlay_rainfall_areas_dynamic.gif|left|frame|Dynamic rainfall defined by 101 different rain areas, which is shown in the mini-map halfway the animation. Animation is showing the [[Last rain result type (Water Overlay)|last rain result]]]]{{clear}} | [[File:Wateroverlay_rainfall_areas_dynamic.gif|left|frame|Dynamic rainfall defined by 101 different rain areas, which is shown in the mini-map halfway the animation. Animation is showing the [[Last rain result type (Water Overlay)|last rain result]]]]{{clear}} | ||
Latest revision as of 13:42, 8 July 2026
When using the Water Overlay, you can add one or more Rain areas to define specific amounts of rainfall for different regions of the Project area.
How to create a Rain area for the Water Overlay:
- Either draw a new Area, or import an area.
- Ensure the new Area has a RAIN_M Attribute. Its value is not yet important.
- Open the Water Overlay Wizard.
- Ensure in the step regarding Weather, that the rain mode is set to allow Areas to override the Weather's Rain.
- In the step to override rain with areas, select the Area you created or imported.
- To set a constant amount of rainfall for the entire simulation period, select "Fixed" and enter the total value for the Rain area.
- To set varying rainfall intensity over time, select "dynamic" and import a CSV to define the values.
-
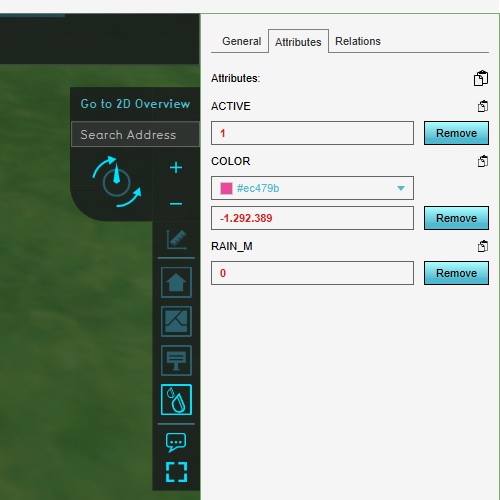 Add an area with a RAIN_M attribute. Its value is not yet relevant.
 -
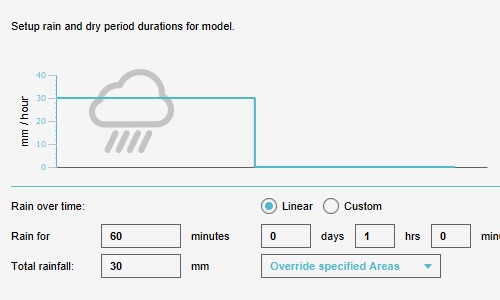 Set the Water Overlay to allow Rain areas.
 -
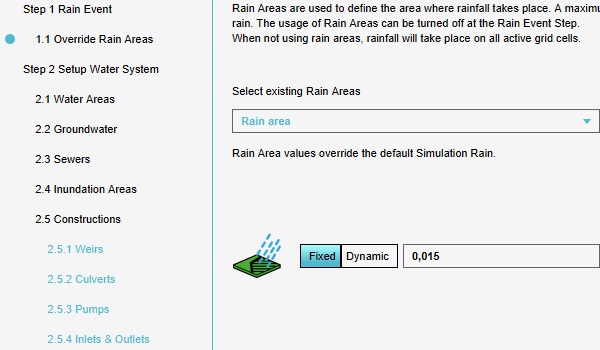 It's possible to configure a single value for rain.
 -
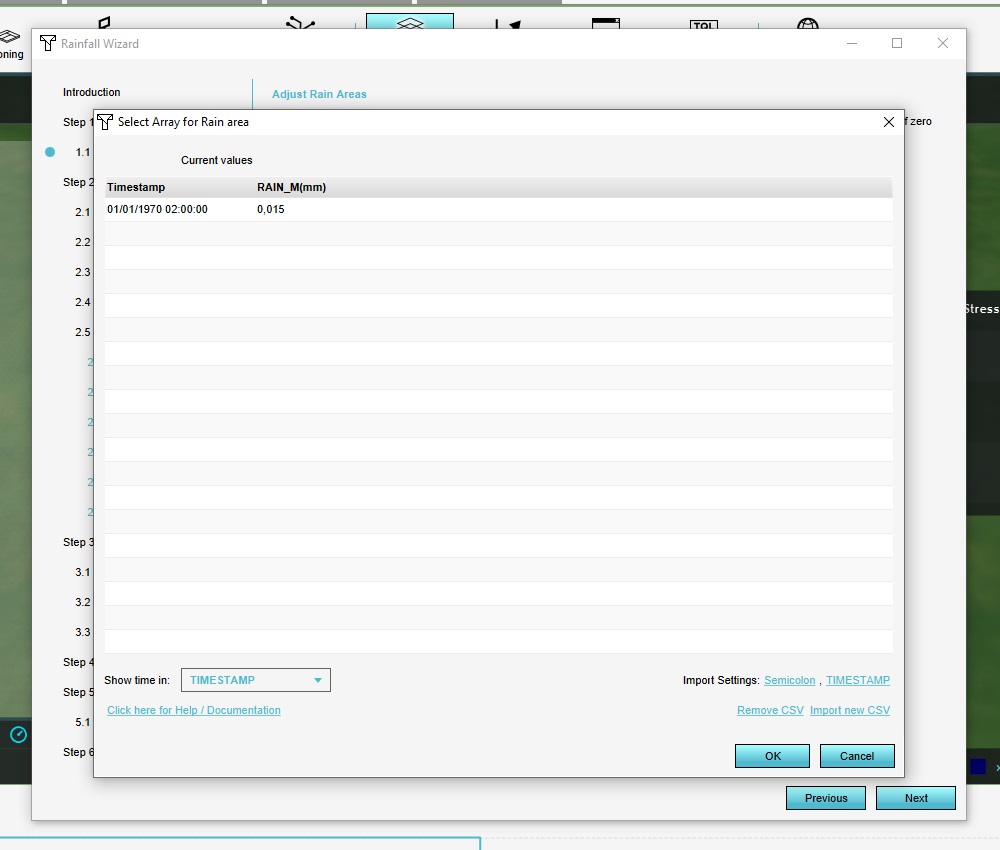 It's possible to upload a time sequence to define the amount of rain over time.


Notes
- When importing one or more Areas, the imported data can have RAIN_M Attributes predefined, skipping the need to configure or load in individual time sequences per Area afterwards. The array should consist of a time sequence(end-time), and should be pairs of values indicating times in seconds and amounts of rainfall in meters.
- The RAIN_M Attribute can be configured manually via the Editor, although using the Water Overlay Wizard or importing data is recommended for better efficiency.
- A CSV for dynamic rainfall defines a time sequence(end-time), and should be structured as follows:
time, rain
3600, 0.03
7200, 0
9000, 0.03
10800, 0.06
The first number indicates time, the second number the amount of rain in meters. During import, you are prompted to specify the unit of time (seconds, minutes, days), and whether the separator is a comma or a semicolon.
- It is possible to eventually create a dynamic rainfall situation using multiple rain areas:
