How to export a DXF reference file for a project: Difference between revisions
Jump to navigation
Jump to search
No edit summary |
No edit summary |
||
| (15 intermediate revisions by 4 users not shown) | |||
| Line 1: | Line 1: | ||
You can export a Tygron [[Project]] to a [[DXF]] reference file for use in CAD programs. You can use this [[DXF]] as a reference in AutoCAD with the correct [[Geo Plugin]] layers to draw a new plan. Another benefit is that the exported DXF is Geo referenced to the correct coördinates set in the Tygron Project. In this way the [[DXF]] can be reimported to the project which it came from without a faulty | You can export a Tygron [[Project]] to a [[DXF]] reference file for use in CAD programs. You can use this [[DXF]] as a reference in AutoCAD with the correct [[Geo Plugin]] layers to draw a new plan. Another benefit is that the exported DXF is Geo referenced to the correct coördinates set in the Tygron Project. In this way the [[DXF]] can be reimported to the project which it came from without a faulty coordinate system. | ||
<youtube>LNwlLWwVZeA</youtube> | |||
{{editor location|geo plugins}} | {{editor location|geo plugins}} | ||
{{howto|title=export a DXF reference file | {{howto|title=export a DXF reference file | ||
| Go to [[Geo Plugins]] in the [[Tools]] tab. Click on it to show the current [[Geo Plugins]] available in your project. They can be found on the left panel of the [[Editor]] | | Go to [[Geo Plugins]] in the [[Tools]] tab. Click on it to show the current [[Geo Plugins]] available in your project. They can be found on the left panel of the [[Editor]] | ||
| If you do not have a [[Geo Plugin]] set up, go to [[How to create a Geo Plugin to import Buildings from a DXF]]. | | If you do not have a [[Geo Plugin]] set up, go to [[How to create a Geo Plugin to import Buildings from a DXF]]. | ||
| If you do have a [[Geo Plugin]], click on it and it's properties will be shown on the Right Panel. | | If you do have a [[Geo Plugin]], click on it and it's properties will be shown on the Right Panel. | ||
| Click on the [[Geo Link]] tab. A list of GeoLinks will be shown. This is a list of Tygron Functions which will be converted to CAD layers when exported to DXF. | | Click on the [[Geo Link]] tab. A list of GeoLinks will be shown. This is a list of Tygron Functions which will be converted to CAD layers when exported to DXF. | ||
| Go to the [[Tools]] tab in the [[Editor]] [[Ribbon]] and hover over the [[Geo Plugin]] dropdown menu. Choose Export AutoCAD [[DXF]] Reference. | | Go to the [[Tools]] tab in the [[Editor]] [[Ribbon]] and hover over the [[Geo Plugin]] dropdown menu. Choose Export AutoCAD [[DXF]] Reference. This will open an export dialog window. | ||
| | | Ensure the "Export Buildings (Attribute)" option is selected. | ||
| | | Ensure the "Export Roads" option is selected. | ||
| | | Leave "Area of Interest" as is. | ||
| Ensure that the CRS is set to a reference system is set to a regional system with units of meters or feet. | |||
| Click on the CRS: Edit link to change you Coordinate Reference System or leave as default. By default, it is set to the [[Project]]'s [[export CRS]]. | |||
| Finally choose a [[Geo Plugin]] from the dropdown list. This Geo Plugin will be used to create the Layers in DXF. | |||
| Click on "Export File" and save the [[DXF]] to a location on your computer. | |||
| You can open the DXF in AutoCAD or other packages that support DXF. | |||
| After editing, the [[How to import a DXF|DXF can be imported]] back into the [[Project]]. | |||
}} | |||
{{gallery | |||
|Export dxf 001.png|Show available GeoPlugins | |||
|Export dxf 002.png|Show available Geo Links | |||
|Export dxf 003.png|Export DXF dialog | |||
}} | |||
{{article end | |||
| notes= | |||
* The [[Building]] [[Attribute]] selected during export dictates which [[Building]] features are part of the DXF's background layer. [[Solid (Function Value)|SOLID]] is the default setting as it provides all large structures which is generally sufficient context. | |||
* The Area of Interest option works similar to the [[Building]] [[Attribute]] option, in that it will add all [[Area]]s with that [[Attribute]] to the export as well. [[Area of interest (Area Attribute)|AREA_OF_INTEREST]] is the default setting, and will match the [[Attribute]] added to [[Area]]s used for [[Project generation]]. | |||
* The [[CRS]] configured will allow any drawing in the [[DXF]] file to be automatically placed in the right world location when loaded back into the {{software}} (or in any other geo data application). | |||
| howtos= | |||
* [[How to create a Geo Plugin to import Buildings from a DXF]] | |||
* [[How to import a DXF]] | |||
* [[How to set the geo-location of a AutoCAD DXF]] | |||
* [[How to set the unit of measurement for a DXF]] | |||
* [[How to deal with a long processing DXF import]] | |||
}} | }} | ||
[[Category:How-to's]][[Category:DXF]] | |||
Latest revision as of 14:34, 30 January 2024
You can export a Tygron Project to a DXF reference file for use in CAD programs. You can use this DXF as a reference in AutoCAD with the correct Geo Plugin layers to draw a new plan. Another benefit is that the exported DXF is Geo referenced to the correct coördinates set in the Tygron Project. In this way the DXF can be reimported to the project which it came from without a faulty coordinate system.
How to export a DXF reference file:
- Go to Geo Plugins in the Tools tab. Click on it to show the current Geo Plugins available in your project. They can be found on the left panel of the Editor
- If you do not have a Geo Plugin set up, go to How to create a Geo Plugin to import Buildings from a DXF.
- If you do have a Geo Plugin, click on it and it's properties will be shown on the Right Panel.
- Click on the Geo Link tab. A list of GeoLinks will be shown. This is a list of Tygron Functions which will be converted to CAD layers when exported to DXF.
- Go to the Tools tab in the Editor Ribbon and hover over the Geo Plugin dropdown menu. Choose Export AutoCAD DXF Reference. This will open an export dialog window.
- Ensure the "Export Buildings (Attribute)" option is selected.
- Ensure the "Export Roads" option is selected.
- Leave "Area of Interest" as is.
- Ensure that the CRS is set to a reference system is set to a regional system with units of meters or feet.
- Click on the CRS: Edit link to change you Coordinate Reference System or leave as default. By default, it is set to the Project's export CRS.
- Finally choose a Geo Plugin from the dropdown list. This Geo Plugin will be used to create the Layers in DXF.
- Click on "Export File" and save the DXF to a location on your computer.
- You can open the DXF in AutoCAD or other packages that support DXF.
- After editing, the DXF can be imported back into the Project.
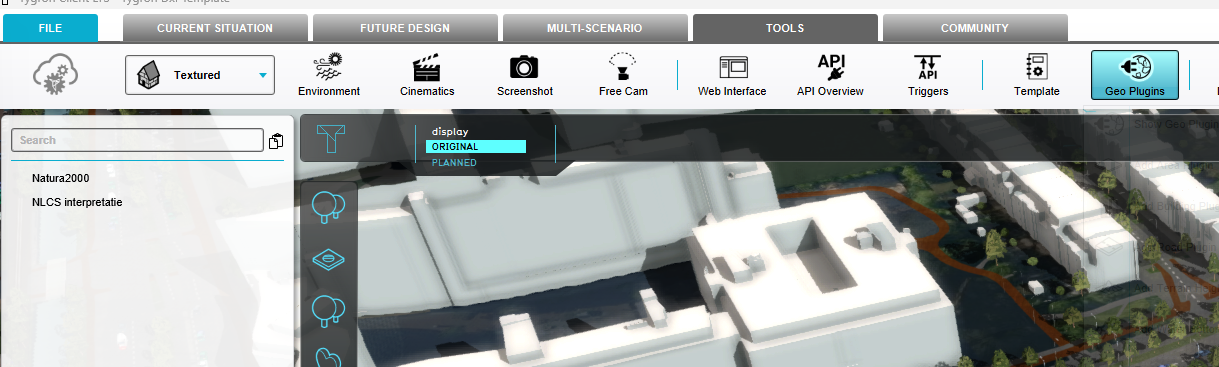
Show available GeoPlugins
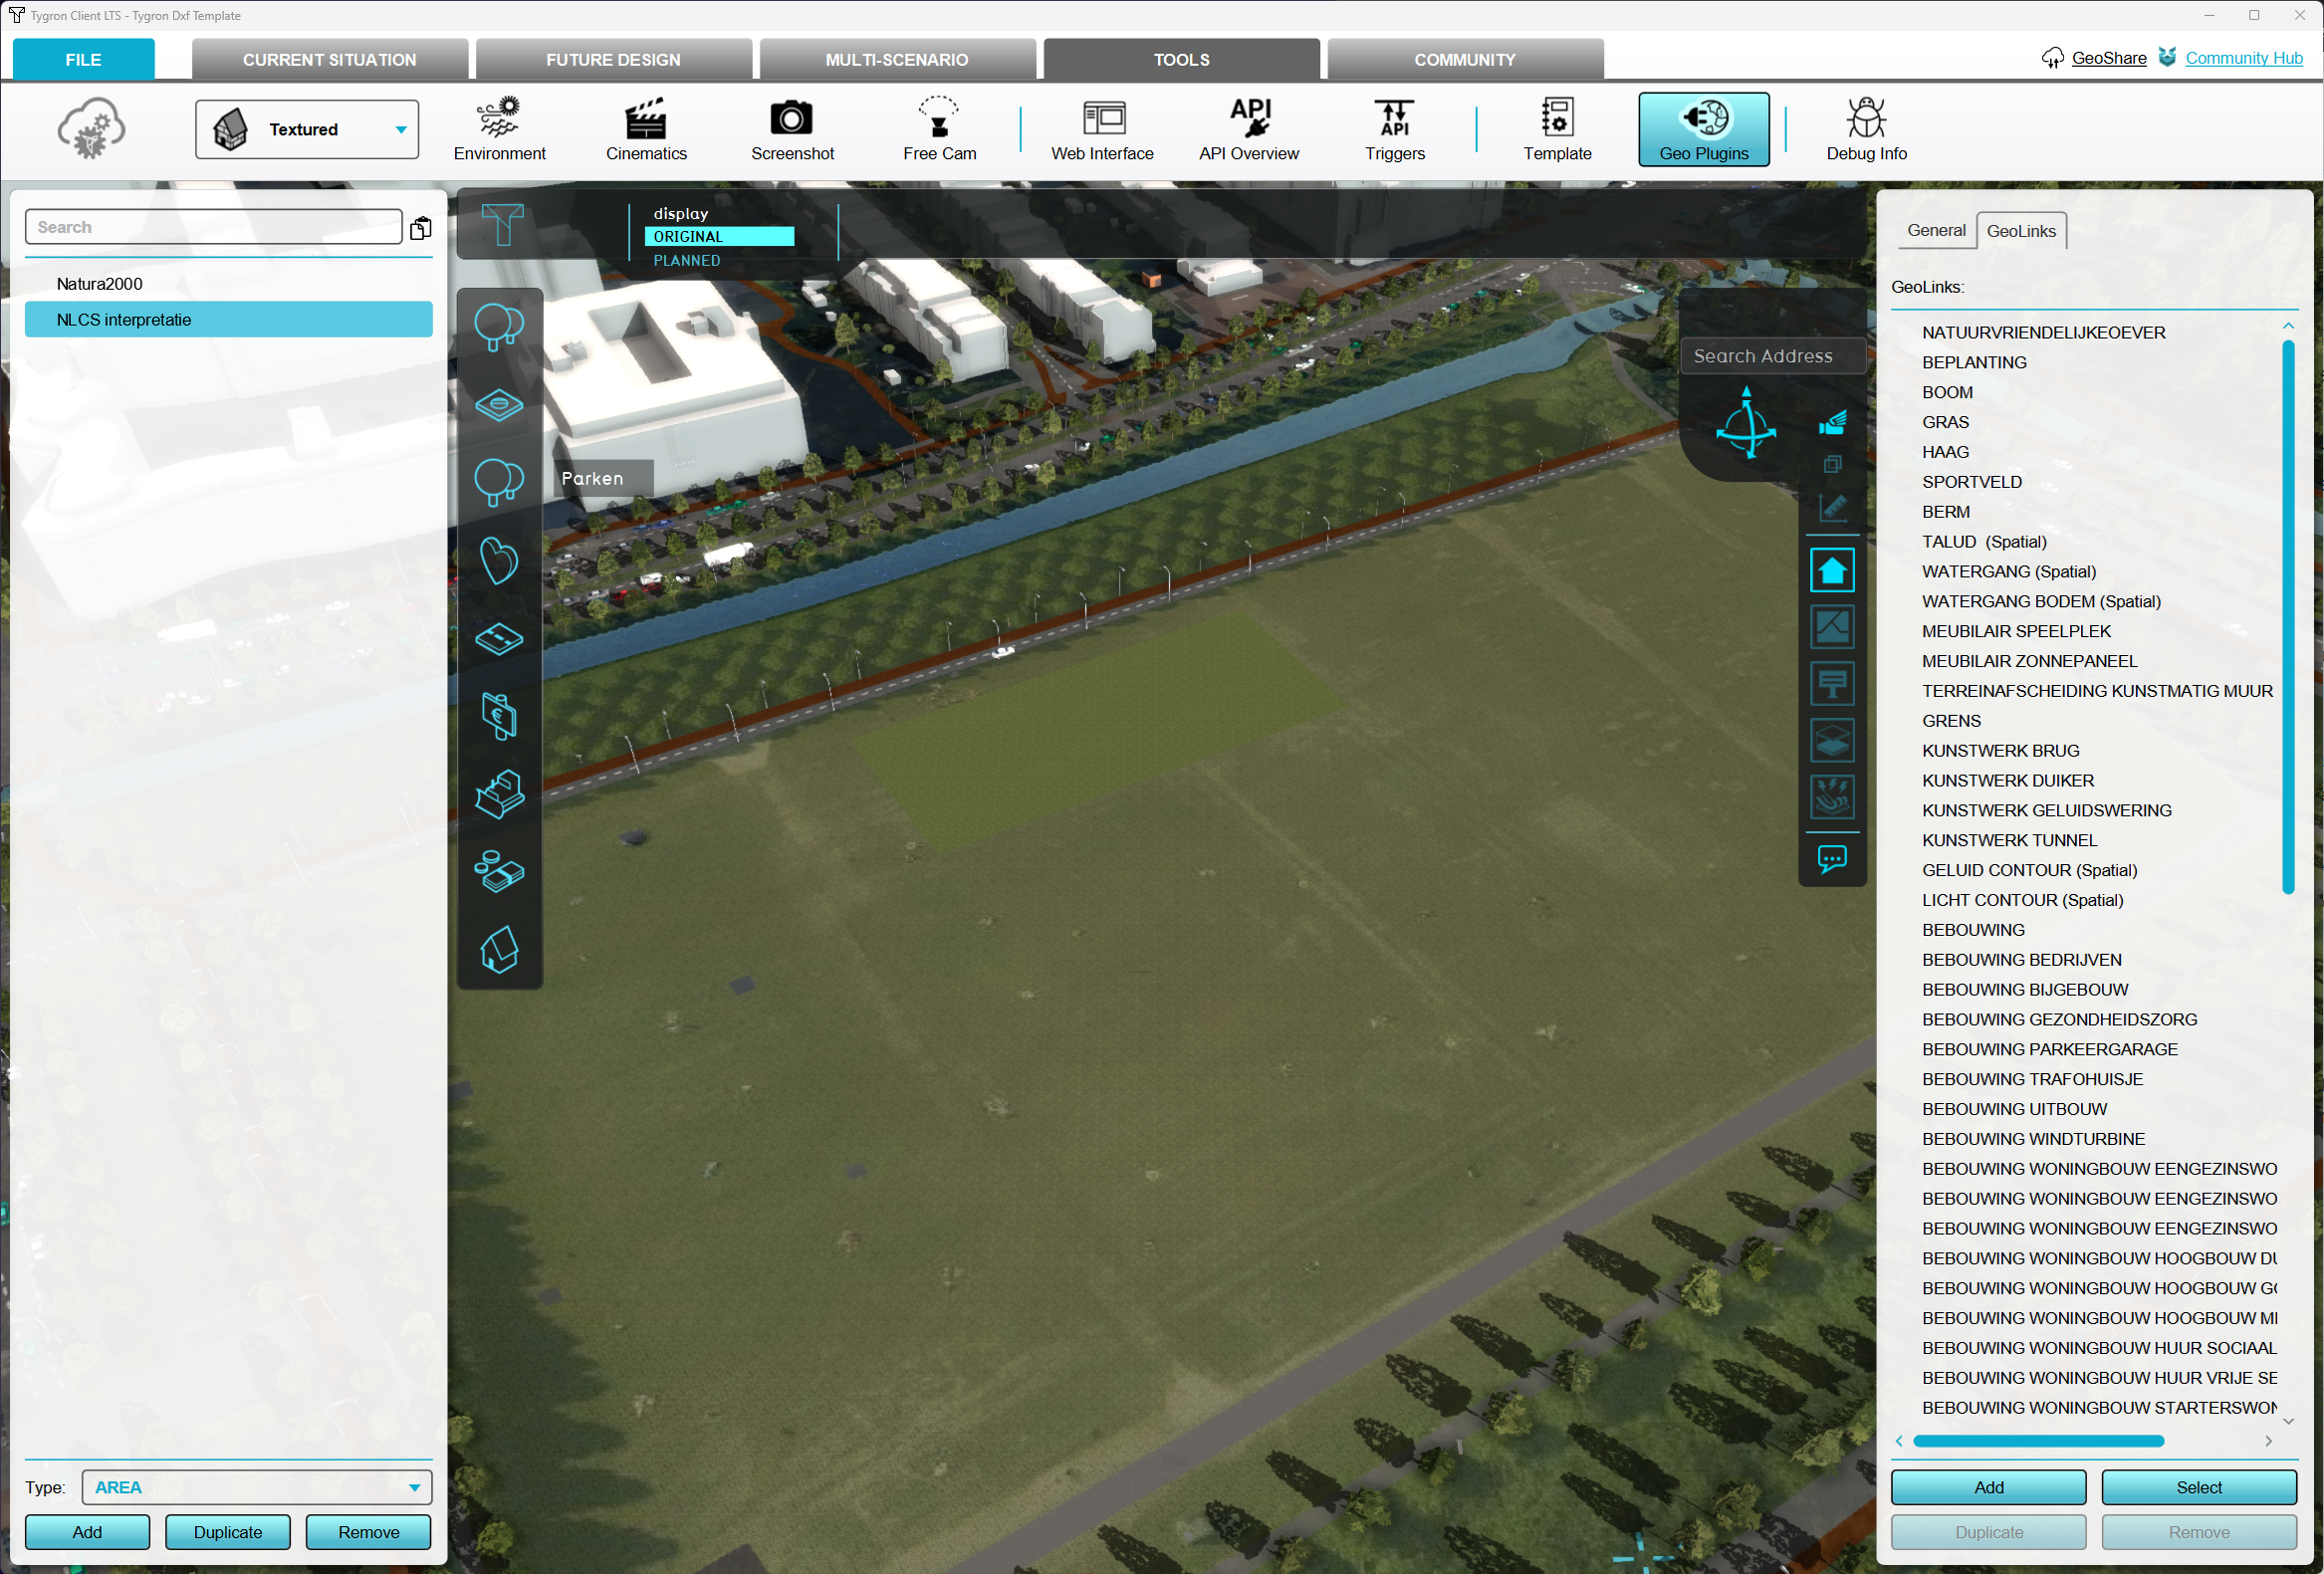
Show available Geo Links
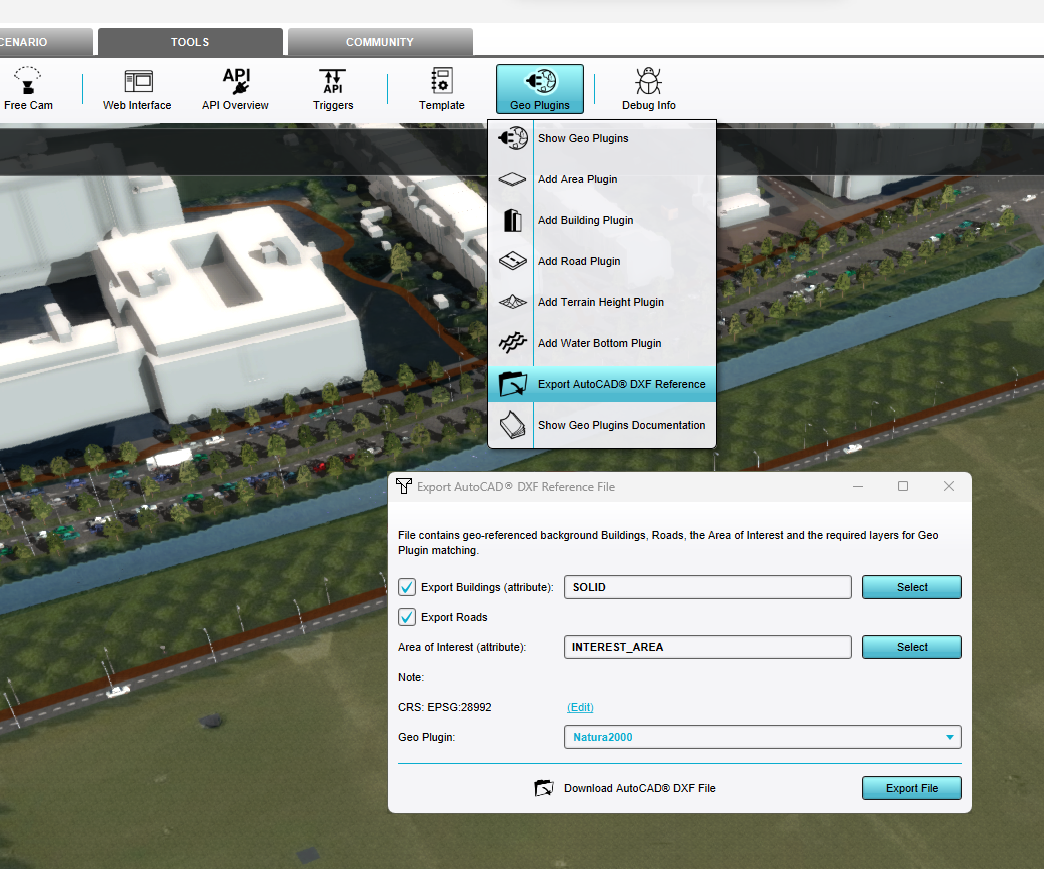
Export DXF dialog


Notes
- The Building Attribute selected during export dictates which Building features are part of the DXF's background layer. SOLID is the default setting as it provides all large structures which is generally sufficient context.
- The Area of Interest option works similar to the Building Attribute option, in that it will add all Areas with that Attribute to the export as well. AREA_OF_INTEREST is the default setting, and will match the Attribute added to Areas used for Project generation.
- The CRS configured will allow any drawing in the DXF file to be automatically placed in the right world location when loaded back into the Tygron Platform (or in any other geo data application).