|
|
| (91 intermediate revisions by 7 users not shown) |
| Line 1: |
Line 1: |
| {{learned|file=DikeLogo-Q3-2015.jpg|what a Dike is and what other names are in use for Dikes|how Dikes relate to the Tygron Engine|what different types of Dike are present in the Tygron Engine|how to add Dikes to your project|how to change Dikes in your project}}
| | [[File:Api_future_design.png|thumb|right|400px|[[Levee Type]]s in relation to other [[Action]]s]] |
| | In spatial planning '''Levee''' refers to a natural or artificial slope or wall to regulate water levels, called '''levee''' in US English. |
|
| |
|
| =What are Dikes?=
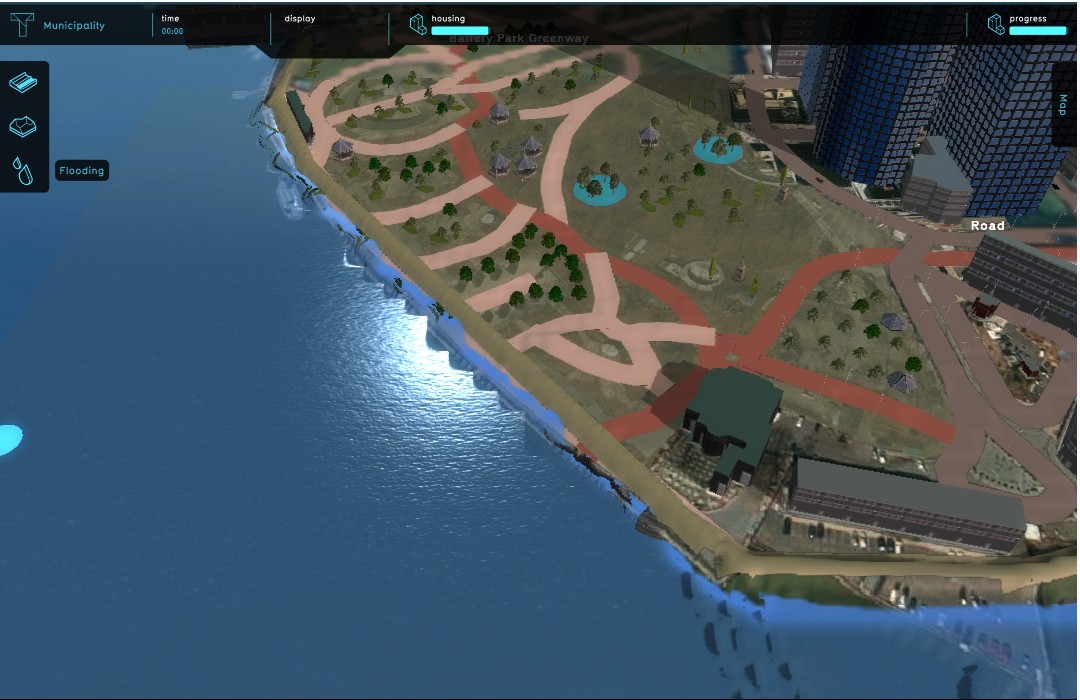
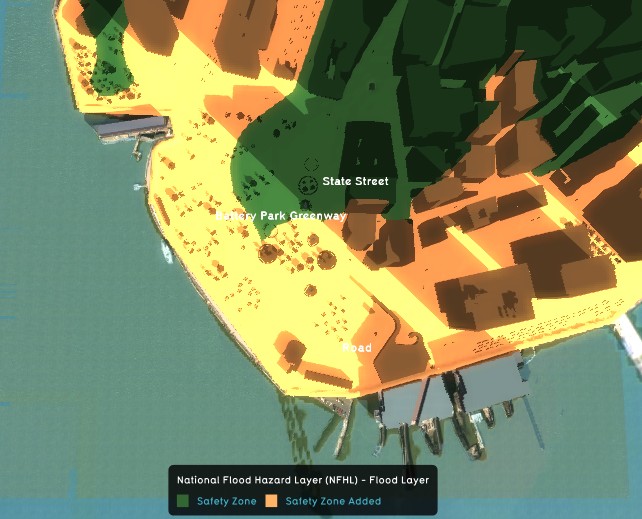
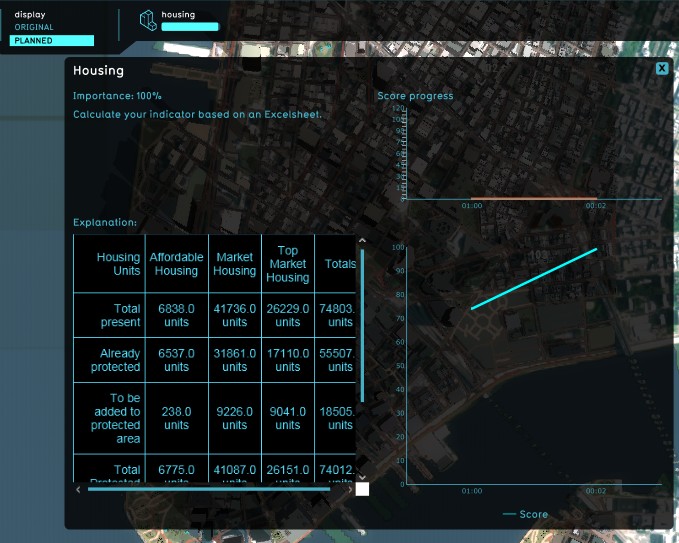
| | In the {{software}} these levees play a special part. As dedicated [[Buildings]] they can affect [[Areas#Safe zone|safe zones and floods]]. By constructing a levee as an independent [[Actions|action]] or as part of a [[Predefined Measures|measure]], the safe zone terrain will be expanded, protecting more houses and industry when a flood occurs. This can all be visualized in the {{software}} and a dedicated [[Indicators|indicator]] can be set up to have the implementation of levees score on the [[stakeholder]] progression. |
| | |
| In spatial planning '''Dike''' or '''dyke''' refers to a natural or artificial slope or wall to regulate water levels, called '''levee''' in US English. | |
| | |
| For more information, see also: https://en.wikipedia.org/wiki/Dyke & https://en.wikipedia.org/wiki/Levee
| |
| | |
| ==Three distinct implementations of Dikes==
| |
| | |
| ===River Flood Protection===
| |
| : Along some of the larger rivers in the world (Rhine, Mississippi) elaborate levee structures have been constructed to prevent the river and its delta from flooding the banks.
| |
| | |
| ===Coastal Flood Protection===
| |
| : Many coastal flatlands are protected by complex flood defenses, for example the sea wall at Vancouver BC (Canada). An extreme example is the Netherlands, where huge levee structures such as the Delta works protect against coastal inundations. Besides protecting the landmass, these huge dikes are also used in the Netherlands to claim more land that was originally below mean sea level.
| |
| | |
| ===Spur dykes or groynes===
| |
| : These man made constructions are implemented as erosion prevention. These dikes are usually constructed at an angle to the bank or coast, and can be found in inland rivers and canals, and at the sea coast. They are for instance deployed in the 'Room for the Rivers' project in the Netherlands to counter bank erosion.
| |
| <gallery>
| |
| File:DikesRiverDike-Q3-2015.jpg|River dike
| |
| File:DikeCoastalDikeNL-Q3-2015.jpg|Coastal flood protection
| |
| File:DikesGroynes-Q3-2015.jpg|Spur dikes/ groynes
| |
| </gallery>
| |
| | |
| =How do Dikes relate to the Tygron Engine?=
| |
| Water management is an important factor of spatial planning. Dikes (or levees) are some of the most basic water management measures that can be implemented; just build a wall and keep the water out!
| |
| | |
| In the Tygron Engine these Dikes play a special part. As dedicated [[constructions]] they can affect [[Terrains#Safe Zone Terrain|safe zone terrains]] and [[Terrains#Flooding Terrain|floods]]. By constructing a Dike as an independent [[Actions|action]] or as part of a [[Predefined Measures|measure]], the safe zone terrain will be expanded, protecting more houses and industry when a flood occurs. This can all be visualized in the Tygron Engine and a dedicated [[Indicators|indicator]] can be set up to have the implementation of levees score on the [[stakeholder]] progression.
| |
| <gallery> | | <gallery> |
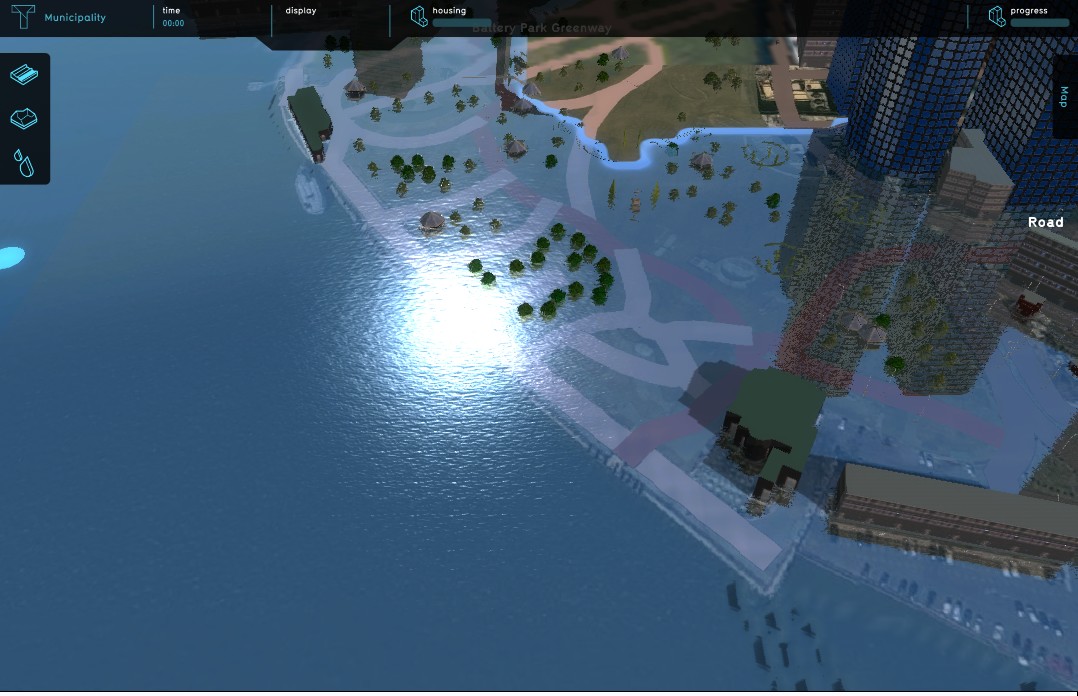
| File:DikesLMBefore-Q3-2015.jpg|High water in Lower Manhattan, before flood protection | | File:DikesLMBefore-Q3-2015.jpg|High water in Lower Manhattan, before flood protection |
| Line 34: |
Line 10: |
| </gallery> | | </gallery> |
|
| |
|
| =Different ways of deploying Dikes in the Tygron Engine= | | =Different ways of deploying levees in the {{software}}= |
| In the Tygron Engine are two ways present to implement Dikes in a project; drawn in manually during the session as action, or deployed as part of a (predefined) measure. | | In the {{software}} are two ways present to implement levees in a project; drawn in manually during the session as action, or deployed as part of a [[measure]] using [[LeveeSpatial]]s. |
|
| |
|
| Implementation as action allows for trying out new plans and ideas. This can for instance be convenient when the project is part of an outreach to non-planners, for example residents or business owners, to let them try their own plans and ideas without an engineer pre-planning the flood protection for them. This can give session participants a stronger sentiment of involvement with the project. | | Implementation as action allows for trying out new plans and ideas. This can for instance be convenient when the project is part of an outreach to non-planners, for example residents or business owners, to let them try their own plans and ideas without an engineer pre-planning the flood protection for them. This can give session participants a stronger sentiment of involvement with the project. |
|
| |
|
| On the other hand, deploying the dikes as part of a predefined measure enables a project to quickly switch between different pre-planned alignments, in order to visualize the impact of each alignment on the indicators. | | On the other hand, deploying the levees as part of a predefined measure enables a project to quickly switch between different pre-planned alignments, in order to visualize the impact of each alignment on the indicators. |
| | |
| ==Manually drawn in as an Action==
| |
| {{Editor ribbon|header=3D World|bar=Dike Types|dropdown=Add new Dike Type}}
| |
| | |
| {{Editor steps|title=implement dikes/ levees as Action|Select 3D World → Dike Types → Add new Dike Type|Select the newly created Dike entry in the left panel|On the right panel, change the name to something more suitable|Change the image, or upload a new image|Enter a description to describe the new levee|Change or remove the top and side function of the dike|Select the check box in case the levee has a fixed size|Enter default height and width|Select Stakeholders → Actions|Add a new action (if desired)|Select Assigned Actions|Add new levee to Assigned actions by marking check box on right panel}}
| |
| <br>
| |
| <gallery mode=nolines>
| |
| File:DikeActionAddNew-Q3-2015.jpg|1. Select Add new Dike Type
| |
| File:DikeActionSelectNew-Q3-2015.jpg|2. Select new entry on left panel
| |
| File:DikeActionChangeName-Q3-2015.jpg|3. Change name on right panel
| |
| File:DikeActionChangeImage-Q3-2015.jpg|4. Change image on right panel
| |
| File:DikeActionChangeDescription-Q3-2015.jpg|5. Enter a description on the right panel
| |
| File:DikeActionChangeFunction-Q3-2015.jpg|6. Change or remove the top and side function of the dike
| |
| File:DikeActionSelectFixedSize-Q3-2015.jpg|7. Select if levee has fixed size
| |
| File:DikeActionEnterDefaultSize-Q3-2015.jpg|8. Enter default height and width
| |
| File:DikeActionSelectActions-Q3-2015.jpg|9. Select Stakeholders → Actions
| |
| File:DikeActionAddNewActions-Q3-2015.jpg|10. Add new Action (if desired)
| |
| File:DikeActionSelectAssignedActions-Q3-2015.jpg|11. Select Assigned Actions
| |
| File:DikeActionAddLeveeToActionMenu-Q3-2015.jpg|12. Add new levee to Assigned Actions
| |
| </gallery>
| |
| | |
| ===Editing properties of a Dike as Action===
| |
| The following properties can be edited of a new or already existing Dike that is set up as an action:
| |
| ====Name====
| |
| [[File:DikeActionNameField-Q3-2015.jpg|right|frame|Enter new name]]
| |
| : In the name field ion the right panel, the default name can be replaced by entering a more suitable name. This can be for instance a reference to the top and side functions (see below).
| |
| <br>
| |
| ====Image====
| |
| [[File:DikeActionImageField-Q3-2015.jpg|right|frame|Select image to change it]]
| |
| : By selecting the Image field, a new panel will open. Here the user can select a new image, or upload a custom asset to be used as image. When uploading a new asset, the image (a ''png'' file) must adhere to the resolution of 200x200 pixels.
| |
| <br>
| |
| ====Description====
| |
| [[File:DikeActionDescriptionField-Q3-2015.jpg|frame|right|Describe the Dike here]]
| |
| : The description field on the right panel allows for a descriptive text to accompany the Dike. This can be a description of the top and side functions and/ or the impact thereof on the indicators. This is also a good space to elaborate on the dedicated name given earlier.
| |
| | |
| ====Top & side functions====
| |
| ====Fixed size====
| |
| ====Height & width====
| |
| | |
| ==Deployed as part of a (predefined) Measure==
| |
| | |
| : ''Note: it is currently only possible to assign functions to the top and side of a dike when deployed as an Action.''
| |
| | |
| {{Editor ribbon|header=Stakeholders|bar=Measures|dropdown=Add Spatial Measure}}
| |
| | |
| {{Editor steps|title=implement dikes/ levees as predefined Measure|Select Stakeholders → Measures → Add Spatial Measure|Open the MeasureSpatials entry|Select the WATER 1 (default) entry|On the right panel, select DIKE as type from the drop down menu on the right panel|Set relative and absolute height on the right panel|Use brush panel to draw Outer Area, and apply|Use brush panel to draw Inner Area, and apply|Select Stakeholders → Actions|Add new action (if desired)|Select Assigned Actions|Add new Measure to Assigned Actions on the right panel}}
| |
| <br>
| |
| <gallery mode=nolines>
| |
| File:DikeMeasureAddSpatialMeasures-Q3-2015.jpg|1. Select Add Spatial Measure
| |
| File:DikeMeasureOpenMeasureSpatials-Q3-2015.jpg|2. Open the MeasureSpatials entry
| |
| File:DikeMeasureSelectDefault-Q3-2015.jpg|3. Highlight the WATER 1 (default) entry
| |
| File:DikeMeasureSelectType-Q3-2015.jpg|4. Select DIKE from the drop down menu
| |
| File:DikeMeasureSetHeight-Q3-2015.jpg|5. Set relative and absolute height
| |
| File:DikeMeasureDrawOuterArea-Q3-2015.jpg|6. Draw Outer Area
| |
| File:DikeMeasureDrawInnerArea-Q3-2015.jpg|7. Draw Inner Area
| |
| File:DikeActionSelectActions-Q3-2015.jpg|7. Select Stakeholders → Actions
| |
| File:DikeActionAddNewActions-Q3-2015.jpg|8. Add new Action (if desired)
| |
| File:DikeActionSelectAssignedActions-Q3-2015.jpg|10. Select Assigned Actions
| |
| File:DikeMeasureAddMeasureToActionMenu-Q3-2015.jpg|11. Add new Measure to Assigned Actions
| |
| </gallery>
| |
|
| |
|
| ===Properties of a Dike as (predefined) Measure=== | | {{article end |
| ====Type====
| | |howtos= |
| ====Relative and absolute height====
| | * [[How to add a Levee Type to an Action Menu]] |
| ====Outer area====
| | * [[How to edit properties of a Levee Type]] |
| ====Inner area====
| | * [[How to add a Levee Spatial to a Measure]] |
| | * [[How to edit properties of a Levee Spatial]] |
| | |seealso= |
| | * [[LeveeSpatial]] |
| | * [[Measure]] |
| | * [[Action Menu]] |
| | }} |
| | {{Template:Editor_future_design_nav}} |
| | [[Category:Levee Type]][[Category:Items]] |