Handout Watershed Module: Difference between revisions
No edit summary |
No edit summary |
||
| (21 intermediate revisions by 2 users not shown) | |||
| Line 1: | Line 1: | ||
This handout can be used for an advanced water training course. | This handout can be used for an advanced water training course about the [[Watershed_Module|Watershed module]]. | ||
{{clear}} | {{clear}} | ||
'''How to use:''' | '''How to use:''' Advice is to print this handout and use it during the training to take notes. Afterwards, you will have a summary of what you have learned during the training. {{clear}} | ||
'''Note:''' This handout is not a complete standalone tutorial but provides | '''Project''': The steps in the handout can be applied on the Demo Watershed project. {{clear}} | ||
'''Note:''' This handout is not a complete standalone tutorial but provides a guide for during a training. To learn more about the Watershed Module, see the [[Demo_Watershed_Project|Demo Watershed Project]] in where results and settings are explained. | |||
{{clear}} | {{clear}} | ||
The subjects in this hand out are: | The subjects in this hand out are: | ||
* Add and configure a Rainfall Overlay | * Add and configure a Rainfall Overlay | ||
* | * Add and configure the Watershed Overlay | ||
* Export results | * Export results | ||
===Open project=== | ===Open project=== | ||
# Log in wih your username and password on the LTS | # Log in wih your username and password on the [[Roadmap#engine.tygron.com_.28Long_Term_Support.29|LTS]]. | ||
# Click on Edit project and choose the Demo Watershed project. Choose your preferred language. | # Click on Edit project and choose the Demo Watershed project. Choose your preferred language. | ||
=== Remove overlays === | === Remove overlays === | ||
# In the Current Situation tab, click on the button Overlays | # In the [[Current_Situation|Current Situation tab]], click on the button Overlays | ||
# From the left panel, select the Rainfall overlay and click on the Remove button in the bottom left corner. | # From the left panel, select the Rainfall overlay and click on the Remove button in the bottom left corner. | ||
# Also remove the Watershed Overlay. | # Also remove the Watershed Overlay. | ||
[[File:Remove_overlays.png| | [[File:Remove_overlays.png|400px]] | ||
{{page break}} | |||
=== Add the Rainfall Overlay === | === Add the Rainfall Overlay === | ||
# In the Current Situation tab, hover over the Overlay button and add from the Water category the Rainfall Overlay. | # In the [[Current_Situation|Current Situation tab]], hover over the Overlay button and add from the Water category the [[Rainfall_Overlay|Rainfall Overlay]]. | ||
# In the left panel, notice that the Rainfall Overlay is added to the project. | # In the left panel, notice that the Rainfall Overlay is added to the project. | ||
# | # In the left panel, select the Rainfall Overlay and click in the right panel on the Configuration wizard. In the following steps this [[Water_Overlay_Wizard|Water Overlay Wizard]] will be completed to configure settings for the rainfall. | ||
[[File:Open_rainfall_wizard.png| | [[File:Open_rainfall_wizard.png|700px]] | ||
=== Configure Rainfall Overlay === | === Configure Rainfall Overlay === | ||
| Line 31: | Line 33: | ||
# Configure the Rainfall as can be seen in the image below: | # Configure the Rainfall as can be seen in the image below: | ||
[[File:Configure_rainfall.png | [[File:Configure_rainfall.png]] | ||
# Click on Next until you are at step 5. Notice that the culverts are already imported | |||
# In step 5, check the Surface | {{page break}} | ||
# In step 5.1 set the number of timeframes to 100. | # Click on Next until you are at step 5. Notice that the [[Culvert_(Water_Overlay)|culverts]] are already imported in the project. | ||
# In step 5, check the [[Surface_avg_direction_result_type_(Water_Overlay)|Surface Avg Direction type]]. | |||
# In step 5.1 set the number of timeframes to 100. | |||
[[File:Result_types_rainfall.png|600px]] | |||
# Click on Next until the wizard is Finished. The Rainfall Overlay is now being calculated. | # Click on Next until the wizard is Finished. The Rainfall Overlay is now being calculated. | ||
# Play the Rainfall overlay by clicking on the play button in the legend bar, you will see the water on the surface. Also take a look at the | # Play the Rainfall overlay by clicking on the play button in the legend bar, you will see the water on the surface. Also take a look at the Surface Avg Direction result type. Remember from which timeframe the flow direction remains approximately the same. | ||
[[File:Results_kockengen.JPG|500px]] | |||
[[File: | |||
=== Add the Watershed Overlay === | === Add the Watershed Overlay === | ||
# In the Current Situation tab, hover over the Overlay button and add from the Water category the Watershed Overlay. | # In the [[Current_Situation|Current Situation tab]], hover over the Overlay button and add from the Water category the [[Watershed_Overlay|Watershed Overlay]]. | ||
# In the left panel, notice that the Watershed Overlay is added to the project. | # In the left panel, notice that the Watershed Overlay is added to the project. | ||
# Select the Watershed Overlay and click in the right panel on Configuration Wizard. In the following steps the Watershed Overlay will be configured. | # Select the Watershed Overlay and click in the right panel on the Configuration Wizard button. In the following steps the Watershed Overlay will be configured. | ||
[[File:Add_watershed.png| | [[File:Add_watershed.png|700px]] | ||
{{page break}} | |||
=== Configure the Watershed Overlay === | |||
* In step 1 of the Watershed Wizard, choose for the option Water Flow Direction and choose the Surface Avg Direction result type. Select also the timeframe from where the flow direction remains approximately the same. | |||
[[File:Step1_Water_flow_direction.png]] | |||
* Choose in step 2 the third option: Specified discharge areas. In this project the [[Discharge_area_(Watershed_Overlay)|discharge areas]] are already imported (see the Pumping stations (Gemalen) Overlay with the two areas Area A and Area B). | |||
* Click on Next. | |||
[[File:Step2_discharge_areas.png]] | |||
* In step 2.1, select the option Select existing Discharge areas, since the discharge areas are already imported. Select the common attribute of these areas. From this attribute, the {{software}} can recognize the areas. In this case the common attribute is UIT. Select this attribute and click on Next. | |||
[[File:Select_discharge_areas.png]] | |||
* Select in step 3 all four the [[Result_type_(Watershed_Overlay)|result types]] and set the [[Fill_distance_(Watershed_Overlay)|Fill distance]] on 0. With the Fill distance attribute, gaps in the watershed areas are not filled. Click on Next. | |||
[[File:Step3_result_types.png]] | |||
* Check the [[Culvert_flow_direction_(Watershed_Overlay)|Use culvert flow direction]] option to use the flow direction in Culverts to determine the discharge areas. Finish the wizard. | |||
[[File:Step4_advanced_options.png]] | |||
* View the result types of the Watershed Overlay. To learn more about the [[Watershed_Module|Watershed Module]], see the [[Demo_Watershed_Project|Demo Watershed Project]] in where results and settings are explained. | |||
=== Export results === | |||
For most use cases with the Watershed Module, it is desired to post process the watershed areas in a GIS. Therefore the data needs to be exported. There are different ways to [[Export_Geo_data|export data]]. In the next steps, a few of them are mentioned. | |||
* Click on the button Overlays and select the Watershed overlay. In the right panel, click on Export Grid Data. | |||
[[File:Export_grid_data.png|700px]] | |||
* In the new panel that pops up, select the Watershed Overlay and as format [[GeoTIFF]]. Click on Export File. You can now select a location to save this rasterfile of the Watershed Overlay. The values in the raster references the [[ID]] of the input discharge areas (in this project Area A and Area B). In this way it is also possible to download for example one or all timeframes of the Rainfall Overlay. | |||
[[File:Export_geotiff.png|400px]] | |||
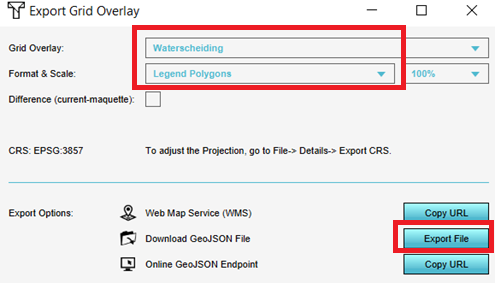
* Click again on Export Grid Data and select as format [[How_to_export_a_Grid_Overlay_as_GeoJSON|Legend Polygons]]. Click on Export File. Now you have downloaded a vector file (GeoJSON). | |||
[[File:Export_legend_polygons.png|400px]] | |||
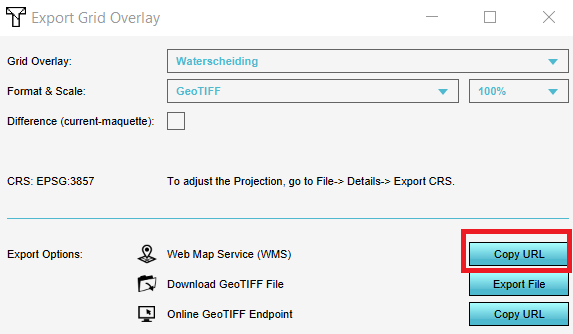
* Click again on Export Grid Data and click on Copy URL. You have now downloaded the WMS URL. You can add this URL to a GIS to view the Overlays. Read more about WMS on [[WMS|this page]]. | |||
[[File:Copy_WMS_URL.png|400px]] | |||
Latest revision as of 13:07, 17 January 2022
This handout can be used for an advanced water training course about the Watershed module.
How to use: Advice is to print this handout and use it during the training to take notes. Afterwards, you will have a summary of what you have learned during the training.
Project: The steps in the handout can be applied on the Demo Watershed project.
Note: This handout is not a complete standalone tutorial but provides a guide for during a training. To learn more about the Watershed Module, see the Demo Watershed Project in where results and settings are explained.
The subjects in this hand out are:
- Add and configure a Rainfall Overlay
- Add and configure the Watershed Overlay
- Export results
Open project
- Log in wih your username and password on the LTS.
- Click on Edit project and choose the Demo Watershed project. Choose your preferred language.
Remove overlays
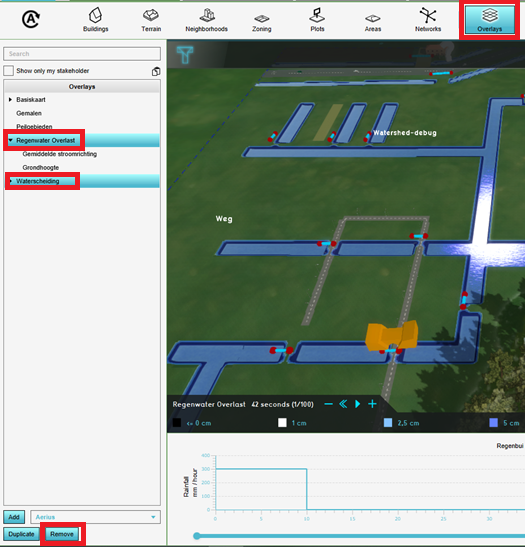
- In the Current Situation tab, click on the button Overlays
- From the left panel, select the Rainfall overlay and click on the Remove button in the bottom left corner.
- Also remove the Watershed Overlay.
Add the Rainfall Overlay
- In the Current Situation tab, hover over the Overlay button and add from the Water category the Rainfall Overlay.
- In the left panel, notice that the Rainfall Overlay is added to the project.
- In the left panel, select the Rainfall Overlay and click in the right panel on the Configuration wizard. In the following steps this Water Overlay Wizard will be completed to configure settings for the rainfall.
Configure Rainfall Overlay
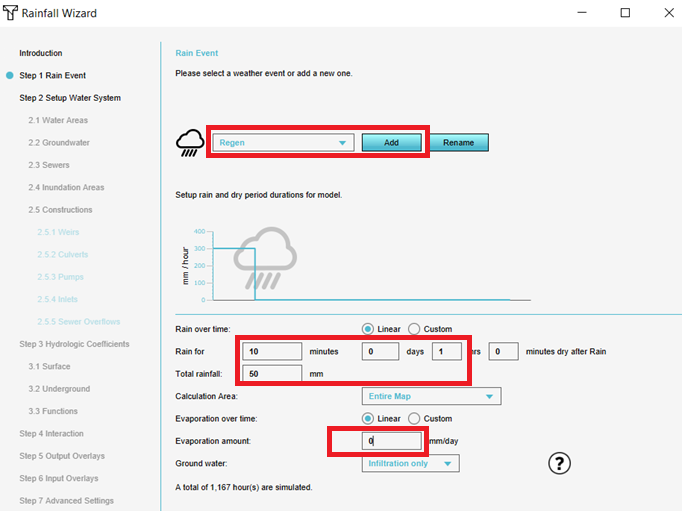
- In step 1 of the Rainfall Wizard, click on Add to add a new rainfall.
- Configure the Rainfall as can be seen in the image below:
- Click on Next until you are at step 5. Notice that the culverts are already imported in the project.
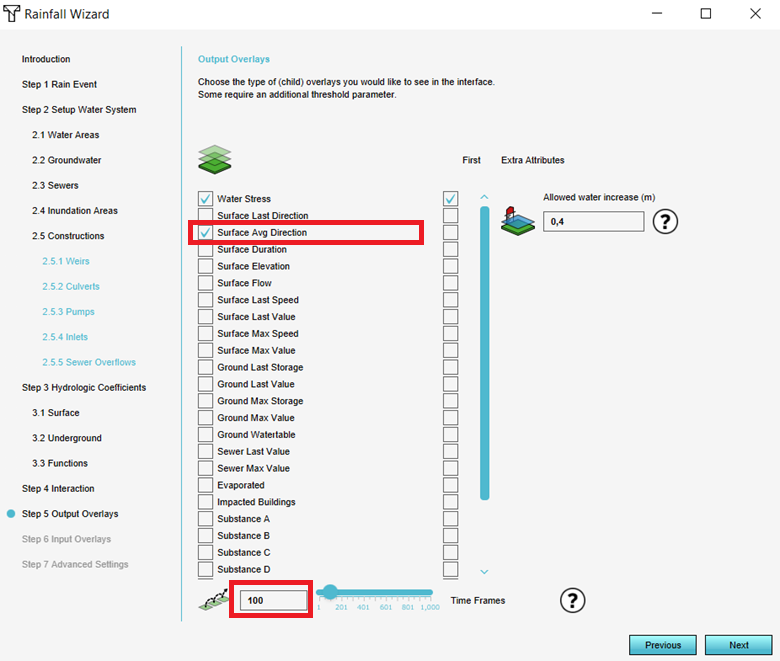
- In step 5, check the Surface Avg Direction type.
- In step 5.1 set the number of timeframes to 100.
- Click on Next until the wizard is Finished. The Rainfall Overlay is now being calculated.
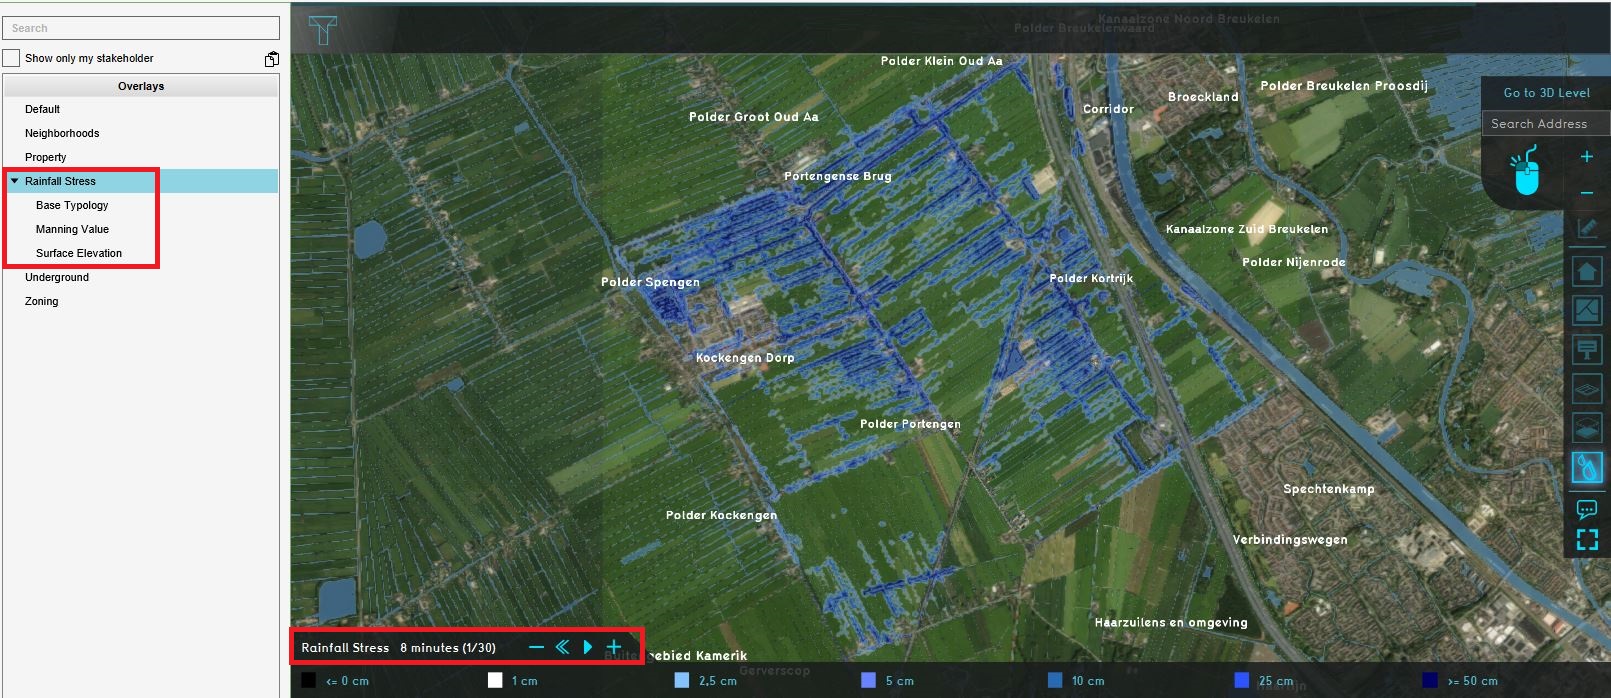
- Play the Rainfall overlay by clicking on the play button in the legend bar, you will see the water on the surface. Also take a look at the Surface Avg Direction result type. Remember from which timeframe the flow direction remains approximately the same.
Add the Watershed Overlay
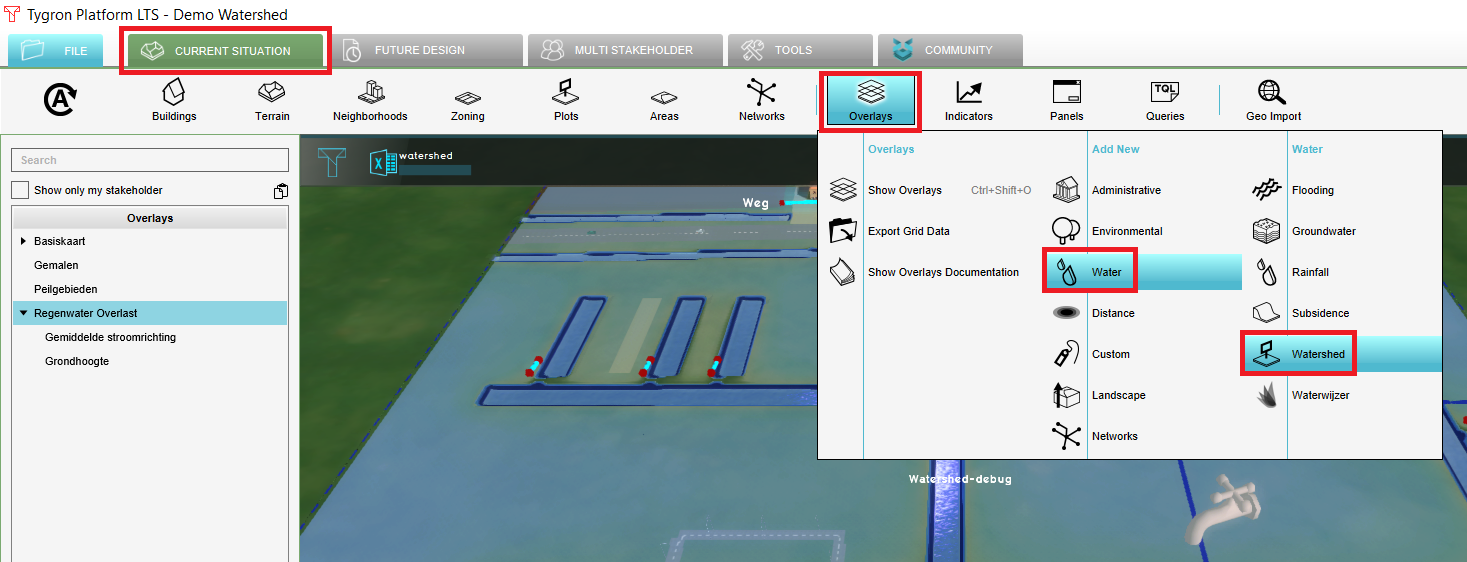
- In the Current Situation tab, hover over the Overlay button and add from the Water category the Watershed Overlay.
- In the left panel, notice that the Watershed Overlay is added to the project.
- Select the Watershed Overlay and click in the right panel on the Configuration Wizard button. In the following steps the Watershed Overlay will be configured.
Configure the Watershed Overlay
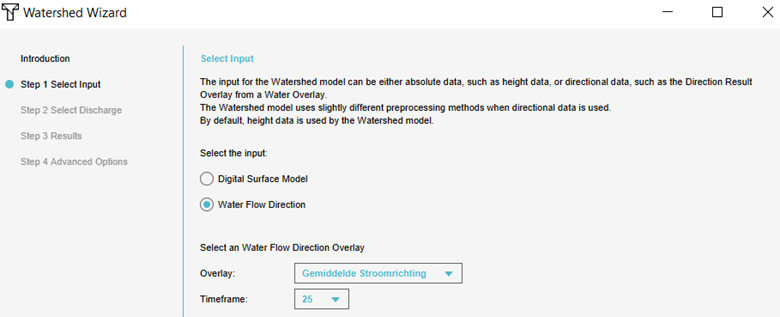
- In step 1 of the Watershed Wizard, choose for the option Water Flow Direction and choose the Surface Avg Direction result type. Select also the timeframe from where the flow direction remains approximately the same.
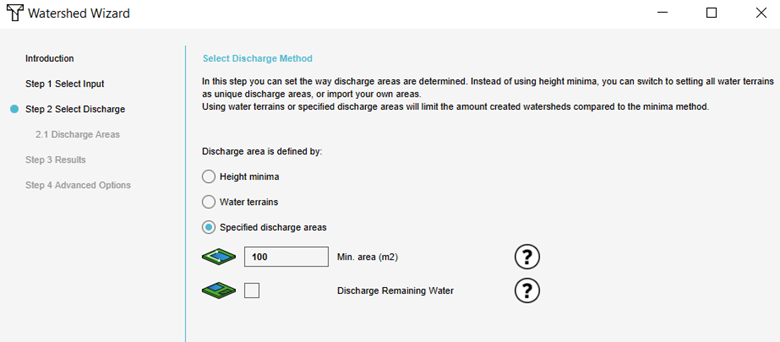
- Choose in step 2 the third option: Specified discharge areas. In this project the discharge areas are already imported (see the Pumping stations (Gemalen) Overlay with the two areas Area A and Area B).
- Click on Next.
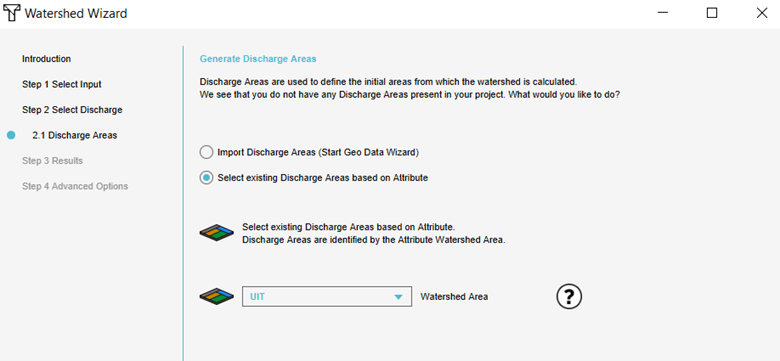
- In step 2.1, select the option Select existing Discharge areas, since the discharge areas are already imported. Select the common attribute of these areas. From this attribute, the Tygron Platform can recognize the areas. In this case the common attribute is UIT. Select this attribute and click on Next.
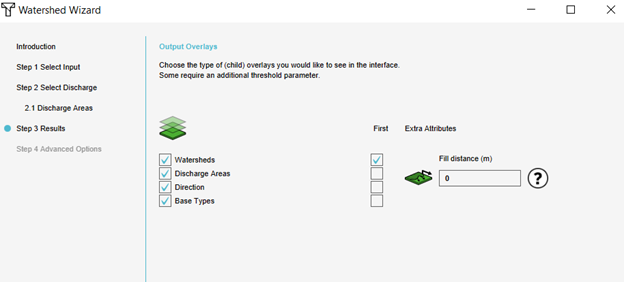
- Select in step 3 all four the result types and set the Fill distance on 0. With the Fill distance attribute, gaps in the watershed areas are not filled. Click on Next.
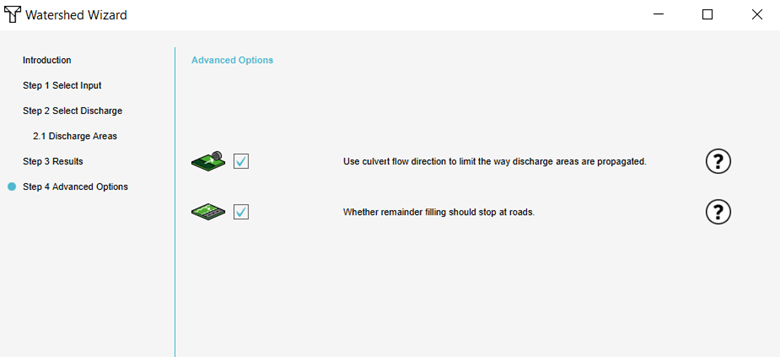
- Check the Use culvert flow direction option to use the flow direction in Culverts to determine the discharge areas. Finish the wizard.
- View the result types of the Watershed Overlay. To learn more about the Watershed Module, see the Demo Watershed Project in where results and settings are explained.
Export results
For most use cases with the Watershed Module, it is desired to post process the watershed areas in a GIS. Therefore the data needs to be exported. There are different ways to export data. In the next steps, a few of them are mentioned.
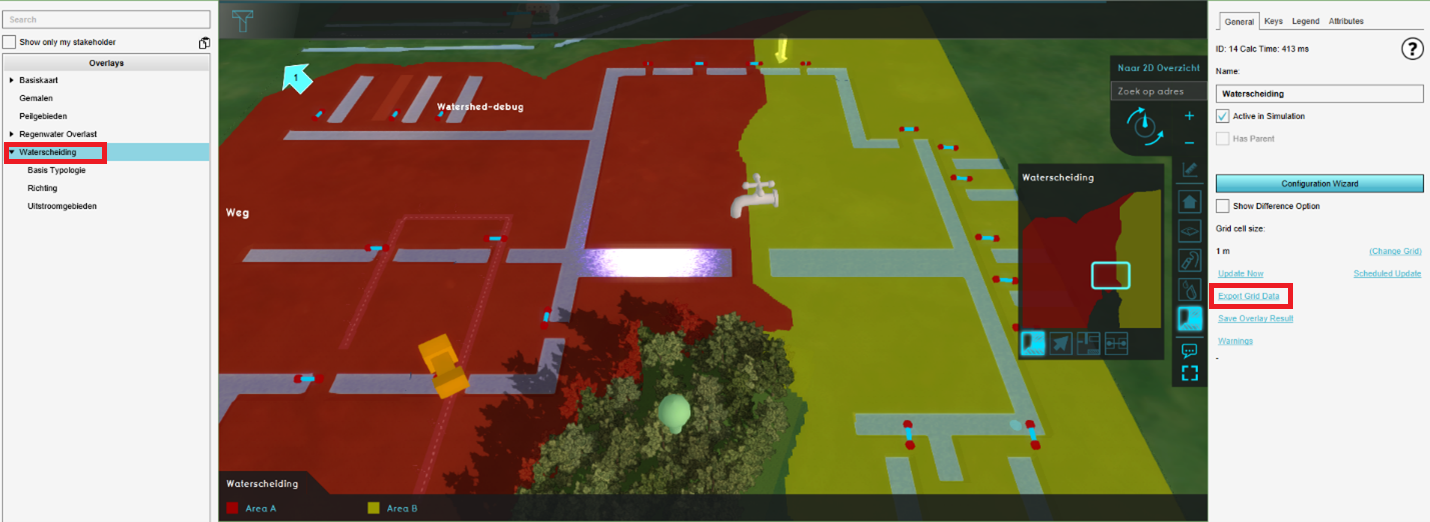
- Click on the button Overlays and select the Watershed overlay. In the right panel, click on Export Grid Data.
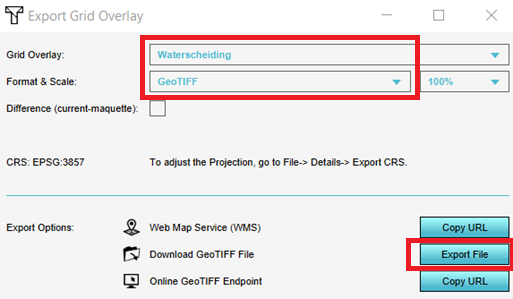
- In the new panel that pops up, select the Watershed Overlay and as format GeoTIFF. Click on Export File. You can now select a location to save this rasterfile of the Watershed Overlay. The values in the raster references the ID of the input discharge areas (in this project Area A and Area B). In this way it is also possible to download for example one or all timeframes of the Rainfall Overlay.
- Click again on Export Grid Data and select as format Legend Polygons. Click on Export File. Now you have downloaded a vector file (GeoJSON).
- Click again on Export Grid Data and click on Copy URL. You have now downloaded the WMS URL. You can add this URL to a GIS to view the Overlays. Read more about WMS on this page.
