How to rasterize walls for grid calculations: Difference between revisions
Jump to navigation
Jump to search
No edit summary |
No edit summary |
||
| (3 intermediate revisions by 2 users not shown) | |||
| Line 6: | Line 6: | ||
| Add a [[Heightmap Overlay]], configured as [[DTM]], to the [[Project]] (if it does not exist yet) | | Add a [[Heightmap Overlay]], configured as [[DTM]], to the [[Project]] (if it does not exist yet) | ||
| Add a [[Heightmap Overlay]], configured as [[DSM]], to the [[Project]] (if it does not exist yet) | | Add a [[Heightmap Overlay]], configured as [[DSM]], to the [[Project]] (if it does not exist yet) | ||
| {{howtoblock | image= | | {{howtoblock | image=dsm averaging.jpg | ||
| Add an [[Average Overlay]] to the [[Project]] with the following configuration | Name: | | Add an [[Average Overlay]] to the [[Project]] with the following configuration | Name: DSM Smoothing | Set the averaging to the [[DSM]] [[Heightmap Overlay]]. | Set the averaging distance to approximately 2.5 times the [[grid cell size]]. }} | ||
| {{howtoblock | image= | | {{howtoblock | image=wall combo overlay.jpg | ||
| Add a [[Combo Overlay]] to the [[Project]] with the following configuration: | Name: Walls | Input A: [[DTM]] Overlay | Input B:[[DSM]] Overlay | Input C:" | | Add a [[Combo Overlay]] to the [[Project]] with the following configuration: | Name: Walls | Input A: [[DTM]] Overlay | Input B:[[DSM]] Overlay | Input C:"DSM Smoothing" Overlay | Formula: AND(GT(SUB(C, A), 1), GT(SUB(C, B), 1)) }} | ||
| {{howtoblock | image= | | {{howtoblock | image=wall combo overlay legend.jpg | ||
| Modify the legend of the [[Combo Overlay]] to have only the following values: | Value 0: No wall | Value 1: Wall }} | | Modify the legend of the [[Combo Overlay]] to have only the following values: | Value 0: No wall | Value 1: Wall }} | ||
}} | }} | ||
| Line 16: | Line 16: | ||
{{article end | {{article end | ||
|notes= | |notes= | ||
* This calculations performs an estimation of the locations of walls, and may miss spots. This calculation should therefor not be taken at absolute value, but can be used as a valid estimation in other calculations, such as the percentage of walls which also overlaps with specific [[Distance | * This calculations performs an estimation of the locations of walls, and may miss spots. This calculation should therefor not be taken at absolute value, but can be used as a valid estimation in other calculations, such as the percentage of walls which also overlaps with specific [[Sight Distance Overlay|sight-lines]]. | ||
* The formula of the [[Combo Overlay]] checks whether the localized average [[DSM]] exceeds the absolute height by at least 1 meter, which generally means that the height of a wall should be at least 2 meters high. By changing the "1" into a lower or higher number, the approximation can be made more or less sensitive respectively. | * The formula of the [[Combo Overlay]] checks whether the localized average [[DSM]] exceeds the absolute height by at least 1 meter, which generally means that the height of a wall should be at least 2 meters high. By changing the "1" into a lower or higher number, the approximation can be made more or less sensitive respectively. | ||
}} | }} | ||
[[Category:How-to's]] | |||
Latest revision as of 15:54, 30 January 2024
For some calculations, it may be relevant to know where the walls of structures exist. This is a trivial consideration, but a bit more complex to implement in a geographical calculation. However, by using some localized checks on the behavior and local changes of elevation models, it is possible to create a spatial calculation which can find the locations of walls of structures.
How to rasterize walls for grid calculations:
- Add a Heightmap Overlay, configured as DTM, to the Project (if it does not exist yet)
- Add a Heightmap Overlay, configured as DSM, to the Project (if it does not exist yet)
- Add an Average Overlay to the Project with the following configuration
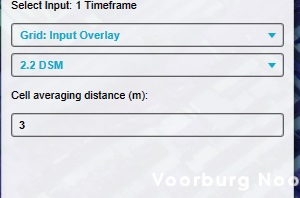
Name: DSM Smoothing
Set the averaging to the DSM Heightmap Overlay.
Set the averaging distance to approximately 2.5 times the grid cell size. - Add a Combo Overlay to the Project with the following configuration:
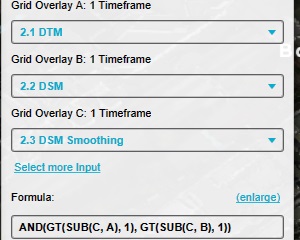
Name: Walls
Input A: DTM Overlay
Input B:DSM Overlay
Input C:"DSM Smoothing" Overlay
Formula: AND(GT(SUB(C, A), 1), GT(SUB(C, B), 1)) - Modify the legend of the Combo Overlay to have only the following values:
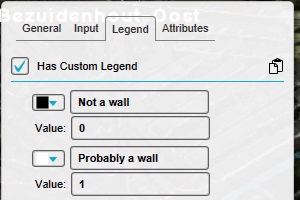
Value 0: No wall
Value 1: Wall


Notes
- This calculations performs an estimation of the locations of walls, and may miss spots. This calculation should therefor not be taken at absolute value, but can be used as a valid estimation in other calculations, such as the percentage of walls which also overlaps with specific sight-lines.
- The formula of the Combo Overlay checks whether the localized average DSM exceeds the absolute height by at least 1 meter, which generally means that the height of a wall should be at least 2 meters high. By changing the "1" into a lower or higher number, the approximation can be made more or less sensitive respectively.