Water stress (Indicator): Difference between revisions
(File:ID adjustment.PNG) |
|||
| Line 40: | Line 40: | ||
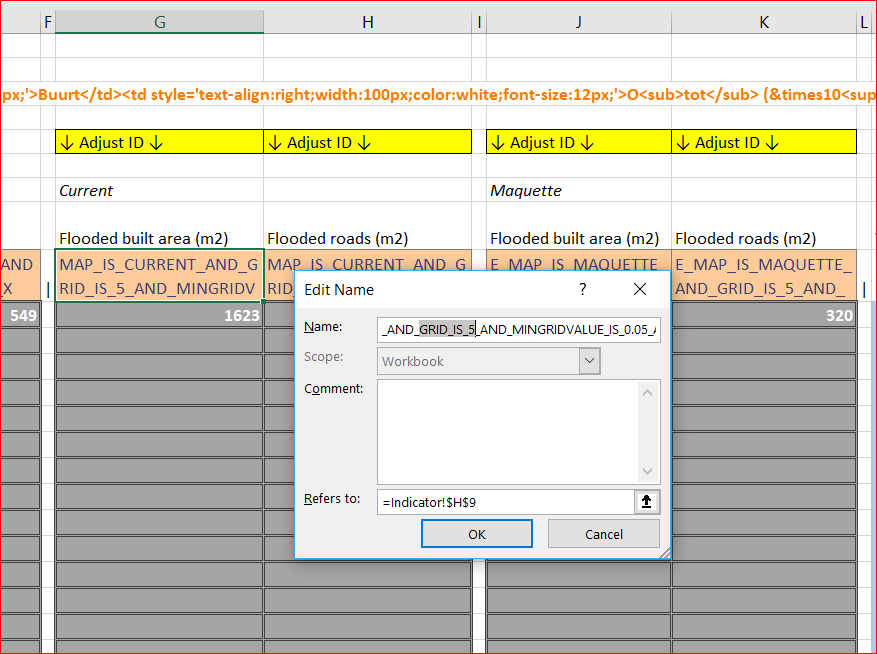
[[File:ID_adjustment.PNG|thumb|300px|right|Figure 2. The ID's in queries can be changed through the Name Manager.]] | [[File:ID_adjustment.PNG|thumb|300px|right|Figure 2. The ID's in queries can be changed through the Name Manager.]] | ||
In the Excel file the ID of the [[Rainfall (Overlay)|Rainfall Overlay]] needs to be changed in the TQL queries in cells G9, H9, J9 and K9. | In the Excel file the ID of the [[Rainfall (Overlay)|Rainfall Overlay]] needs to be changed in the TQL queries in cells G9, H9, J9 and K9. | ||
{{Editor steps|title=|Open the | {{Editor steps|title=|Open the downloaded Excel spreadsheet from the Index.|On the Formulas tab, in the Define Names group, click the Name Manager.|Edit the 4 names containing GRID_IS_5 and change the ID to the correct number (Fig. 2).|For clarity adjust the corresponding cell formulas accordingly.|Save your changes and [[Excel#Uploading_and_Downloading| update the indicator file]] in your project.| Hover over the [[Calculation_panel|Calculation panel]] and choose for ''Reset X Queries (slower)'' to update your project.}} | ||
Revision as of 14:52, 9 May 2019
General
What is the water stress indicator?
The Water stress indicator yields insight into the flood resilience of built areas (default: neighborhoods) based on the fraction of total built area in that area which inundates beyond the preconfigured threshold inundation level (default: 0.05 m). Despite it being only a rather simplistic measure, it differentiates well between the more resilient (usually greener) areas and those less capable of dealing with excessive inflow of water.
The indicator can prove especially suitable for:
- standardized stress testing, as it provides information on the individual and mean performance of the neighborhoods after having been exposed to, for instance, an hour-long, 60-mm/h rainfall event.
The most straightforward measures to improve flood resilience and, therefore, the indicator score are local increase of water drainage and/or water storage which can be attained by replacing paved (impermeable) surface with green (e.g., grass).
By default the area type under consideration are neighborhoods and the inundation threshold is set at 0.05 m (i.e., a 5-cm thick layer of water across the built area of a neighborhood). These parameters can be manually changed according the user's wishes by simply editing the Excel indicator file.
Indicator panel
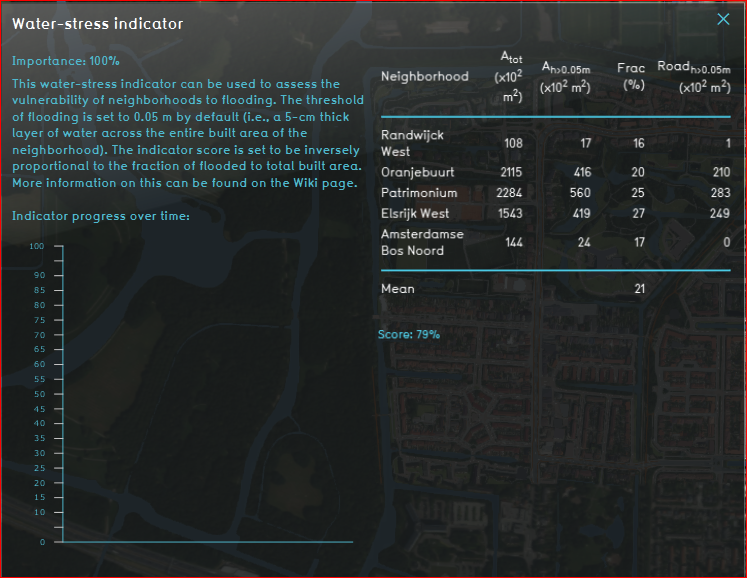
By default the indicator panel (Fig. 1) displays the following information in the columns from left to right:
- Name of the neighborhood
- Total built area (m2)
- Built area exceeding the inundation threshold (m2)
- Ratio between the previous two parameters (%)
- Road/street area exceeding the inundation threshold (m2)
Note: the rightmost column is nothing more than a narrowed-down version of the 3rd column, so its values can never turn out higher.
Calculations
The indicator approximates the built area of a neighborhood using the LOTSIZE function. Then, it measures the part of that area where water accumulation exceeds the threshold of 0.05 m. Next, the ratio of threshold-exceeding over total built area is multiplied by a 100%. In addition, step 2 is repeated but with the threshold-exceeding built area being replaced by threshold-exceeding roads/streets.
Score
A progress bar, that runs from 0 to 100%, keeps the user updated about the current state of the neighborhoods in their project in terms of flood resilience. The indicator score is set to be inversely proportional to the fraction of flooded (i.e., exceeding threshold) to total built area (averaged over the neighborhoods present in the project). For instance, if on average 21% of the built area exceeds threshold, the score will be set to (100-21=) 79%. The user decides whether they whish to display the absolute or relative score. Naturally, a higher score means better flood resilience and vice versa.
Flood resilience is mainly controlled by factors such as water drainage and storage. The easiest way to improve the score is by replacing paved/tarmac surface with green, which will greatly benefit the drainage capacity (i.e., the infiltration rate) of the ground surface. On the other hand, choosing a more porous soil type or implementation of innovative measures, such as green roofs, will contribute to the water storage.
Additional configurations
In order for the indicator to work properly, a variant of the Water Overlay needs to be added to the project, and its ID should match the number (#) as it appears in the queries containing WHERE_GRID_IS_# found in the indicator Excel file. Once an overlay is added, e.g., Rainfall Overlay, its ID can be retrieved through the Query Tool using the query sequence SELECT_ID_WHERE_OVERLAY_IS_<Rainfall>.
Add the Overlay
- In the Editor select 'Current Situation' from the ribbon header.
- Select Overlays from the ribbon bar.
- Select Add Rainfall from the dropdown menu.
- Proceed by implementing a standardized (e.g., 1-h long, 70 mm/h) rainfall event through the Configuration Wizard.
- Hover over the Calculation panel and choose for Reset to Start values (faster) to update your project.
Edit the Excel file
In the Excel file the ID of the Rainfall Overlay needs to be changed in the TQL queries in cells G9, H9, J9 and K9.
- Open the downloaded Excel spreadsheet from the Index.
- On the Formulas tab, in the Define Names group, click the Name Manager.
- Edit the 4 names containing GRID_IS_5 and change the ID to the correct number (Fig. 2).
- For clarity adjust the corresponding cell formulas accordingly.
- Save your changes and update the indicator file in your project.
- Hover over the Calculation panel and choose for Reset X Queries (slower) to update your project.

