How to set dynamic breach height: Difference between revisions
Jump to navigation
Jump to search
mNo edit summary |
No edit summary |
||
| (19 intermediate revisions by 4 users not shown) | |||
| Line 1: | Line 1: | ||
Breaches can be set to have a dynamic breach height, so that over time the [[ | Breaches can be set to have a dynamic breach height, so that over time the [[elevation model (Water Overlay)|terrain]] is heightened or lowered. This can allow a breach to appear or worsen at a later point during the simulated period. It can also allow a breach to be closed over time, or a levee breach to appear after a set period. | ||
See the [[Breach_height_(Water_Overlay)|breach height]] page for more information on how the breach is lowered to the provided values. | |||
{{Editor location|overlay wizard|The Flooding Overlay}} | {{Editor location|overlay wizard|The Flooding Overlay}} | ||
| Line 5: | Line 6: | ||
{{Editor steps|title=set a dynamic breach height for an existing breach. | {{Editor steps|title=set a dynamic breach height for an existing breach. | ||
|Prepare a [[CSV]] file with the desired timing data for the [[Breach height (Water Overlay)|breach height]]. | |Prepare a [[CSV]] file with the desired timing data for the [[Breach height (Water Overlay)|breach height]]. | ||
|Open the [[Water Overlay Wizard|configuration wizard]] of the [[ | |Open the [[Water Overlay Wizard|configuration wizard]] of the [[Flooding Overlay]] and continue to the step concerning [[Breach (Water Overlay)|breach]]es. | ||
|Set the breach height's mode to dynamic, and select 'Select'. This will open the [[CSV importing tool]]. | |Set the breach height's mode to dynamic, and select 'Select'. This will open the [[CSV importing tool]]. | ||
|Select 'Import new CSV', and select the CSV file with the desired timing data. | |Select 'Import new CSV', and select the CSV file with the desired timing data. | ||
| | |Answer the questions about your data format to ensure the file is interpreted correctly. | ||
|The imported values now appear in the CSV importing tool. The CSV importing tool can now be closed. | |The imported values now appear in the CSV importing tool. The CSV importing tool can now be closed. | ||
| | |Continue with the configuration wizard of the Flooding Overlay. | ||
}} | }} | ||
<gallery mode=nolines> | <gallery mode=nolines> | ||
File: | File:Breach_csv.JPG|Example of a CSV file opened in Excel. In the left column the time in seconds is displayed. In the right column the terrain height. | ||
File:Dynamic_bres.JPG|Choose the option dynamic in the wizard and click on select. | |||
File:Import csv.JPG|Choose import CSV and import the created file. | |||
</gallery> | </gallery> | ||
{{article end | |||
|notes= | |||
[[File:Breach_array.JPG|thumb|right|200px| Fill in the values for time and height in the breach height attribute.]] | |||
For breaches open at the start, set the first CSV height value low enough to allow water flow. For breaches that open during simulation, set the initial height equal to the local terrain height. | |||
Dynamic breach heights can also be set manually in the [[Breach (Water Overlay)|breach]]'s [[Breach height (Water Overlay)|breach height]] attribute. | |||
See also the image below. | |||
|seealso= | |||
* [[Breach (Water Overlay)]] | |||
* [[Breach height (Water Overlay)]] | |||
}} | |||
[[Category:How-to's]] | |||
Latest revision as of 11:10, 15 July 2026
Breaches can be set to have a dynamic breach height, so that over time the terrain is heightened or lowered. This can allow a breach to appear or worsen at a later point during the simulated period. It can also allow a breach to be closed over time, or a levee breach to appear after a set period. See the breach height page for more information on how the breach is lowered to the provided values.
Editor → Current Situation (Ribbon tab) → Overlays (Ribbon bar) → The Flooding Overlay (Left panel) → Configuration Wizard (Right panel)
How to set a dynamic breach height for an existing breach.:
- Prepare a CSV file with the desired timing data for the breach height.
- Open the configuration wizard of the Flooding Overlay and continue to the step concerning breaches.
- Set the breach height's mode to dynamic, and select 'Select'. This will open the CSV importing tool.
- Select 'Import new CSV', and select the CSV file with the desired timing data.
- Answer the questions about your data format to ensure the file is interpreted correctly.
- The imported values now appear in the CSV importing tool. The CSV importing tool can now be closed.
- Continue with the configuration wizard of the Flooding Overlay.
-
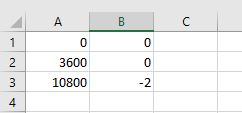 Example of a CSV file opened in Excel. In the left column the time in seconds is displayed. In the right column the terrain height.
 -
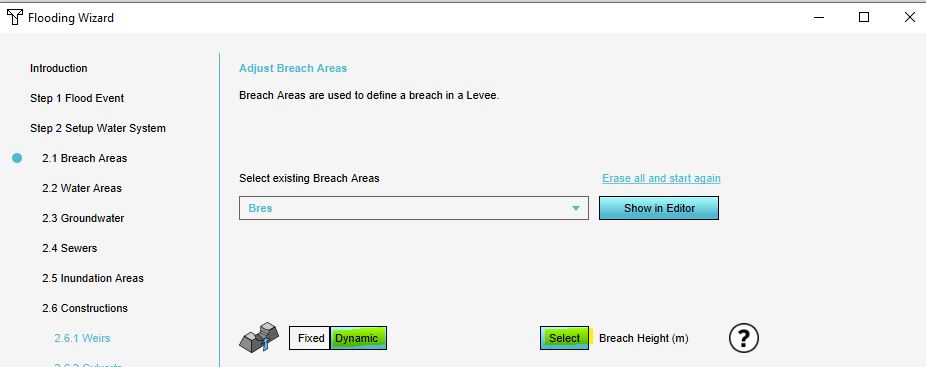 Choose the option dynamic in the wizard and click on select.
 -
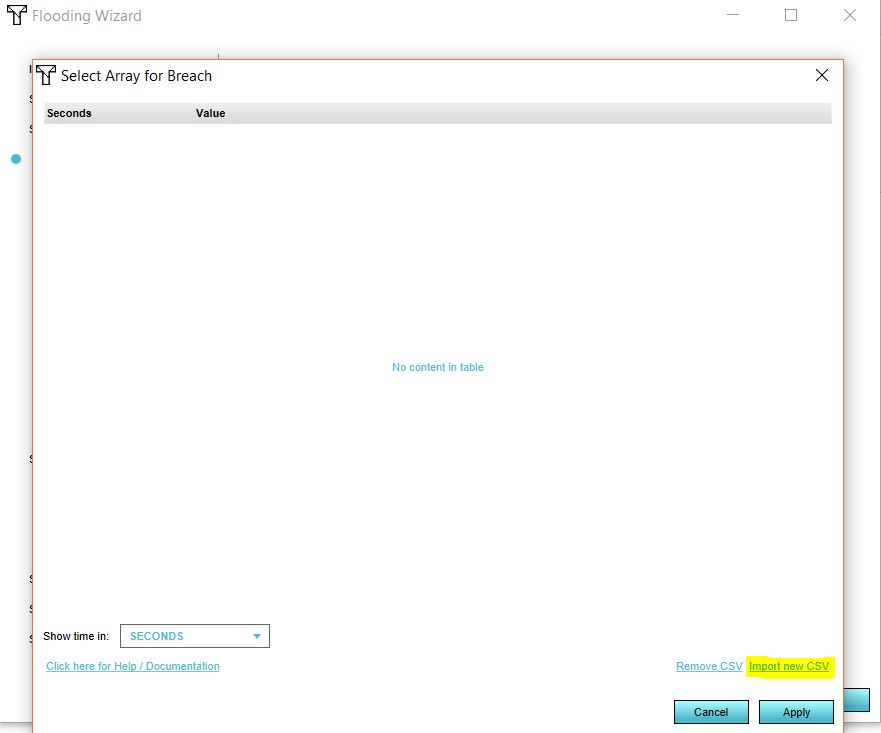 Choose import CSV and import the created file.


Notes

For breaches open at the start, set the first CSV height value low enough to allow water flow. For breaches that open during simulation, set the initial height equal to the local terrain height.
Dynamic breach heights can also be set manually in the breach's breach height attribute. See also the image below.