How to export a Grid Overlay to the GeoShare: Difference between revisions
Jump to navigation
Jump to search
No edit summary |
No edit summary |
||
| (10 intermediate revisions by the same user not shown) | |||
| Line 1: | Line 1: | ||
[[Grid Overlay]]s can be exported as [[ | [[Grid Overlay]]s can be exported as [[GeoTIFF]]s to the GeoShare, either as a backup or as a means to share it with other applications. Additionally, a [[GeoShare Viewer]] can be added that allows users to visualize the Grid overlay results without the need of a [[keep alive]] project [[session]]. | ||
<onlyinclude> | <onlyinclude> | ||
{{editor location|overlays}} | {{editor location|overlays}} | ||
{{editor steps|title=create a GeoShare Viewer | {{editor steps|title=create a GeoShare Viewer | ||
| In the [[Ribbon]], select [[Overlay]]s to show the list of all [[Overlay]]s in the [[Project]]. | | In the [[Ribbon]], select [[Overlay]]s to show the list of all [[Overlay]]s in the [[Project]]. | ||
| Line 8: | Line 7: | ||
| Click on "Export Grid Data". | | Click on "Export Grid Data". | ||
| In the prompt that appears, opt to save the last timeframe to the [[GeoShare]] | | In the prompt that appears, opt to save the last timeframe to the [[GeoShare]] | ||
| The [[GeoShare]] window will remain open with the saved [[ | | The [[GeoShare]] window will remain open with the saved [[GeoTIFF]] visible | ||
}} | }} | ||
</onlyinclude> | <gallery> | ||
File:export_grid_data_overlays.jpg|Export Grid Data by hovering over [[Overlay]]s in the [[Ribbon]]. | |||
File:export_grid_data_geoshare_last_frame.jpg|Exporting the last frame of a [[Grid Overlay]] to the [[GeoShare]] | |||
File:export_grid_data_geoshare_all_frames.jpg|Exporting all timeframes of a [[Grid Overlay]] to the [[GeoShare]] | |||
File:geoshare_grid_overlay_tiffs.jpg|Exported [[GeoTIFF]]s of a [[Rainfall Overlay]] in a folder on the [[GeoShare]] | |||
</gallery></onlyinclude> | |||
{{article end | {{article end | ||
|notes= * A GeoShare Viewer can be added to a [[GeoShare]] that can visualize multiple exported [[ | |notes= * A GeoShare Viewer can be added to a [[GeoShare]] that can visualize multiple exported [[GeoTIFF]]s. | ||
* Instead of exporting only the last timeframe, all timeframes can be exported at once by selecting this option using the choice box. | |||
* The Export Grid Overlay panel can also be opened directly by selecting it in the Overlay popup in the [[Ribbon]]. | |||
|howtos= * [[How to create a GeoShare Viewer]] | |howtos= * [[How to create a GeoShare Viewer]] | ||
|seealso=* [[Grid Overlay]] | |||
*[[GeoTIFF Overlay]] | |||
}} | }} | ||
Latest revision as of 15:51, 29 March 2024
Grid Overlays can be exported as GeoTIFFs to the GeoShare, either as a backup or as a means to share it with other applications. Additionally, a GeoShare Viewer can be added that allows users to visualize the Grid overlay results without the need of a keep alive project session.
How to create a GeoShare Viewer:
- In the Ribbon, select Overlays to show the list of all Overlays in the Project.
- Select the Grid Overlay the results of which you wish to share.
- Click on "Export Grid Data".
- In the prompt that appears, opt to save the last timeframe to the GeoShare
- The GeoShare window will remain open with the saved GeoTIFF visible
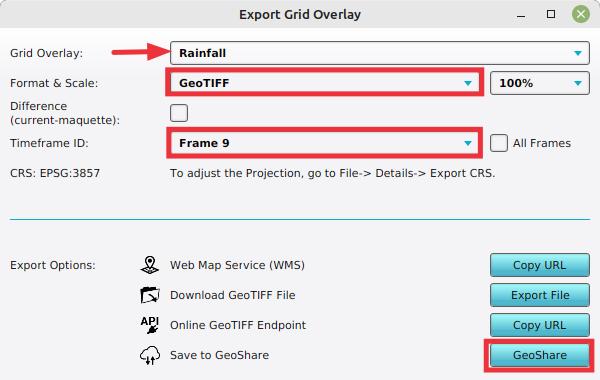
Exporting the last frame of a Grid Overlay to the GeoShare
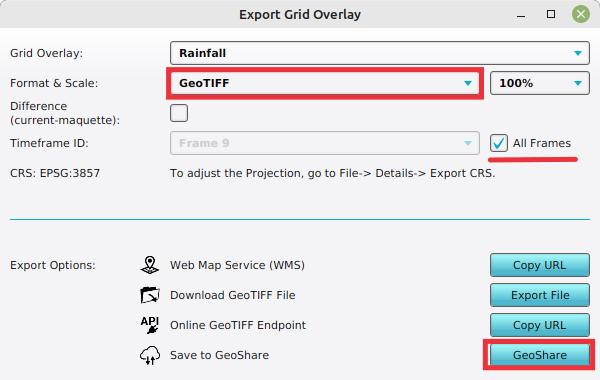
Exporting all timeframes of a Grid Overlay to the GeoShare
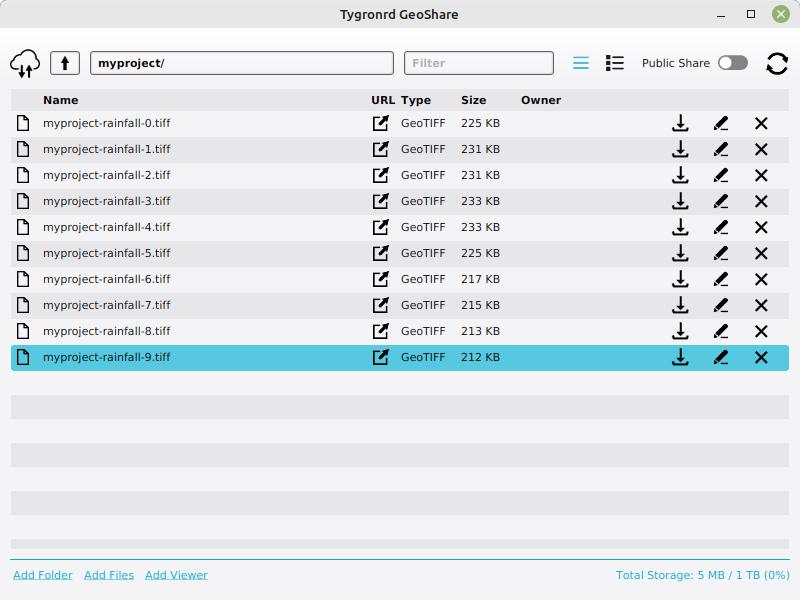
Exported GeoTIFFs of a Rainfall Overlay in a folder on the GeoShare


Notes
- A GeoShare Viewer can be added to a GeoShare that can visualize multiple exported GeoTIFFs.
- Instead of exporting only the last timeframe, all timeframes can be exported at once by selecting this option using the choice box.
- The Export Grid Overlay panel can also be opened directly by selecting it in the Overlay popup in the Ribbon.