How to edit properties of a Levee Type: Difference between revisions
Jump to navigation
Jump to search
(Created page with "left|frame|Right Panel The following properties can be edited of a new or already existing levee that is set up as an action: ====Name==== right|thumb|Enter new name : In the name field on the right panel, the default name can be replaced by entering a more suitable name. This can be for instance a reference to the top and side functions (see below). <br clear=right> ====Image==== File:...") |
No edit summary |
||
| (2 intermediate revisions by the same user not shown) | |||
| Line 17: | Line 17: | ||
====Top & side functions==== | ====Top & side functions==== | ||
[[File:DikeActionFunctionFields-Q3-2015.jpg|thumb|right|Function fields]] | [[File:DikeActionFunctionFields-Q3-2015.jpg|thumb|right|Function fields]] | ||
: This area is used for assigning specific [[functions]] to the top and side of the levee. This can make a levee affect indicators such as a [[Housing (Indicator)|building indicator]] or a [[Green (Indicator)|green indicator]]. When a levee has a bicycle lane as top function, constructing this levee will affect a building indicator if this indicator has such bicycle lanes as a target. Implementing trees as top function affects the green indicator | : This area is used for assigning specific [[functions]] to the top and side of the levee. This can make a levee affect indicators such as a [[Housing (Indicator)|building indicator]] or a [[Green (Indicator)|green indicator]]. When a levee has a bicycle lane as top function, constructing this levee will affect a building indicator if this indicator has such bicycle lanes as a target. Implementing trees as top function affects the green indicator. | ||
<br clear=right> | <br clear=right> | ||
====Fixed size==== | ====Fixed size==== | ||
| Line 27: | Line 27: | ||
: These fields allow for adjustments of the height and width of the levee. These settings are the starting point during a session, however, the values can then still be adjusted when drawing in the levee placement. | : These fields allow for adjustments of the height and width of the levee. These settings are the starting point during a session, however, the values can then still be adjusted when drawing in the levee placement. | ||
<br clear=all> | <br clear=all> | ||
{{article end | |||
|seealso= | |||
*[[Levee Type]] | |||
}} | |||
[[Category:How-to's]][[Category:Levee Type]] | |||
Latest revision as of 12:16, 1 March 2023

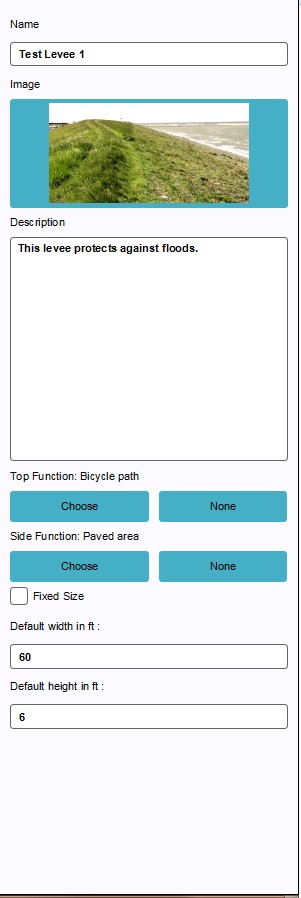
Right Panel
The following properties can be edited of a new or already existing levee that is set up as an action:
Name

- In the name field on the right panel, the default name can be replaced by entering a more suitable name. This can be for instance a reference to the top and side functions (see below).
Image

- By selecting the Image field, a new window will open. Here the user can select a new image, or upload a custom asset to be used as image. When uploading a new asset, the image (a .png file) must adhere to the resolution of 200x100 pixels.
Description

- The description field on the right panel allows for a descriptive text to accompany the levee. The description is visible in the project main view when selecting the action belonging to the levee. This text can be a description of the top and side functions and/ or the impact thereof on the indicators. This is also a good space to elaborate on the dedicated name given earlier.
Top & side functions

- This area is used for assigning specific functions to the top and side of the levee. This can make a levee affect indicators such as a building indicator or a green indicator. When a levee has a bicycle lane as top function, constructing this levee will affect a building indicator if this indicator has such bicycle lanes as a target. Implementing trees as top function affects the green indicator.
Fixed size
- Check this box to ensure that a levee remains at a fixed size and does not adjust its size relatively to the terrain elevation present in the project area.
Height & width

- These fields allow for adjustments of the height and width of the levee. These settings are the starting point during a session, however, the values can then still be adjusted when drawing in the levee placement.