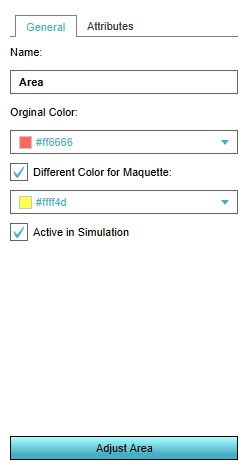
How to edit the properties of an Area
Selecting an area in the left panel makes its properties adjustable in the right panel. Multiple kinds of properties exist for areas. It's possible to switch between the various types of properties by selecting the desired tab at the top of the right panel.
General
Areas have a number of general properties.
Name
The name of the area. This is used to differentiate between different areas. If the area is part of an overlay, the name is also used in the legend of the overlay. The name can be changed by changing the text in this field.
Original Color
The color of the area. When the area is displayed in the 3D Visualization, the area is displayed using this color. You can change this by selecting the color field. A panel will appear in which you can specify the desired color. The color will be available as an attribute as well.
Different Color for Maquette
Whether a different color should be used to display sections of this area which are added during a session. This option an be toggled by checking the checkbox.
When checked, the option for selecting a second color will appear. You can change this by selecting the color field. A panel will appear in which you can specify the desired color. The maquette color will be available as an attribute as well, with a similar behavior as the color attribute.
Active in simulation
Whether the area should be considered active. When an area is not active, it is not displayed as part of overlays, and has no polygon in the 3D Visualization. You can toggle this by checking the checkbox.
Adjust Area
The "Adjust Area" button is used to indicate which part of the project area will be part of an area. To do this, select the "Adjust Area" button. This will open the brush panel, which will allow you to indicate which part of the project area should be covered by the area.
Attributes
- Main article: Attribute
Areas can be assigned (user-defined) attributes. Some attributes are automatically created or modified when certain properties of the area are changed.

