How to add and remove a Zone: Difference between revisions
No edit summary |
No edit summary |
||
| (2 intermediate revisions by the same user not shown) | |||
| Line 1: | Line 1: | ||
{{Editor location|Zoning}} | {{Editor location|Zoning}} | ||
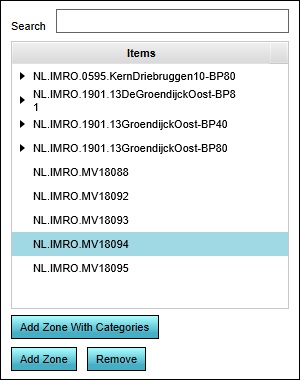
[[File:zoning-left.jpg|framed|left|The [[left panel]] allows you to add, remove and select zones.]] | [[File:zoning-left.jpg|framed|left|The [[left panel]] allows you to add, remove and select zones.]] | ||
New zones can be added to the project by opening the Zoning panel in the editor. In the [[left panel]], one or more new zones can then be added. To add a zone which does not restrict the categories of buildings allowed within it, select "Add Zone". To add a zone which does restrict the [[category|categories]] of [[building]]s allowed, select "Add Zone With Categories". A new zone will appear in the list of zones. | New zones can be added to the project by opening the Zoning panel in the editor. In the [[left panel]], one or more new zones can then be added. To add a zone which does not restrict the categories of buildings allowed within it, select "Add Zone". To add a zone which does restrict the [[category|categories]] of [[building]]s allowed, select "Add Zone With Categories". A new zone will appear in the list of zones. | ||
''Note that when a new zone is added, it is not yet present in the 3D | ''Note that when a new zone is added, it is not yet present in the [[3D Visualization]]. Its contour must still be drawn in the 3D Visualization for it to apply. | ||
Existing zones can be removed by selecting them, and then selecting "Remove". When a zone is removed with child zones (displayed in the left panel as being one or more subitems of the zone), the child zones remain. | Existing zones can be removed by selecting them, and then selecting "Remove". When a zone is removed with child zones (displayed in the left panel as being one or more subitems of the zone), the child zones remain. | ||
{{Editor steps|title=add a zone to the 3D | {{Editor steps|title=add a zone to the 3D Visualization|Open the Zoning panel|Select "Add Zone".}} | ||
{{Editor steps|title=add a zone with categories to the 3D | {{Editor steps|title=add a zone with categories to the 3D Visualization|Open the Zoning panel|Select "Add Zone".|Select "Add Zone With Categories".}} | ||
{{Editor steps|title=remove zones from the 3D | {{Editor steps|title=remove zones from the 3D Visualization|Open the Zoning panel|Select the zone you wish to remove.|Select "Remove"}}{{clear|right}} | ||
[[Category:Zone]][[Category:How-to]] | [[Category:Zone]][[Category:How-to's]] | ||
Latest revision as of 11:51, 30 January 2023

New zones can be added to the project by opening the Zoning panel in the editor. In the left panel, one or more new zones can then be added. To add a zone which does not restrict the categories of buildings allowed within it, select "Add Zone". To add a zone which does restrict the categories of buildings allowed, select "Add Zone With Categories". A new zone will appear in the list of zones.
Note that when a new zone is added, it is not yet present in the 3D Visualization. Its contour must still be drawn in the 3D Visualization for it to apply.
Existing zones can be removed by selecting them, and then selecting "Remove". When a zone is removed with child zones (displayed in the left panel as being one or more subitems of the zone), the child zones remain.
- Open the Zoning panel
- Select "Add Zone".
- Open the Zoning panel
- Select "Add Zone".
- Select "Add Zone With Categories".
- Open the Zoning panel
- Select the zone you wish to remove.
- Select "Remove"