Demo Wind Solar power project: Difference between revisions
No edit summary |
No edit summary |
||
| (26 intermediate revisions by 4 users not shown) | |||
| Line 13: | Line 13: | ||
Note that the [[Network]] functionality the {{software}} offers is not showcased in this this demo project. | Note that the [[Network]] functionality the {{software}} offers is not showcased in this this demo project. | ||
{{clear}} | |||
==Exploring the project== | ==Exploring the project== | ||
{| class="wikitable" | {| class="wikitable" | ||
|style="width: 5%"|1 | |style="width: 5%"|1 | ||
|style="width: 50%"|Click on the [[Future Design]] tab. Notice the [[ | |style="width: 50%"|Click on the [[Future Design]] tab. Notice the [[Action Menu]] is now visible (vertical black bar on the left side of the Main View, below the Future Design tab). Click on the question mark icon to start a flytrough of the project. In this flytrough you will get familiar with different wind and solar functions in the {{software}}. | ||
|style="width: 10%"|[[file:DemoSolarWind-Exploring1.jpg|300px|center|thumb]] | |style="width: 10%"|[[file:DemoSolarWind-Exploring1.jpg|300px|center|thumb]] | ||
|- | |- | ||
| Line 29: | Line 29: | ||
{| class="wikitable" | {| class="wikitable" | ||
|style="width: 5%"|1 | |style="width: 5%"|1 | ||
|style="width: 50%"|Navigate to the block of houses with solar panels, indicated by a yellow arrow | |style="width: 50%"|Navigate to the block of houses with solar panels, indicated by a yellow arrow. | ||
|style="width: 10%"|[[file:DemoSolarWind-SolarFunctions1.jpg|300px|center|thumb]] | |style="width: 10%"|[[file:DemoSolarWind-SolarFunctions1.jpg|300px|center|thumb]] | ||
|- | |- | ||
| Line 40: | Line 40: | ||
|style="width: 10%"|[[File:DemoSolarWind-SolarFunctions3.jpg|300px|center|thumb]] | |style="width: 10%"|[[File:DemoSolarWind-SolarFunctions3.jpg|300px|center|thumb]] | ||
|} | |} | ||
====Solar Farm==== | ====Solar Farm==== | ||
{| class="wikitable" | {| class="wikitable" | ||
|style="width: 5%"|1 | |style="width: 5%"|1 | ||
|style="width: 50%"|Navigate to the solar farm in the field, indicated by the second yellow arrow | |style="width: 50%"|Navigate to the solar farm in the field, indicated by the second yellow arrow. | ||
|style="width: 10%"|[[file:DemoSolarWind-SolarFunctions4.jpg|300px|center|thumb]] | |style="width: 10%"|[[file:DemoSolarWind-SolarFunctions4.jpg|300px|center|thumb]] | ||
|- | |- | ||
|style="width: 5%"|2 | |style="width: 5%"|2 | ||
|style="width: 50%"|Click on the | |style="width: 50%"|Click on the Solar Area [[Indicator]] on the [[Top bar]] to open the indicator panel. On this panel you can see the surface area of solar farms in hectares (on land, on water and in total) in the project area. | ||
|style="width: 10%"|[[File:DemoSolarWind-SolarFunctions5.jpg|300px|center|thumb]] | |style="width: 10%"|[[File:DemoSolarWind-SolarFunctions5.jpg|300px|center|thumb]] | ||
|} | |} | ||
==Wind functions== | |||
{| class="wikitable" | |||
|style="width: 5%"|1 | |||
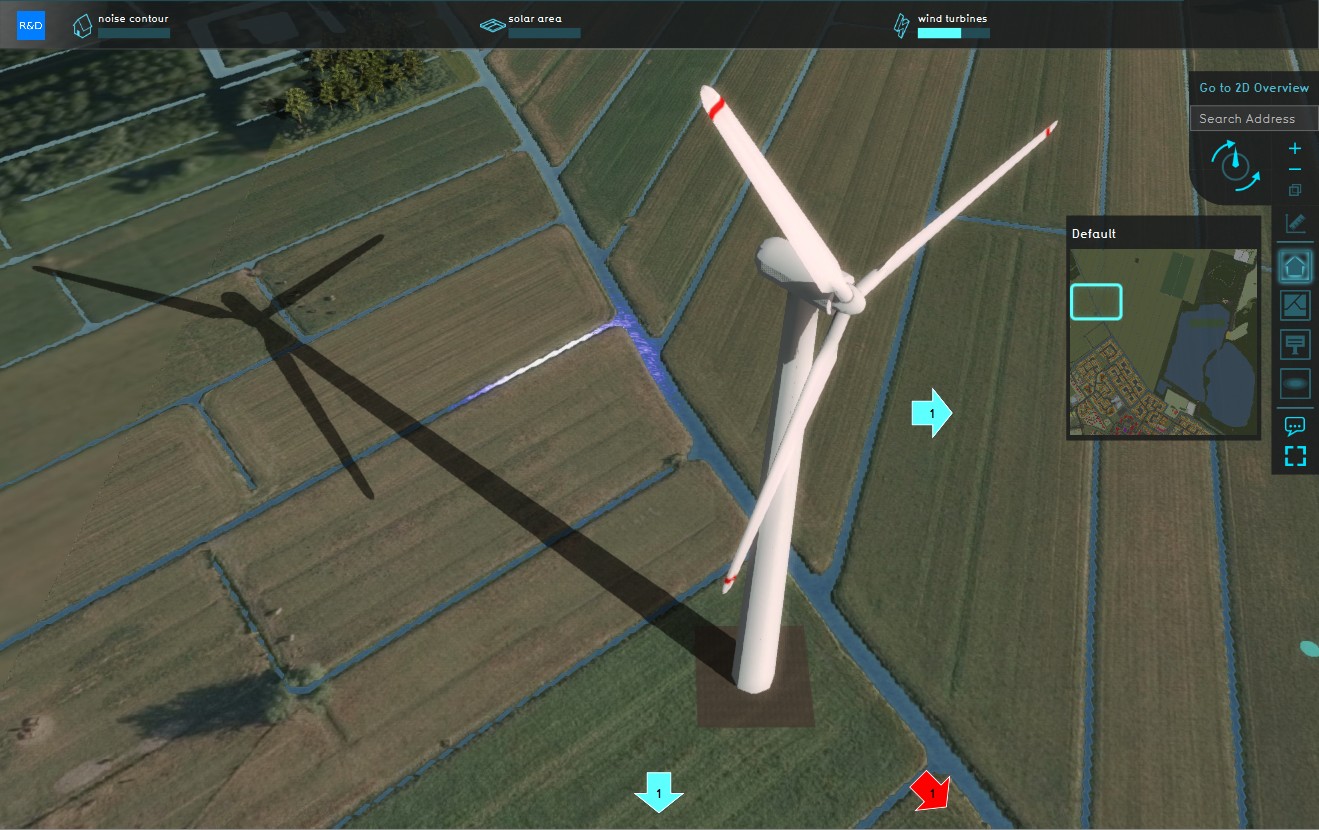
|style="width: 50%"|Navigate to the wind turbine. When you have located the turbine, you can see the shadow it casts on the surrounding area. With the {{software}} it is possible to see how the shadow changes throughout a day and/ or year, which is important for finding a suitable location for a wind turbine. | |||
In a project it is possible to add custom types of wind turbines to the | |style="width: 10%"|[[file:DemoSolarWind-WindFunctions1.jpg|300px|center|thumb]] | ||
|- | |||
|style="width: 5%"|2 | |||
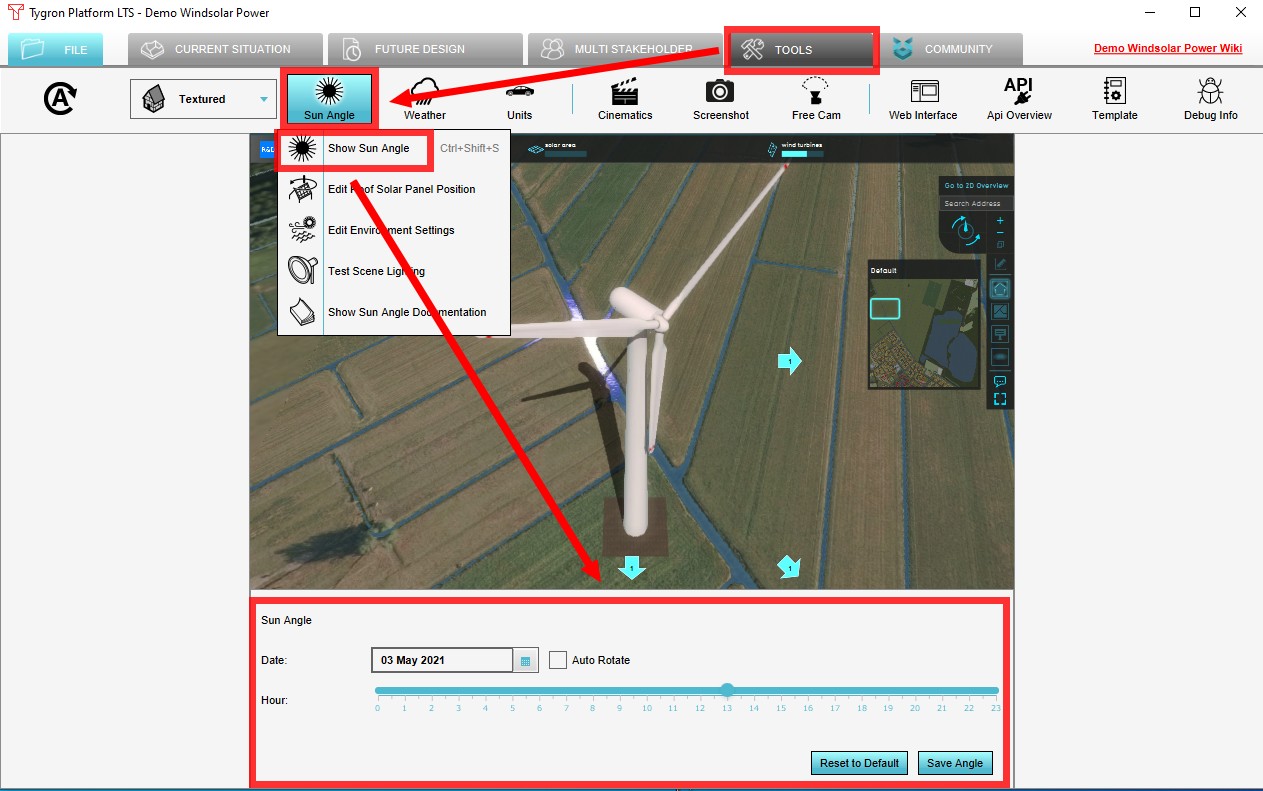
|style="width: 50%"|Click on the [[Tools]] tab and click on the [[Sun_angle|Sun angle]] button. Change the date and time to see the shadow moving. | |||
|style="width: 10%"|[[File:DemoSolarWind-WindFunctions2.jpg|300px|center|thumb]] | |||
|- | |||
|style="width: 5%"|3 | |||
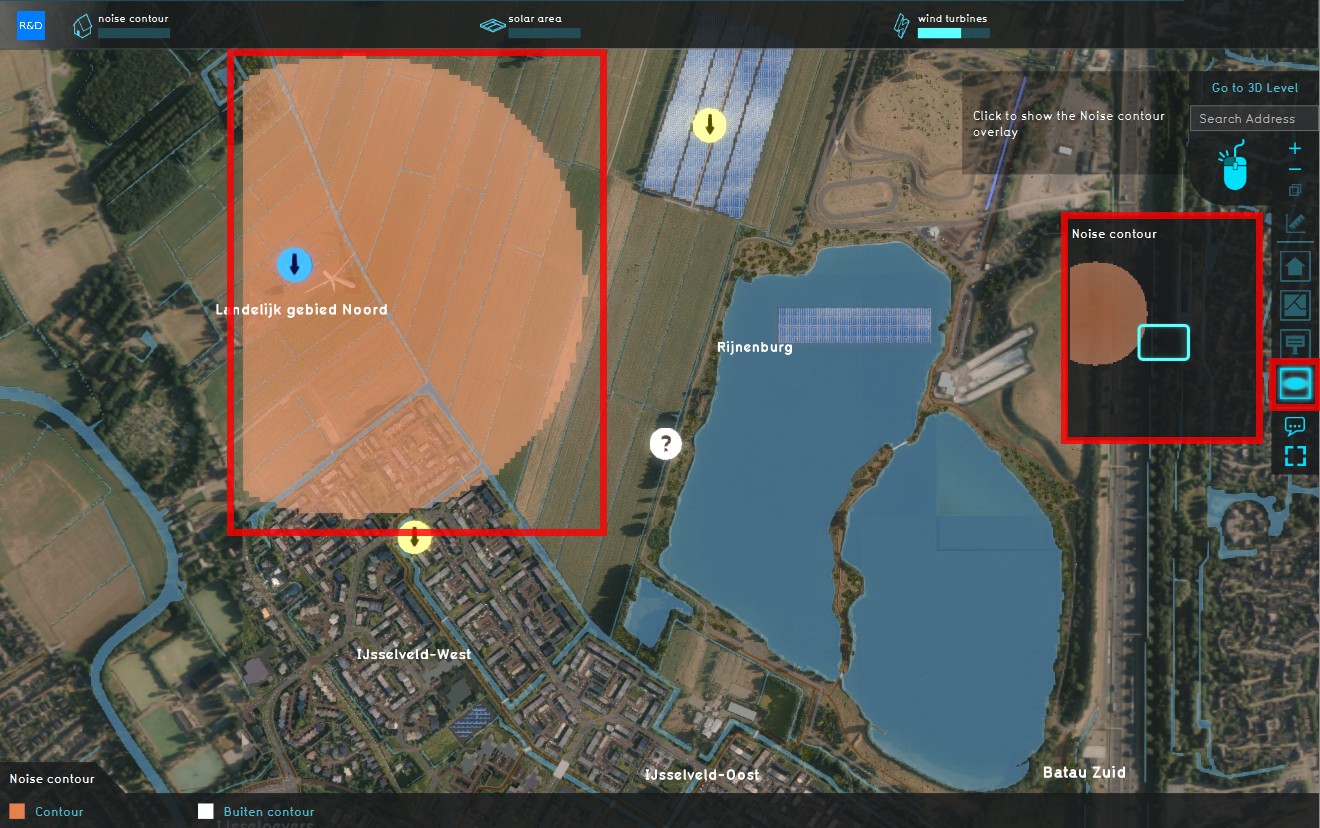
|style="width: 50%"|A wind turbine also has a certain noise contour. To see the noise contour, click on the Noise contour [[Overlay]] in the [[Overlay]] bar. Tip: the overlay is better visible if you zoom out a bit. | |||
|style="width: 10%"|[[file:DemoSolarWind-WindFunctions3.jpg|300px|center|thumb]] | |||
|- | |||
|style="width: 5%"|4 | |||
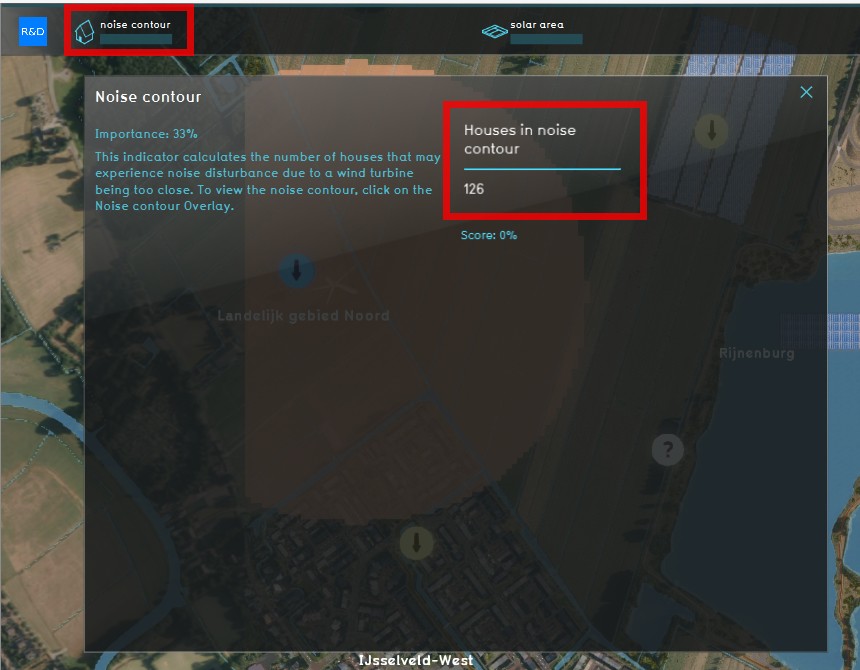
|style="width: 50%"|Click on the Noise contour [[Indicator]] in the [[Top bar]] to see how many houses are in this contour and may experience noise disturbance. | |||
|style="width: 10%"|[[File:DemoSolarWind-WindFunctions4.jpg|300px|center|thumb]] | |||
|- | |||
|style="width: 5%"|4 | |||
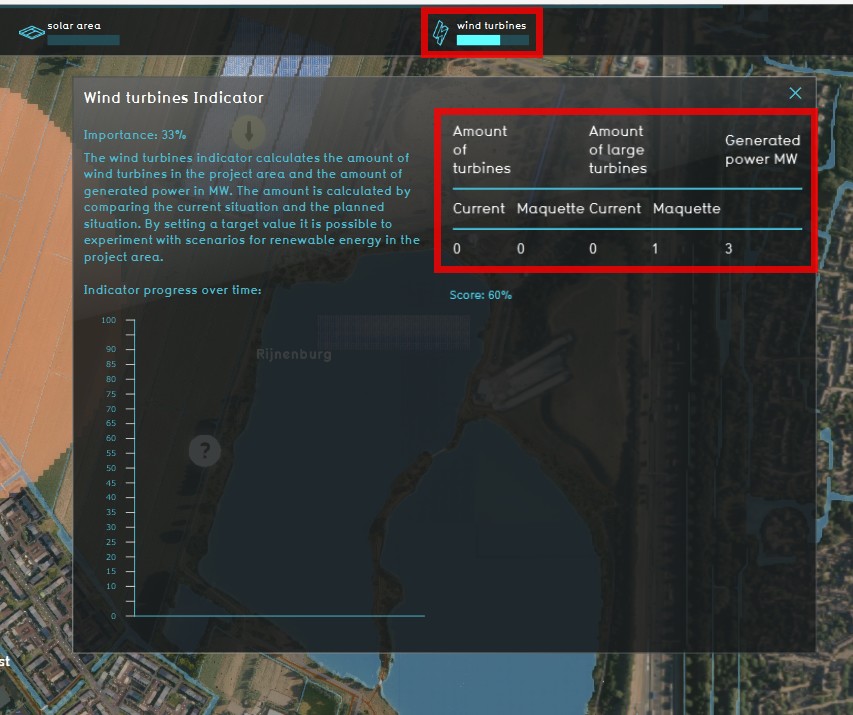
|style="width: 50%"|Click on the wind turbines [[Indicator]] in the [[Top bar]] to see how much power is generated. For more information about this indicator, see the [[Wind_turbine_(Indicator)|description]]. Notice that a score is calculated, based on the generated power and a target. The target is set on 5 MW and is adjustable. | |||
|style="width: 10%"|[[File:DemoSolarWind-WindFunctions5.jpg|300px|center|thumb]] | |||
|} | |||
In a project it is possible to add custom types of wind turbines to the {{software}}, with different attributes such as height, radius of the noise contour or safety contour and power and create scenarios to find the most suitable placement, depending on the requirements for the use case. | |||
<gallery mode=nolines> | <gallery mode=nolines> | ||
</gallery> | </gallery> | ||
| Line 63: | Line 83: | ||
| [[Demo_Wind Solar_power_Project_Future_Design|Next page>>]] | | [[Demo_Wind Solar_power_Project_Future_Design|Next page>>]] | ||
|} | |} | ||
{{article end | |||
|seealso= | |||
* [[List of Demo Projects]] | |||
}} | |||
[[Category:Demo projects]] | |||
Latest revision as of 09:35, 21 February 2023
| Next page>> |
The Demo Windsolar Power Project is available for all users and can be found in the main menu under Edit projects. This project does not count towards your license.
Take a look at this project when working with topics such as sustainable energy, (regional) energy strategy, visualization of energy sources, stakeholder participation.
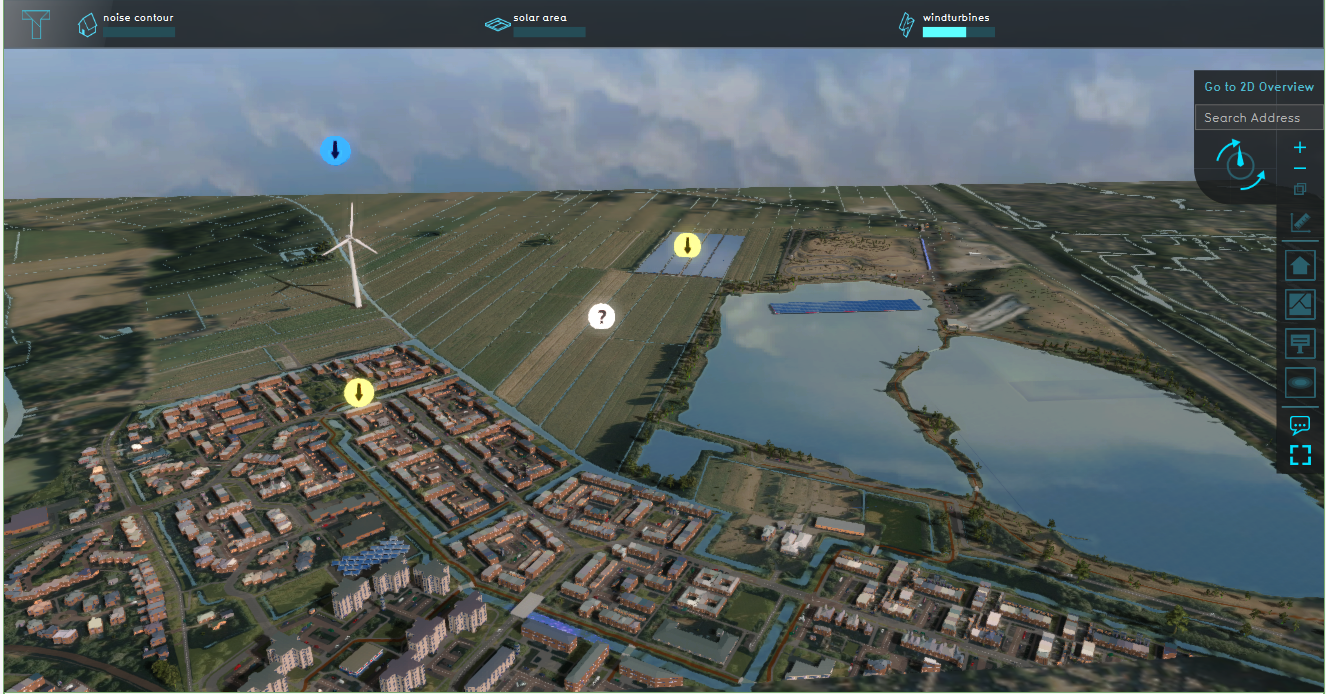
This project showcases Wind and solar functionalities in the Tygron Platform.
The Demo Wind Solar power project demonstrates examples of different wind and solar functionalities in a location in the Netherlands. The scenarios in this project are completely fictional and only serve to demonstrate these functionalities. It can serve as a working demo to further explore the possibilities of adding wind and solar functionalities in a project, configurable parameters and examples of analysis that can be done with the Tygron Platform.
Note that the Network functionality the Tygron Platform offers is not showcased in this this demo project.
Exploring the project
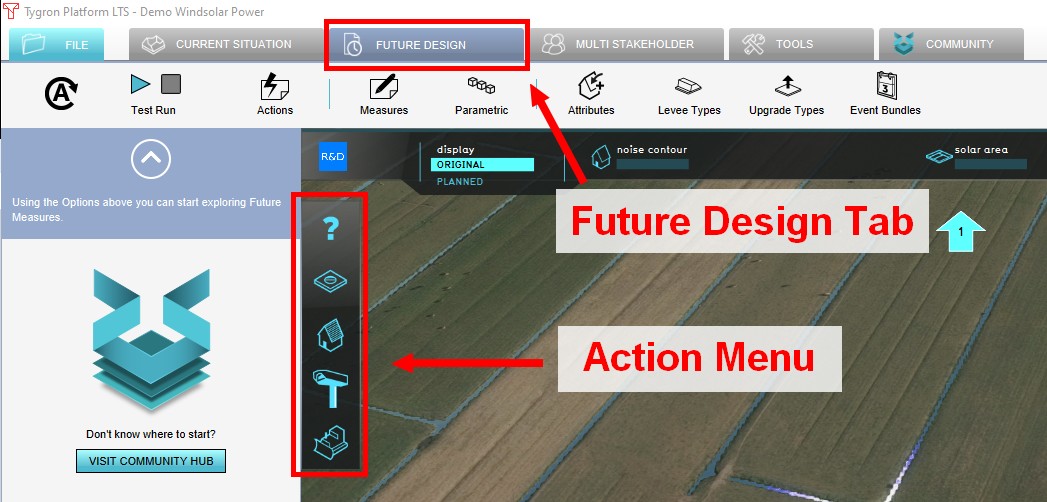
| 1 | Click on the Future Design tab. Notice the Action Menu is now visible (vertical black bar on the left side of the Main View, below the Future Design tab). Click on the question mark icon to start a flytrough of the project. In this flytrough you will get familiar with different wind and solar functions in the Tygron Platform. | |
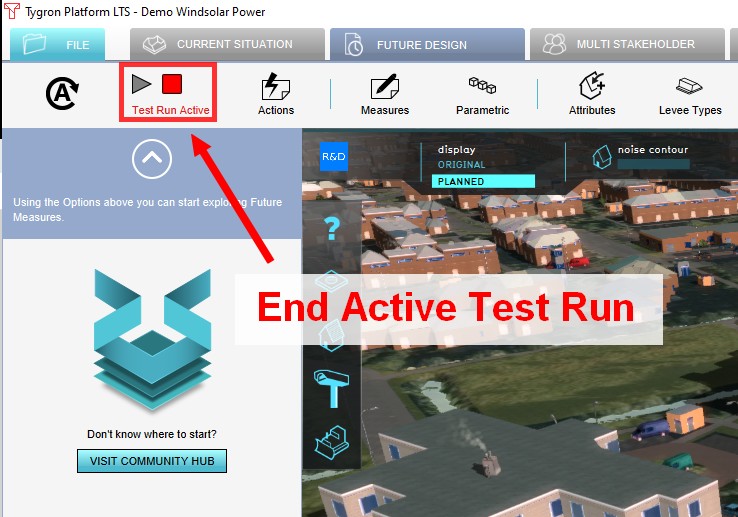
| 2 | After the flytrough, make sure the Test Run is stopped by clicking on the red square stop button (in the top left corner in the screen) for the following steps. |
Solar functions
Solar Roof Panels
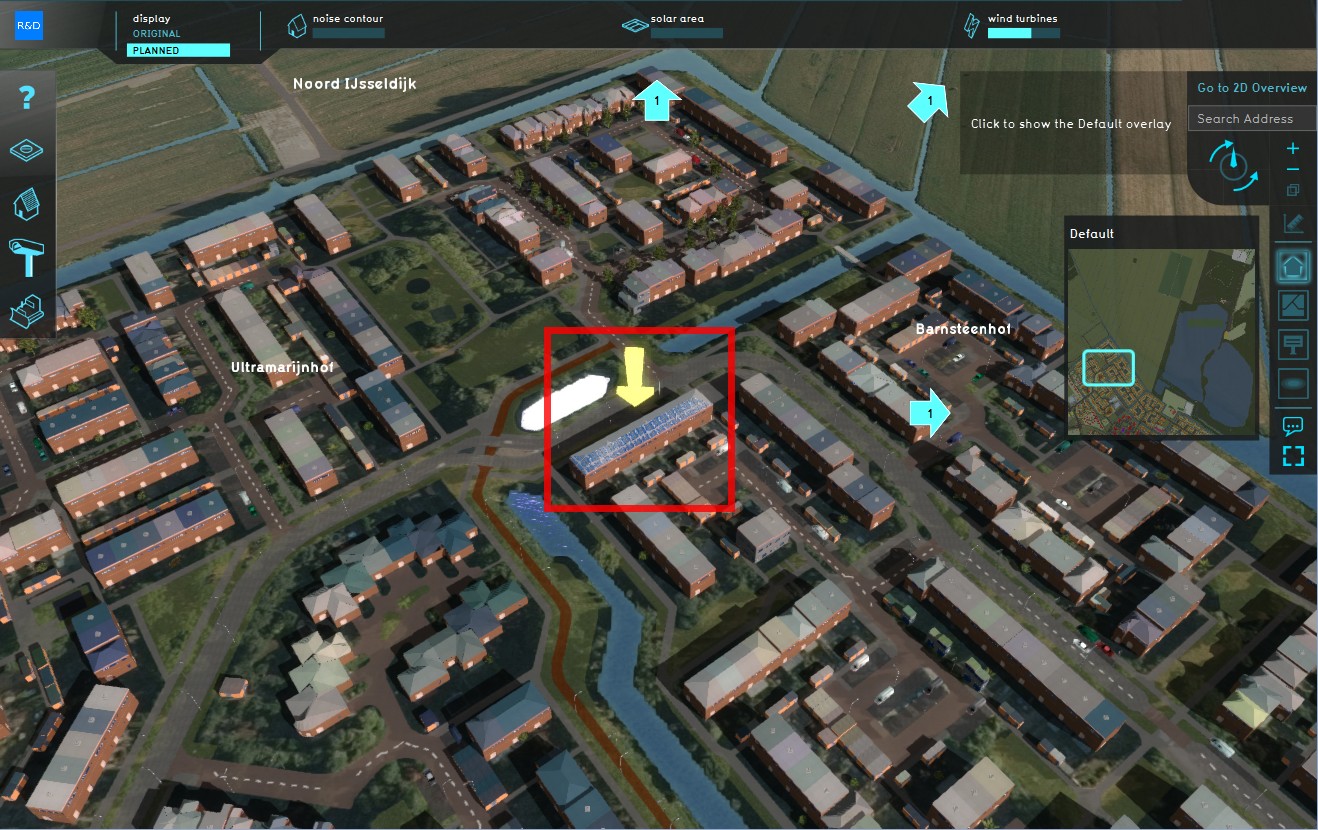
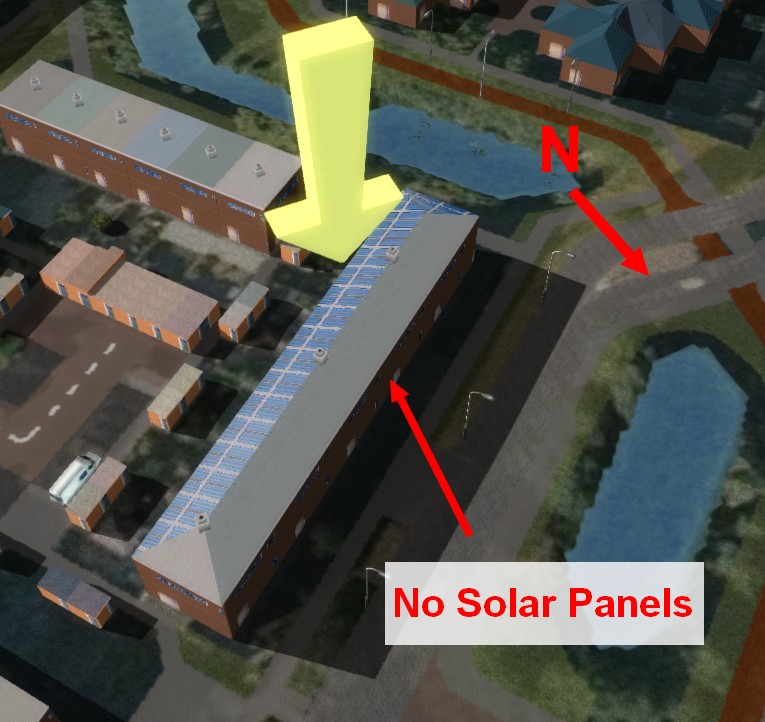
| 1 | Navigate to the block of houses with solar panels, indicated by a yellow arrow. | |
| 2 | Notice that the solar panels are not placed on the north side of the roof. | |
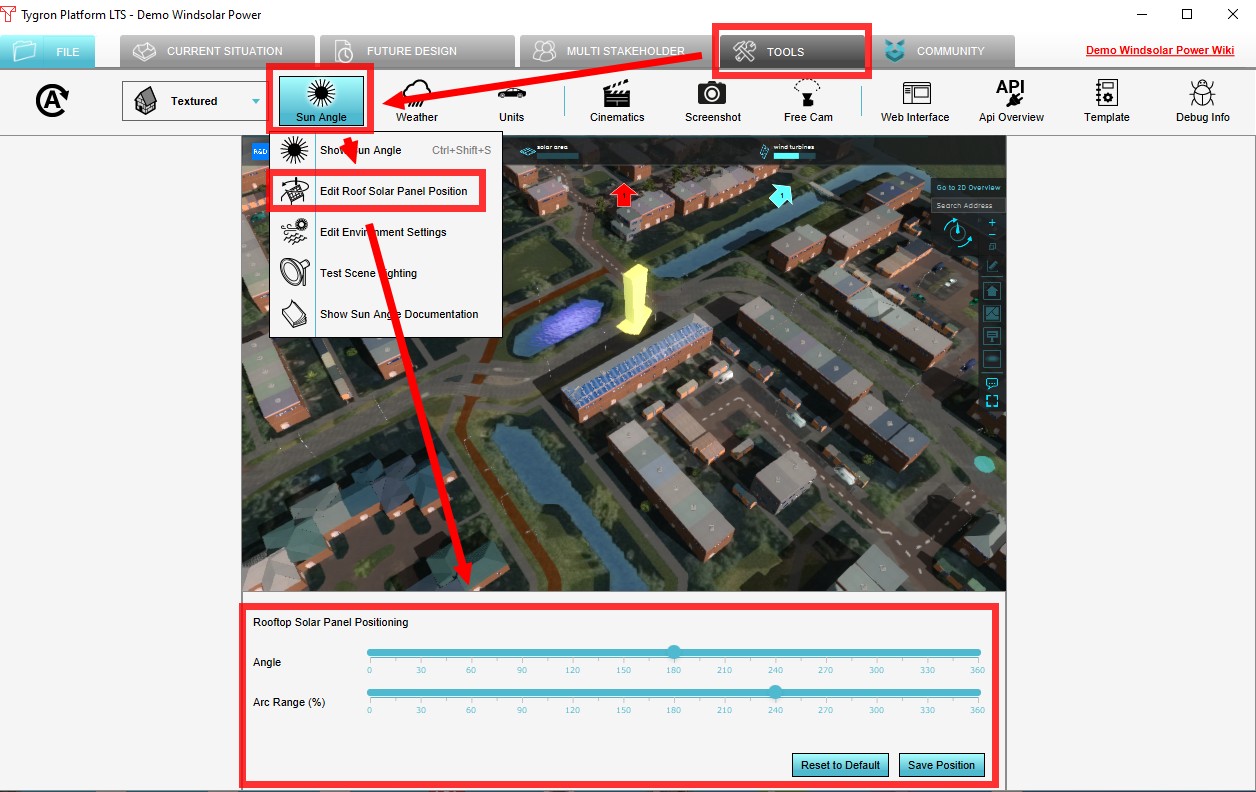
| 3 | To adjust this Solar Panel setting, go to the Tools tab, hover over Sun angle and click on Edit roof solar position. Adjust the sliders in the Bottom panel and notice the difference in placement of the solar panels. For more information, see this article. |
Solar Farm
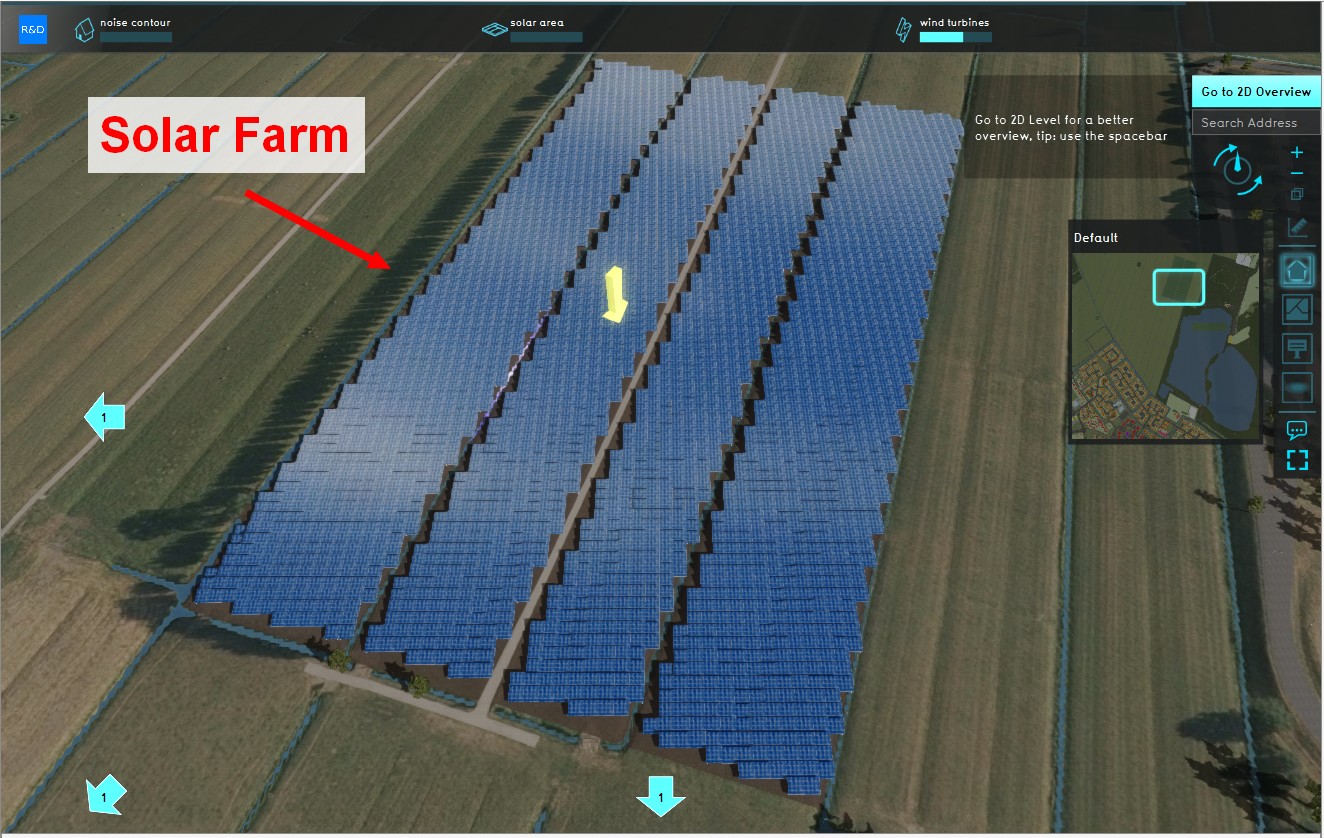
| 1 | Navigate to the solar farm in the field, indicated by the second yellow arrow. | |
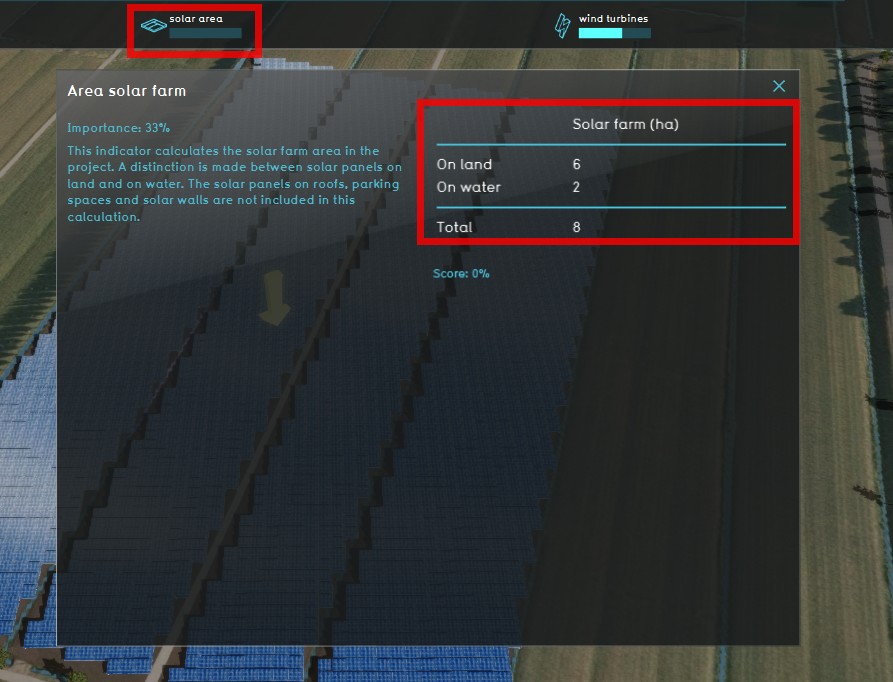
| 2 | Click on the Solar Area Indicator on the Top bar to open the indicator panel. On this panel you can see the surface area of solar farms in hectares (on land, on water and in total) in the project area. |
Wind functions
| 1 | Navigate to the wind turbine. When you have located the turbine, you can see the shadow it casts on the surrounding area. With the Tygron Platform it is possible to see how the shadow changes throughout a day and/ or year, which is important for finding a suitable location for a wind turbine. | |
| 2 | Click on the Tools tab and click on the Sun angle button. Change the date and time to see the shadow moving. | |
| 3 | A wind turbine also has a certain noise contour. To see the noise contour, click on the Noise contour Overlay in the Overlay bar. Tip: the overlay is better visible if you zoom out a bit. | |
| 4 | Click on the Noise contour Indicator in the Top bar to see how many houses are in this contour and may experience noise disturbance. | |
| 4 | Click on the wind turbines Indicator in the Top bar to see how much power is generated. For more information about this indicator, see the description. Notice that a score is calculated, based on the generated power and a target. The target is set on 5 MW and is adjustable. |
In a project it is possible to add custom types of wind turbines to the Tygron Platform, with different attributes such as height, radius of the noise contour or safety contour and power and create scenarios to find the most suitable placement, depending on the requirements for the use case.
On the next page steps to create a custom scenario are explained.
| Next page>> |
