How to import a DWG file in ArcGIS Pro: Difference between revisions
Jump to navigation
Jump to search
No edit summary |
No edit summary |
||
| Line 1: | Line 1: | ||
A DWG (Drawing) is used in CAD software and can be exported from most 3D animation packages. | A DWG (Drawing) is used in CAD software and can be exported from most 3D animation packages. | ||
{{editor steps|title=import a DWG file into ArcGIS Pro|In ArcGIS Pro go to the "Map" tab and select "Add Data"|Choose the DWG file. If the file is not visible in the add Data panel, click on the refresh button (top right corner)|Select the Multipatch layer, right click on the Multipatches layer and choose properties.|Select the Elevation tab and select ''On the ground'' and then Ok to place the model on the surface terrain.}} | {{editor steps|title=import a DWG file into ArcGIS Pro | ||
|In ArcGIS Pro go to the "Map" tab and select "Add Data" | |||
|Choose the DWG file. If the file is not visible in the add Data panel, click on the refresh button (top right corner) | |||
|Select the Multipatch layer, right click on the Multipatches layer and choose properties. | |||
|Select the Elevation tab and select ''On the ground'' and then Ok to place the model on the surface terrain. | |||
}} | |||
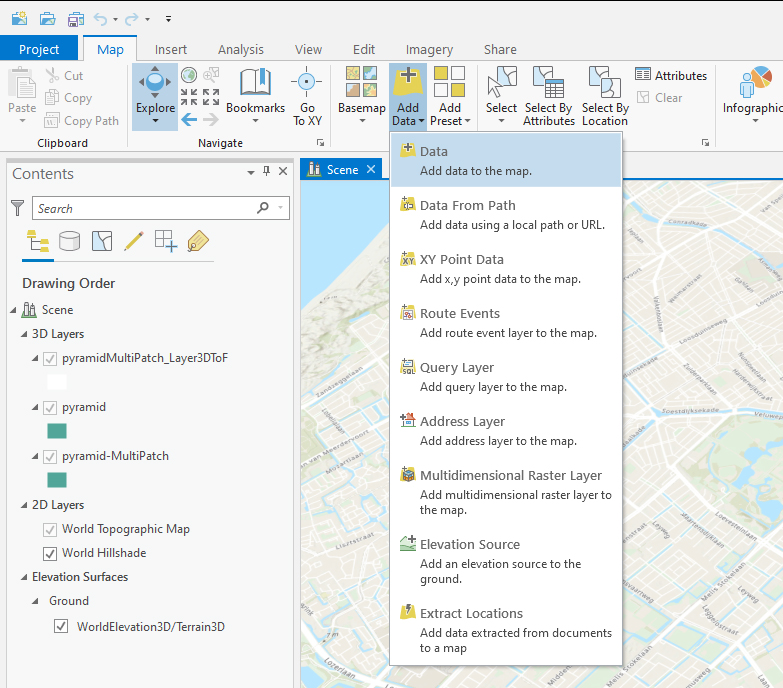
[[File:Add_data.jpg|450px]] | [[File:Add_data.jpg|450px]] | ||
{{article end | |||
*An AutoCAD 2004 or AutoCAD release 14 export works best to create an [[SLPK]] file | |notes= | ||
* An AutoCAD 2004 or AutoCAD release 14 export works best to create an [[SLPK]] file | |||
}} | |||
{|class="wikitable" style="margin: auto; background-color:#ffffcc;" | {|class="wikitable" style="margin: auto; background-color:#ffffcc;" | ||
| [[ | | [[How_to_create_an_SLPK_file|<<Back to SLPK manual]] | ||
|} | |} | ||
Revision as of 06:21, 5 October 2023
A DWG (Drawing) is used in CAD software and can be exported from most 3D animation packages.
How to import a DWG file into ArcGIS Pro:
- In ArcGIS Pro go to the "Map" tab and select "Add Data"
- Choose the DWG file. If the file is not visible in the add Data panel, click on the refresh button (top right corner)
- Select the Multipatch layer, right click on the Multipatches layer and choose properties.
- Select the Elevation tab and select On the ground and then Ok to place the model on the surface terrain.
Notes
- An AutoCAD 2004 or AutoCAD release 14 export works best to create an SLPK file
| <<Back to SLPK manual |
