Measure
Measures
How measures relate to the Tygron Engine
When to use measures
Creating and editing measures
Creating and removing measures
- Select "Stakeholders" in the ribbon header.
- Select "Measures" in the ribbon bar.
- Select "Add" in the left panel.
- Select "Stakeholders" in the ribbon header.
- Select "Measures" in the ribbon bar.
- Select an existing measure you wish to duplicate.
- Select "Duplicate" in the left panel.
- Select "Stakeholders" in the ribbon header.
- Select "Measures" in the ribbon bar.
- Select the measure you wish to remove.
- Select "Remove" in the left panel.
Editing general measure properties
A measure has many properties that may be adjusted. The measure's general properties can be adjusted when the measure itself is selected in the left panel.
Name
- The name of the measure. This is the name which will appear in a stakeholder's list of actions. Depending on the effects of the measure, it is important to provide a descriptive name. You can change this by altering the text in the text field.
Owner
- The owner of the measure. This is the stakeholder who will be considered the stakeholder performing the measure, if it is not directly enacted via a stakeholder's list of actions. You can change this by selecting a different stakeholder in the dropdown menu.
Image
- The image seen when the measure is selected in a stakeholder's list of actions. A fitting image will help users identify the measure at a glance. You can change this by clicking the image, and selecting a new image in the opened window.
Requires confirmation
- Whether the measure will require confirmation from other stakeholders. If this is the case, when the measure is planned, the appropriate stakeholders (such as the owners of land and buildings, and the municipality) will need to approve the measure via a popup. To change this, check or uncheck the checkbox.
Start automatically on date
- Whether the measure will automatically be performed on a given date. When the checkbox is unchecked, the measure will not be automatically performed. When the checkbox is checked, the measure will automatically be performed when the time in the session reaches the point specified in the textfield. To change this property, check or uncheck the checkbox. To change the date on which to automatically perform the measure, change the date in the text field
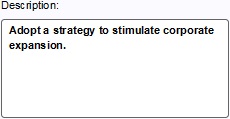
Description
- The description of the measure. This will also appear in a stakeholder's list of actions when the measure is selected. In addition to the name, a good description can be necessary to convey the intent and effect of the measure. You can change this by altering the text in the text area.
Editing Cost Details
Construction Time
- The construction time in months. This is how long it takes in timeline projects to perform the measure. You can change this by altering the number in the "construction time" field.
Demolition Time
- The demolition time in months. This is how long it takes in timeline projects to demolish the measure. You can change this by altering the number in the "demolition time" field.
Construction cost
- The construction cost. This is the impact the measure will have on the enacting stakeholder's budget when the measure is enacted. This cost is in addition to any cost brought forth by spatial aspects of the measure, such as the placement of buildings. The cost type can be set to the following values:
- NONE (No additional costs)
- FIXED (A fixed additonal cost)
- VOLUME (An additional cost based on the area/volume of the spatial aspects of the measure)
- You can change this by selecting the desired cost type using the dropdown, and entering or changing the number in the field below it.
Demolition cost
- The demolition cost. This is the impact the measure will have on the enacting stakeholder's budget when the measure is demolished. This cost is in addition to any cost brought forth by spatial aspects of the measure, such as the placement of buildings. The cost type can be set to the following values:
- NONE (No additional costs)
- FIXED (A fixed additonal cost)
- VOLUME (An additional cost based on the area/volume of the spatial aspects of the measure)
- You can change this by selecting the desired cost type using the dropdown, and entering or changing the number in the field below it.
Fixed Water Storage
- The amount of water storage this measure provides for the area. You can change this by altering the number in the "Fixed water storage" field field below it.
Editing Events
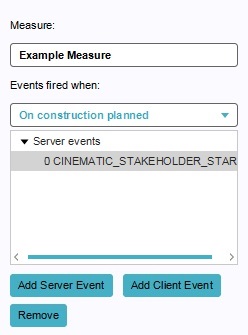
When a measure reaches a certain state (such as being planned, completed, planned for demolition, or demolished), it is possible to trigger one or more events. For each state of the measure, a list of events exists.
Selecting events
- The list of events allows you to select any event currently connected to the measure. By changing the state in the dropdown menu, you can switch between the lists of events present for this measure.
Adding and removing events events
- To add an event to the measure, select the state at which you would like the event to trigger, and select either "Add Server Event" or "Add Client Event" to add the appropriate event to the measure. To remove an event, select it in the list and select "Remove".
Changing events
- When an event is selected in the right panel, you can edit the properties of the event in the bottom panel. You can change the type of event by selecting the desired event from the list of events. If additional parameters are required, fields for these parameters will appear in the bottom panel as well, and can be filled in as required. When the event has been configured as desired, you can select "Commit" to confirm these changes. If you do press "Commit" before closing the panel, your changes are not changed. You can also press "Cancel" to undo your changes.
Editing Indicator Scores
Changing indicator effects
- To change the effects this measure has on indicators, find the indicator in the list of indicator effects, and alter the value next to the indicator you wish to change. The value will be added to the indicator when the measure is performed. A negative value means a detrimental effect on indicators.
Adding and removing effects
- To add indicator effects to the measure, select the indicator for which you want to add an effect in the dropdown menu, and select "Add". If you want to remove an indicator effect from the measure, select in the list of indicator effects above the buttons, and select "remove".
Editing spatial effects
Template:Editor ribbon A measure can also have spatial effects. These effects include the placement of constructions, the manipulation of land and the execution of upgrades. To add a spatial effect to a measure, select the measure you wish to add the effect to, and select one of the following options:
- "Add Building" to add the placement of a building
- "Add Landmark" to add the placement of a landmark
- "Add Upgrade" to add the execution of an upgrade
- "Add Spatial" to add a manipulation of the land
Of each type, multiple effects can be added, e.g. a measure can place multiple buildings, and/or perform multiple upgrades.
To remove a spatial effect from a measure, select the spatial effect sub-item you wish to remove, and select "Remove". Make sure to select the sub-item, and not the measure itself.
Buildings and Landmarks
Template:Editor ribbon Editing a building or a landmark to be placed by a measure is done in the same way as regular construction. For more information, see the article on Constructions.
Upgrades
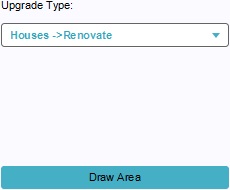
To change the type of upgrade the measure is meant to execute, select the appropriate upgrade type from the dropdown menu. To select where the upgrade is to be performed, select "Draw Area", and use the brush to select an area.
Spatials
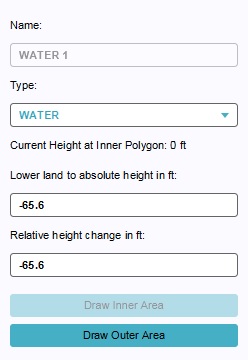
Template:Editor ribbon To change the type of terrain feature the measure is meant to create, select the appropriate land type from the dropdown menu. To change the height the land must have after the measure is executed, change the values in the "Lower land to absolute height" or "Relative height change". To change the location where the land is to be changed, select "Draw Outer Area", and use the brush to select an area. If applicable, select "Draw Inner Area" and select the are within the first selection which must be at the specified height. For more information on changing the terrain height, see the article on Terrain height.


