HTML: Difference between revisions
No edit summary |
|||
| (37 intermediate revisions by 3 users not shown) | |||
| Line 1: | Line 1: | ||
[[File:Tql_webinar.png|link=https://www.tygron.com/nl/2019/05/22/tql-en-upgrades/]] | |||
==HTML== | ==HTML== | ||
HTML stands for HyperText Markup Language. It is a language used to indicate how text or content should be laid out for display. Along with Cascading Style Sheets (CSS), it is generally used for styling webpages. | HTML stands for HyperText Markup Language. It is a language used to indicate how text or content should be laid out for display. Along with Cascading Style Sheets (CSS), it is generally used for styling webpages. | ||
==How HTML relates to the | ==How HTML relates to the {{software}}== | ||
In the | In the {{software}}, there are a number of places where the user is responsible for providing text and information. When that information can be complex, such as the [[Excel]] output for an [[Excel (Indicator)]], the {{software}} allows HTML to be used for determining how the information should be laid out. The {{software}} is effectively HTML5 compliant for these purposes. | ||
==How HTML is structured== | ==How HTML is structured== | ||
| Line 81: | Line 81: | ||
|- | |- | ||
| C || D | | C || D | ||
|} | |}<br style='clear:right;'> | ||
<br style='clear:right;'> | |||
===Forms=== | |||
HTML can also be used to create forms. Forms are a structure for data entry and submission, and can be used in combination with the {{software}} [[API]] to facilitate interactions and effect changes. Forms consist of: | |||
* A <code><form></code> element to contain and define everything | |||
* One or more <code><input></code> elements to define the individual parameters of the instruction you wish to enact | |||
** Alternatively, <code><select></code> elements can also be used in place of inputs to allow a specific list of options, rather than freeform data entry | |||
* A <code><input type='submit'></code> element (with its type set to "submit"), to create a button to actually send the data | |||
A fully functional form in the {{software}} will always follow the same approximate structure: | |||
{{code|padding=yes|inline=yes|1= | |||
<form action='$SESSION/event/LogicEventType/cinematic_stakeholder_start/?token=$TOKEN' method='post'> | |||
<input type='hidden' name='0' value='0'> | |||
<input type='hidden' name='1' value='0'> | |||
<select name='2'> | |||
<option value='true'>Animate</option> | |||
<option value='false'>Don't animate</option> | |||
</select> | |||
<input type='submit' value='Start cinematic' /> | |||
</form> | |||
}} | |||
Forms can be slightly more challenging to construct, due to requiring multiple tags and their correct functioning not merely being dictated by their appearance but also by whether the entered data is sent correctly, which is a less visible aspect. However, they are an important (first) tool when setting up means of changing data in a [[Project]] for an end-user. | |||
===Comments=== | ===Comments=== | ||
HTML also has a syntax for comments. Comments are segments of text which are marked to be ignored by whatever application is interpreting the HTML. Comments are denoted with an opening and closing text. <!-- starts a comment and --> ends it. This means that <code><p><!--<h1>hello!</h1> This is --> text<p></code> is interpreted as <code><p> text<p></code>. This is useful when you wish to have the | HTML also has a syntax for comments. Comments are segments of text which are marked to be ignored by whatever application is interpreting the HTML. Comments are denoted with an opening and closing text. <!-- starts a comment and --> ends it. This means that <code><p><!--<h1>hello!</h1> This is --> text<p></code> is interpreted as <code><p> text<p></code>. This is useful when you wish to have the {{software}} interpret and output an entire text, but you only want certain parts of it to be visible to the user. By commenting out the sections which users should not see, only those parts which are to be seen will be displayed. | ||
==Using CSS styling== | ==Using CSS styling== | ||
It is possible to further style many elements using the "style" attribute. This attribute accepts CSS-style keys and values, which can be used to change how certain elements behave in terms of layout, and can be used to increase readability of text. The style attribute accepts one or more key-value pairs, with the key and the value linked with a colon, and each pair separated with a semicolon. For example, to use a style attribute to set both the width and height of an element: <code><table style='width:100px;height:150px;'></code>. | It is possible to further style many elements using the "style" attribute. This attribute accepts CSS-style keys and values, which can be used to change how certain elements behave in terms of layout, and can be used to increase readability of text. The style attribute accepts one or more key-value pairs, with the key and the value linked with a colon, and each pair separated with a semicolon. For example, to use a style attribute to set both the width and height of an element: <code><table style='width:100px;height:150px;'></code>. | ||
===Width | ===Width and height=== | ||
The width and height of an element. It is possible to set either, or both. | The width and height of an element. It is possible to set either, or both. | ||
| Line 108: | Line 130: | ||
Example: <code><td style='color:#00ff00;'></code> | Example: <code><td style='color:#00ff00;'></code> | ||
<!--==Action buttons== | |||
Example: {{code|inline=yes|middle=yes|padding=yes | |||
|1=<form action="$SLOT/event/LogicEventType/NEIGHBORHOOD_SET_ATTRIBUTE/?token=$TOKEN" method="post"> | |||
<input type="hidden" name="redirect" value="$CLOSE_PANEL"> | |||
<input type="hidden" name="0" value="0"> | |||
<input type="hidden" name="1" value="EXAMPLE_ATTRIBUTE"> | |||
<input type="hidden" name="2" value="123456789"> | |||
<input type="submit" value="Neighborhood attribute button"> | |||
</form>}}--> | |||
==Example HTML== | |||
To display how all of these elements come together, examples are provided here. These examples can be reused freely, and modified to fit your project's needs. | |||
== | ===HTML table=== | ||
[[File:HTML example full.jpg|framed|right|The HTML example will appear like this in the | [[File:HTML example full.jpg|framed|right|The HTML example will appear like this in the {{software}}. There may be slight differences when it is displayed in a browser.]] | ||
The following table layout can be created using HTML: | |||
{{code|padding=yes|inline=yes|middle=yes|style=font-family:sans-serif; | {{code|padding=yes|inline=yes|middle=yes|style=font-family:sans-serif; | ||
|1=<p style='font-size:1.5em;margin-top:1em;font-family:sans-serif;line-height:1.3; | |1=<p style='font-size:1.5em;margin-top:1em;font-family:sans-serif;line-height:1.3; | ||
| Line 125: | Line 158: | ||
</table>}} | </table>}} | ||
The display consists of a header, a paragraph with 2 sentences separated by a linebreak, and a table. The header has a row which serves as a header, followed by a row with a horizontal rule to separate it from the rest of the table. The rest of the table contains the actual data of the table. The values in the table are colored, to create an intuitive overview of where the values are good or bad. | The following is important to note: | ||
* The display consists of a header, a paragraph with 2 sentences separated by a linebreak, and a table. | |||
{{code|padding=yes|inline=yes | * The header has a row which serves as a header, followed by a row with a horizontal rule to separate it from the rest of the table. The rest of the table contains the actual data of the table. | ||
* The values in the table are colored, to create an intuitive overview of where the values are good or bad. This coloring is set on a per-cell basis. | |||
{{clear|all}} | |||
{{code|padding=yes|inline=yes | |||
|1=<h2>Amount of green in the area, per household</h2> | |1=<h2>Amount of green in the area, per household</h2> | ||
<p>Amount of green required per luxury household: 40 m2<br>Amount of green generated by citizens: 15 m2 per household</p> | <p>Amount of green required per luxury household: 40 m2<br>Amount of green generated by citizens: 15 m2 per household</p> | ||
| Line 155: | Line 192: | ||
</tr> | </tr> | ||
</table>}} | </table>}} | ||
===Form to set 1 global=== | |||
[[File:html-example-form-global-1.jpg|framed|right|The HTML example will appear like this in the {{software}}. There may be slight differences when it is displayed in a browser.]] | |||
A form to change a single [[Global]] in a project can be created in HTML. | |||
The example is for a form that allows an end-user to change the value of a [[Global]] with an [[ID]] of 0, to some value which the end-user can set. | |||
Most of the form is hidden, so inspecting the html code is recommended, but the following is important to note: | |||
* The form itself defines an action to take. In this example specifically, the endpoint "global_set_value" will set the value of a global. | |||
* The form includes 2 inputs, named 0 and 1. This is because the "global_set_value" requires 2 pieces of data: the ID of the global to modify, and the value to set the global to. | |||
* The first of those inputs (with name 0) is hidden, so that an end-user cannot change the ID to an incorrect or invalid ID. This means you need to [[How to find the ID of specific data in your project|find and set the ID of the global]] you wish to have the end-user change. I.e., changing it to <code><input type='hidden' name='0' value='3' /></code> will mean the form changes the [[Global]] with ID 3. | |||
* The second input is set to only allow numbers to be entered. | |||
* A redirect input is included, so that after the form is submitted, the software sends the user back to the panel. The address of the panel is set at the end of the example using javascript. | |||
* The only actually visible elements are the leading text, the input field for the (new) value of the global, and the submit button. | |||
{{code|padding=yes|inline=yes|1= | |||
<div> | |||
<p>Set the value of the global using this panel</p> | |||
<form action='$SESSION/event/LogicEventType/global_set_value/?token=$TOKEN' method='post'> | |||
<input type='hidden' name='redirect' class='insertThisUrl' value='#'> | |||
<input type='hidden' name='0' value='0' /> | |||
<input type='number' name='1' value=<nowiki>''</nowiki> placeholder='New value here'/> | |||
<input type='submit' value='Set global'/> | |||
</form> | |||
<script> | |||
$('.insertThisUrl').val(window.location.href); | |||
</script> | |||
</div> | |||
}} | |||
To use this example effectively, it is recommended to create an [[Excel]] which outputs the HTML presented here, and then replaces the following by the desired information: | |||
* Change <code><input type='hidden' name='0' value='0' /></code>, so that the value of 0 is replaced by the ID of the [[Global]] you wish to allow to change. | |||
* Change <code><input type='number' name='1' value=<nowiki>''</nowiki></code>, so that that global's current value is automatically inserted. This means the end-user will know what they are changing the value from. | |||
* Add the name of the global (or a description of its intent/effect) to the leading text so the end-user knows more concretely what they are editing. | |||
===Form to set attribute for multiple areas=== | |||
[[File:html-example-form-area-multiple.jpg|framed|right|The HTML example will appear like this in the {{software}}. There may be slight differences when it is displayed in a browser.]] | |||
A form to set or change the values of a "CUSTOM_ATTRIBUTE" [[Attribute]] of multiple [[Area]]s in a project can be created in HTML, enhanced with javascript to transfer the entered data into a format compatible with the {{software}}'s [[API]]. | |||
The example allows for an end-user to input a desired value for 4 different [[Area]]s. | |||
Most of the form is hidden, so inspecting the html code is recommended, but the following is important to note: | |||
* The form itself defines an action to take. In this example specifically, the endpoint "areas_set_attributes" will set attribute values for multiple areas. This endpoint expects 3 parameters: an [[Area]] specified by [[ID]], the name of the [[Attribute]] to set, and the value to set that [[Area]]'s [[Attribute]] to. This endpoint can also process lists of each of those parameters, so multiple [[Area]]s and/or multiple values can be modified. | |||
* The actual value input fields are actually not part of the HTML form itself. Instead, because the data needs to be structured in a particular way when sending parameters for multiple changes, a small script will run to take all values the end-user has filled in and add it to the form when the end-user is ready. | |||
* There are multiple inputs of type "number", which the end-user can fill in. There is one input field per [[Area]] which the end-user can set. The input fields have some additional data to specify a specific [[Area]] by [[ID]], and to specify an [[Attribute]] to set. | |||
* The "submit" button is part of the form, so that when the user clicks it the form is sent. | |||
* The "onclick" attribute of the button indicates that when the user clicks the button (but before the form is sent), a javascript function is triggered which reads all input fields adds the data the end-user has entered into the form. | |||
* A redirect input is included, so that after the form is submitted, the software sends the user back to the panel. The address of the panel is set at the end of the example using javascript. | |||
{{code|padding=yes|inline=yes|1= | |||
<div> | |||
<p>Set the value of the attribute "CUSTOM_ATTRIBUTE" for the first 4 areas in the project</p> | |||
<div class='inputForm'> | |||
<span style='display:inline-block;width:180px;'>Area 1</span><input type='number' data-area='0' data-attribute='CUSTOM_ATTRIBUTE' value=<nowiki>''</nowiki> placeholder='Area 1 value'><br> | |||
<span style='display:inline-block;width:180px;'>Area 2</span><input type='number' data-area='1' data-attribute='CUSTOM_ATTRIBUTE' value=<nowiki>''</nowiki> placeholder='Area 2 value'><br> | |||
<span style='display:inline-block;width:180px;'>Area 3</span><input type='number' data-area='2' data-attribute='CUSTOM_ATTRIBUTE' value=<nowiki>''</nowiki> placeholder='Area 3 value'><br> | |||
<span style='display:inline-block;width:180px;'>Area 4</span><input type='number' data-area='3' data-attribute='CUSTOM_ATTRIBUTE' value=<nowiki>''</nowiki> placeholder='Area 4 value'><br> | |||
</div> | |||
<form class='submitForm' action="$SESSION/event/LogicEventType/areas_set_attributes/?token=$TOKEN" method="post"> | |||
<input type='hidden' name='redirect' class='insertThisUrl' value='#'> | |||
<input type='hidden' name='0' value=<nowiki>''</nowiki>> | |||
<input type='hidden' name='1' value=<nowiki>''</nowiki>> | |||
<input type='hidden' name='2' value=<nowiki>''</nowiki>> | |||
<input type='submit' onclick='fillForm()' value='Change attributes' /> | |||
</form> | |||
<script> | |||
$('.insertThisUrl').val(window.location.href); | |||
fillForm = function() { | |||
var ids = []; | |||
var attributes = []; | |||
var values = []; | |||
for (var input of $('.inputForm').find('input') ) { | |||
if ( $(input).val() !== <nowiki>''</nowiki> ) { | |||
ids.push( $(input).attr('data-area') ); | |||
attributes.push( $(input).attr('data-attribute') ); | |||
values.push( $(input).val() ); | |||
} | |||
} | |||
if (ids.length>0) { | |||
$('.submitForm').find('[name=\'0\']').val(JSON.stringify(ids)); | |||
$('.submitForm').find('[name=\'1\']').val(JSON.stringify(attributes)); | |||
$('.submitForm').find('[name=\'2\']').val(JSON.stringify(values)); | |||
} else { | |||
return false; | |||
} | |||
} | |||
</script> | |||
</div> | |||
}} | |||
To use this example effectively, it is recommended to create an [[Excel]] which outputs the HTML presented here, and then replaces the following by the desired information: | |||
* Create multiple inputs using an [[x query]], rather than statically defining a fixed number. | |||
* Ensure the "area" attribute of each of the inputs is defined based on the x-query's output, so that each input relates to exactly one valid [[Area]]. | |||
* Change the "attribute" attribute of each the inputs to the [[Attribute]] the end-user should be able to modify via this interface. | |||
* Add a description of the [[Attribute]]'s intent/effect to the leading text so the end-user knows more concretely what they are editing. | |||
{{article end | |||
|external= | |||
* https://www.w3schools.com/html/, a public resource with more information on all facets of HTML and related technologies. | |||
}} | |||
Latest revision as of 08:43, 10 January 2024
HTML
HTML stands for HyperText Markup Language. It is a language used to indicate how text or content should be laid out for display. Along with Cascading Style Sheets (CSS), it is generally used for styling webpages.
How HTML relates to the Tygron Platform
In the Tygron Platform, there are a number of places where the user is responsible for providing text and information. When that information can be complex, such as the Excel output for an Excel (Indicator), the Tygron Platform allows HTML to be used for determining how the information should be laid out. The Tygron Platform is effectively HTML5 compliant for these purposes.
How HTML is structured
HTML consists of a number of elements, which are demarked by two tags: an opening and a closing tag. The opening tag indicates where an element starts, and the closing tag indicates where an element finishes. Each tag consists of a word or a few characters, enclosed by less-than and greater-than characters (< and >). A closing tag has an additional slash in it to indicate it's a closing tag. For example, a full element is constructed as follows: <element>hello!</element>.
There are also tags which are used by themselves, and do not require a closing tag. These are elements like <br>, which insert a linebreak in the layout at the location of the element.
Elements can also have attributes. Attributes configure or fine-tune the behavior of the elements. They generally consist of a key and a value, linked by an "equals" sign. Attributes are placed in the opening tag, and not in the closing tag. For example, an attribute to indicate an intended address: <a href='www.example.com'>Link to another site</a>. Here, the attribute is "href", and the value is "www.example.com".
HTML is best inspected when properly formatted, with linebreaks and indentation to indicate where certain elements begin and end. However, this is not neccesary for the interpretation of HTML. The following pieces of HTML will generate the same output:
<element>
  <element>
    Text
  </element>
</element>
is interpreted the same as
<element><element>Text</element></element>
Using HTML
The full span of the capabilities of HTML extends far beyond the scope of this wiki. Instead, some basic elements will be explained here which will allow you to tackle most formatting challenges. For further information regarding HTML, CSS and javascript, please refer to other online information sources.
Text formatting
For basic text styling, a number of elements exist.
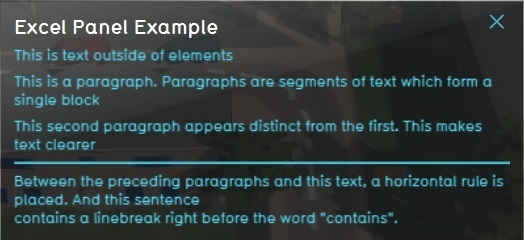
Paragraph: <p>
The paragraph element <p>paragraph</p> is used to define a segment of text which is supposed to appear as a paragraph of text. A paragraph is slightly indented, and is surrounded by a bit of empty space. This automatically separates consecutive paragraphs, for easy of reading.
Horizontal rule: <hr>
The horizontal rule element <hr> inserts a horizontal line into the layout. Horizontal lines are useful for separating segments of information.
Linebreak: <br>
The linebreak element <br> indicates that in this point of the layout, the line ends. Anything that comes after should appear on a new line.
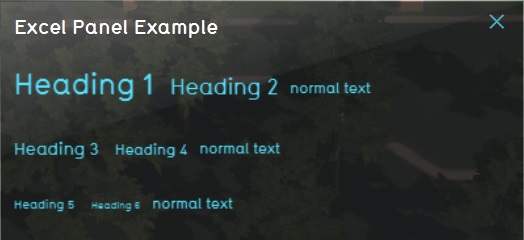
Headings: <h1>, <h2>, etc
The heading elements <h1>heading</h1>, <h2>heading</h2>, (continuing through to <h6>heading</h6>) are generally used for titles. The lower the number, the larger and more prominent the title.
Tables
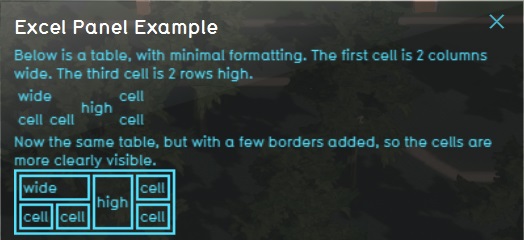
A table element consists of multiple nested elements. The main element is <table>the table</table>. A table consists of one or multiple rows, which are also elements. A row element is <tr>the row</tr>. In turn, each row consists of one or multiple cells, which are also elements. The cell elements are <td>the cell</td>. The net result for a full table will look something like this:
<table>
<tr> <td> A </td> <td> B </td> </tr>
<tr> <td> C </td> <td> D </td> </tr>
</table>
is interpreted as
| <table> | |||||||
| <tr> | <td> | A | </td> | <td> | B | </td> | </tr> |
| <tr> | <td> | C | </td> | <td> | D | </td> | </tr> |
| </table> |
and thus becomes
| A | B |
| C | D |
Colspan and Rowspan
When a cell has to span multiple rows or columns, the colspan and rowspan attributes can be used.
<table>
<tr> <td colspan=2> A </td> </tr>
<tr> <td> C </td> <td> D </td> </tr>
</table>
would result in
| A | |
| C | D |
Forms
HTML can also be used to create forms. Forms are a structure for data entry and submission, and can be used in combination with the Tygron Platform API to facilitate interactions and effect changes. Forms consist of:
- A
<form>element to contain and define everything - One or more
<input>elements to define the individual parameters of the instruction you wish to enact- Alternatively,
<select>elements can also be used in place of inputs to allow a specific list of options, rather than freeform data entry
- Alternatively,
- A
<input type='submit'>element (with its type set to "submit"), to create a button to actually send the data
A fully functional form in the Tygron Platform will always follow the same approximate structure:
<form action='$SESSION/event/LogicEventType/cinematic_stakeholder_start/?token=$TOKEN' method='post'>
	<input type='hidden' name='0' value='0'>
	<input type='hidden' name='1' value='0'>
	<select name='2'>
		<option value='true'>Animate</option>
		<option value='false'>Don't animate</option>
	</select>
	<input type='submit' value='Start cinematic' />
</form>
Forms can be slightly more challenging to construct, due to requiring multiple tags and their correct functioning not merely being dictated by their appearance but also by whether the entered data is sent correctly, which is a less visible aspect. However, they are an important (first) tool when setting up means of changing data in a Project for an end-user.
Comments
HTML also has a syntax for comments. Comments are segments of text which are marked to be ignored by whatever application is interpreting the HTML. Comments are denoted with an opening and closing text. <!-- starts a comment and --> ends it. This means that <p><!--<h1>hello!</h1> This is --> text<p> is interpreted as <p> text<p>. This is useful when you wish to have the Tygron Platform interpret and output an entire text, but you only want certain parts of it to be visible to the user. By commenting out the sections which users should not see, only those parts which are to be seen will be displayed.
Using CSS styling
It is possible to further style many elements using the "style" attribute. This attribute accepts CSS-style keys and values, which can be used to change how certain elements behave in terms of layout, and can be used to increase readability of text. The style attribute accepts one or more key-value pairs, with the key and the value linked with a colon, and each pair separated with a semicolon. For example, to use a style attribute to set both the width and height of an element: <table style='width:100px;height:150px;'>.
Width and height
The width and height of an element. It is possible to set either, or both.
Example: <td style='width:100px;height:20px;'>
The width is especially useful when fine-tuning the usage of horizontal space in tables, by setting the width of individual cells on a single row.
Text-align
The alignment of an element means the alignment of text within that element. It can be set to "left", "right", "center".
Example: <td style='text-align:right;'>
Nested elements, which have "display:inline" as styling, are also aligned.
Color
The color or an element refers to the color of text in that element. It can be set to any valid CSS color code.
Example: <td style='color:#00ff00;'>
Example HTML
To display how all of these elements come together, examples are provided here. These examples can be reused freely, and modified to fit your project's needs.
HTML table
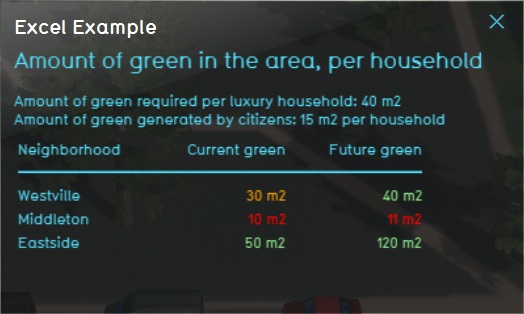
The following table layout can be created using HTML:
Amount of green in the area, per household
Amount of green required per luxury household: 40 m2
Amount of green generated by citizens: 15 m2 per household
| Neighborhood | Current green | Future green |
| Westville | 30 m2 | 40 m2 |
| Middleton | 10 m2 | 11 m2 |
| Eastside | 50 m2 | 120 m2 |
The following is important to note:
- The display consists of a header, a paragraph with 2 sentences separated by a linebreak, and a table.
- The header has a row which serves as a header, followed by a row with a horizontal rule to separate it from the rest of the table. The rest of the table contains the actual data of the table.
- The values in the table are colored, to create an intuitive overview of where the values are good or bad. This coloring is set on a per-cell basis.
<h2>Amount of green in the area, per household</h2>
<p>Amount of green required per luxury household: 40 m2<br>Amount of green generated by citizens: 15 m2 per household</p>
<table>
  <tr>
    <td style='text-align:left;width:100px;'>Neighborhood</td>
    <td style='text-align:right;width:100px;'>Current green</td>
    <td style='text-align:right;width:100px;'>Future green</td>
    </tr>
  <tr>
    <td colspan=3><hr></td>
  </tr>
  <tr>
    <td style='text-align:left;'>Westville</td>
    <td style='text-align:right;color:orange;'>30 m2</td>
    <td style='text-align:right;color:lightgreen;'>40 m2</td>
  </tr>
  <tr>
    <td style='text-align:left;'>Middleton</td>
    <td style='text-align:right;color:#ff0000;'>10 m2</td>
    <td style='text-align:right;color:#ff0000;'>11 m2</td>
  </tr>
  <tr>
    <td style='text-align:left;'>Eastside</td>
    <td style='text-align:right;color:lightgreen;'>50 m2</td>
    <td style='text-align:right;color:lightgreen;'>120 m2</td>
  </tr>
</table>
Form to set 1 global
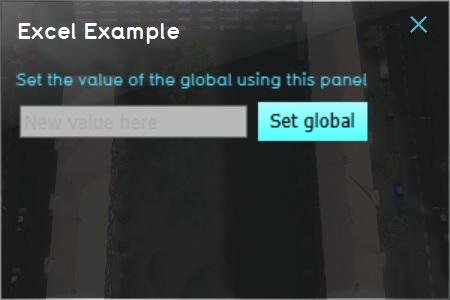
A form to change a single Global in a project can be created in HTML.
The example is for a form that allows an end-user to change the value of a Global with an ID of 0, to some value which the end-user can set.
Most of the form is hidden, so inspecting the html code is recommended, but the following is important to note:
- The form itself defines an action to take. In this example specifically, the endpoint "global_set_value" will set the value of a global.
- The form includes 2 inputs, named 0 and 1. This is because the "global_set_value" requires 2 pieces of data: the ID of the global to modify, and the value to set the global to.
- The first of those inputs (with name 0) is hidden, so that an end-user cannot change the ID to an incorrect or invalid ID. This means you need to find and set the ID of the global you wish to have the end-user change. I.e., changing it to
<input type='hidden' name='0' value='3' />will mean the form changes the Global with ID 3. - The second input is set to only allow numbers to be entered.
- A redirect input is included, so that after the form is submitted, the software sends the user back to the panel. The address of the panel is set at the end of the example using javascript.
- The only actually visible elements are the leading text, the input field for the (new) value of the global, and the submit button.
<div>
	<p>Set the value of the global using this panel</p>

	<form action='$SESSION/event/LogicEventType/global_set_value/?token=$TOKEN' method='post'>
		<input type='hidden' name='redirect' class='insertThisUrl' value='#'>

		<input type='hidden' name='0' value='0' />
		<input type='number' name='1' value='' placeholder='New value here'/>

		<input type='submit' value='Set global'/>
	</form>

	<script>
		$('.insertThisUrl').val(window.location.href);
	</script>
</div>
To use this example effectively, it is recommended to create an Excel which outputs the HTML presented here, and then replaces the following by the desired information:
- Change
<input type='hidden' name='0' value='0' />, so that the value of 0 is replaced by the ID of the Global you wish to allow to change. - Change
<input type='number' name='1' value='', so that that global's current value is automatically inserted. This means the end-user will know what they are changing the value from. - Add the name of the global (or a description of its intent/effect) to the leading text so the end-user knows more concretely what they are editing.
Form to set attribute for multiple areas
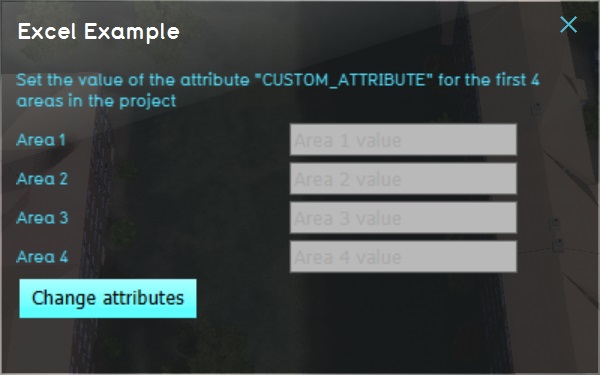
A form to set or change the values of a "CUSTOM_ATTRIBUTE" Attribute of multiple Areas in a project can be created in HTML, enhanced with javascript to transfer the entered data into a format compatible with the Tygron Platform's API.
The example allows for an end-user to input a desired value for 4 different Areas.
Most of the form is hidden, so inspecting the html code is recommended, but the following is important to note:
- The form itself defines an action to take. In this example specifically, the endpoint "areas_set_attributes" will set attribute values for multiple areas. This endpoint expects 3 parameters: an Area specified by ID, the name of the Attribute to set, and the value to set that Area's Attribute to. This endpoint can also process lists of each of those parameters, so multiple Areas and/or multiple values can be modified.
- The actual value input fields are actually not part of the HTML form itself. Instead, because the data needs to be structured in a particular way when sending parameters for multiple changes, a small script will run to take all values the end-user has filled in and add it to the form when the end-user is ready.
- There are multiple inputs of type "number", which the end-user can fill in. There is one input field per Area which the end-user can set. The input fields have some additional data to specify a specific Area by ID, and to specify an Attribute to set.
- The "submit" button is part of the form, so that when the user clicks it the form is sent.
- The "onclick" attribute of the button indicates that when the user clicks the button (but before the form is sent), a javascript function is triggered which reads all input fields adds the data the end-user has entered into the form.
- A redirect input is included, so that after the form is submitted, the software sends the user back to the panel. The address of the panel is set at the end of the example using javascript.
<div>
	<p>Set the value of the attribute "CUSTOM_ATTRIBUTE" for the first 4 areas in the project</p>

	<div class='inputForm'>
		<span style='display:inline-block;width:180px;'>Area 1</span><input type='number' data-area='0' data-attribute='CUSTOM_ATTRIBUTE' value='' placeholder='Area 1 value'><br>
		<span style='display:inline-block;width:180px;'>Area 2</span><input type='number' data-area='1' data-attribute='CUSTOM_ATTRIBUTE' value='' placeholder='Area 2 value'><br>
		<span style='display:inline-block;width:180px;'>Area 3</span><input type='number' data-area='2' data-attribute='CUSTOM_ATTRIBUTE' value='' placeholder='Area 3 value'><br>
		<span style='display:inline-block;width:180px;'>Area 4</span><input type='number' data-area='3' data-attribute='CUSTOM_ATTRIBUTE' value='' placeholder='Area 4 value'><br>
	</div>

	<form class='submitForm' action="$SESSION/event/LogicEventType/areas_set_attributes/?token=$TOKEN" method="post">
		<input type='hidden' name='redirect' class='insertThisUrl' value='#'>
		<input type='hidden' name='0' value=''>
		<input type='hidden' name='1' value=''>
		<input type='hidden' name='2' value=''>

		<input type='submit' onclick='fillForm()' value='Change attributes' />
	</form>

	<script>
		$('.insertThisUrl').val(window.location.href);

		fillForm = function() {
			var ids = [];
			var attributes = [];
			var values = [];
			for (var input of $('.inputForm').find('input') ) {
				if ( $(input).val() !== '' ) {
					ids.push( $(input).attr('data-area') );
					attributes.push( $(input).attr('data-attribute') );
					values.push( $(input).val() );
				}
			}
			if (ids.length>0) {
				$('.submitForm').find('[name=\'0\']').val(JSON.stringify(ids));
				$('.submitForm').find('[name=\'1\']').val(JSON.stringify(attributes));
				$('.submitForm').find('[name=\'2\']').val(JSON.stringify(values));
			} else {
				return false;
			}
		}
	</script>
</div>
To use this example effectively, it is recommended to create an Excel which outputs the HTML presented here, and then replaces the following by the desired information:
- Create multiple inputs using an x query, rather than statically defining a fixed number.
- Ensure the "area" attribute of each of the inputs is defined based on the x-query's output, so that each input relates to exactly one valid Area.
- Change the "attribute" attribute of each the inputs to the Attribute the end-user should be able to modify via this interface.
- Add a description of the Attribute's intent/effect to the leading text so the end-user knows more concretely what they are editing.
External links
- https://www.w3schools.com/html/, a public resource with more information on all facets of HTML and related technologies.

