Tutorial SF Project: Difference between revisions
Jump to navigation
Jump to search
m (Godelief@tygron.nl moved page Demo San Francisco to Demo San Francisco project) |
|||
| Line 15: | Line 15: | ||
# To see from which datasets the 3D model is constructed, [[How_to_add_and_remove_an_Overlay|add]] the [[Source_(Overlay)|Source overlay]]. The [[Source_(Overlay)|Source overlay]] will highlight the used datasets. First check the I3S San Francisco dataset. Notice most of the buildings in the 3D model are highlighted. This means data from the I3S Scene Layer is used to create these buildings. | # To see from which datasets the 3D model is constructed, [[How_to_add_and_remove_an_Overlay|add]] the [[Source_(Overlay)|Source overlay]]. The [[Source_(Overlay)|Source overlay]] will highlight the used datasets. First check the I3S San Francisco dataset. Notice most of the buildings in the 3D model are highlighted. This means data from the I3S Scene Layer is used to create these buildings. | ||
# Uncheck the I3S San Francisco dataset and check the [[Project_Sources|OSM]] dataset. Notice that again almost all buildings are highlighted. This accentuates the effect that the {{software}} uses multiple data sources to create a 3D model. Take a look at the [[Project_Sources|project sources]] page to see all the (open) data we use to generate a new project. | # Uncheck the I3S San Francisco dataset and check the [[Project_Sources|OSM]] dataset. Notice that again almost all buildings are highlighted. This accentuates the effect that the {{software}} uses multiple data sources to create a 3D model. Take a look at the [[Project_Sources|project sources]] page to see all the (open) data we use to generate a new project. | ||
# | # Click on the [[City_Overlay|default overlay]] to see the default model. | ||
# | # Click on the [[Current_Situation|Current situation tab]] on the [[Constructions|Buildings]] button and select a | ||
# Add an attribute overlay | # Add an attribute overlay | ||
# Search in the scene layers for the san francisco layer | # Search in the scene layers for the san francisco layer | ||
Revision as of 15:07, 14 January 2020
This page provides an overview and explanation about the Demo San Francisco project, available for all users.
About the project
The Demo San Francisco project is available for all users in the trial version and can be found in the main menu under Edit projects. The demo is a working project in which an I3S Scene Layer is used in the new project generation wizard to create the 3D buildings. This project can serve to further explore the 3D model and its usage.
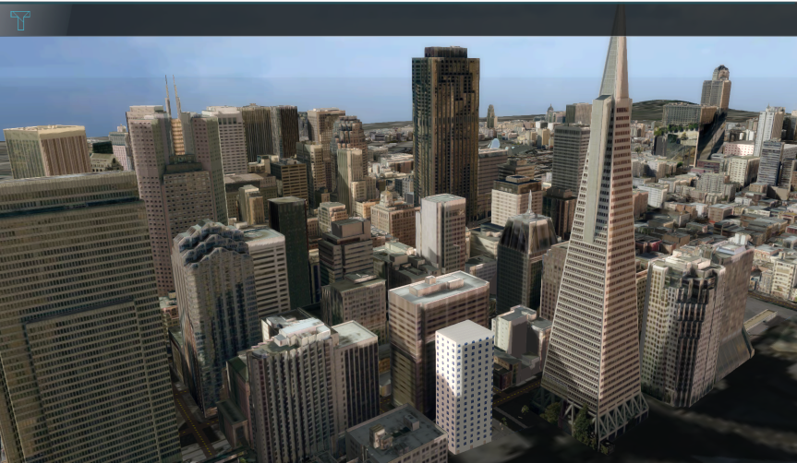
Demo San Francisco
The project shows the San Francisco financial district, created from an I3S Scene Layer and OSM data.
Analyse the project
- Zoom and click around in the project to inspect the 3D model.
- To see from which datasets the 3D model is constructed, add the Source overlay. The Source overlay will highlight the used datasets. First check the I3S San Francisco dataset. Notice most of the buildings in the 3D model are highlighted. This means data from the I3S Scene Layer is used to create these buildings.
- Uncheck the I3S San Francisco dataset and check the OSM dataset. Notice that again almost all buildings are highlighted. This accentuates the effect that the Tygron Platform uses multiple data sources to create a 3D model. Take a look at the project sources page to see all the (open) data we use to generate a new project.
- Click on the default overlay to see the default model.
- Click on the Current situation tab on the Buildings button and select a
- Add an attribute overlay
- Search in the scene layers for the san francisco layer
- Add a function highlight overlay
FAQ
- Can I change the texture, color or shape of a 3D model?
- How do I import new 3D models?
- How do I delete 3D models?
- Why do the 3D models float in the 3D world?
See also
