Tutorial SF Project: Difference between revisions

From Tygron Support wiki
Jump to navigation Jump to search
Line 12: Line 12:


===Analyse the project===
# Click on the arrows in the project to get familiar with the boundary conditions in the model.  
# Click around in the project to inspect the buildings.  
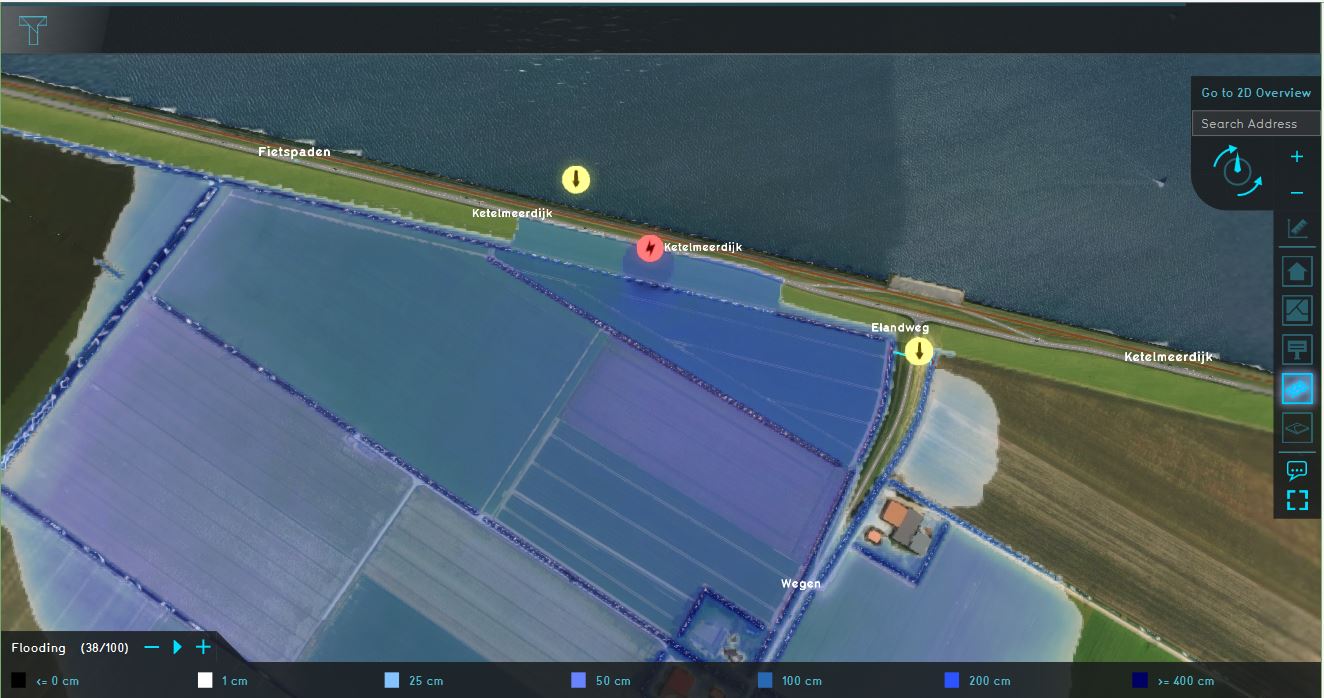
# Go to the Flooding Overlay (named ''Flooding'') in the Overlay bar. Play the flooding overlay and notice how the water flows for example, around the [[Culvert_(Water_Overlay)|Culvert]]. This overlay shows the [[Surface_last_value_result_type_(Water_Overlay)|Surface last value]] result type. Another interesting result type to study is the [[Surface_last_speed_result_type_(Water_Overlay)|Surface last speed]].
# Add a function highlight overlay
# Go to the [[Base_types_result_type_(Water_Overlay)|Base types]] result type, zoom in on the breach location and play the overlay to see how the breach grows over time. The light red area is the active breach area, the dark red area is part of the whole breach area. This is the available space for the active breach to grow depending on the set [[Weather_(Water_Overlay)|simulation time]], the [[Breach_speed_(Water_Overlay)|critical speed]] and the [[Breach_width_(Water_Overlay)|breach width]].
# click on a building to see the attributes
# Take a look at the [[Surface_elevation_result_type_(Water_Overlay)|Surface elevation]] result type. This height data is used for the Water Overlay calculations. If you focus on the breach area, you can clearly see what the breach area does: lowering the terrain height so that water can flood the surface.
# Add an attribute overlay
# Click on the [[Areas|Area menu]] in the Current Situation tab and select the area: ''breach'' in the left panel. In the right panel, select the attributes tab, focus on the attributes and their meaning. Especially the attributes relating to the external area. Since the project area is quite small it does not contain the whole body of water (Ijsselmeer). With no additional settings only the water in the project area would be used as the amount of water which can flow through the breach. Since we would like a more 'realistic' model, the breach area is configured with external area attributes. These attributes enable the use of the Ijsselmeer's whole capacity, without having to create a large project. See the following pages for an explanation of the attributes: [[External_area_(Water_Overlay)|External area]], [[External_surface_level_(Water_Overlay)|External surface level]] and [[External_water_level_(Water_Overlay)|External Water level]].
# Search in the scene layers for the san francisco layer
# Open the flooding wizard and take a look at the settings for the flood event, breach, culvert and output overlays.


<br>
<br>
===See also===
===See also===
#[[Breach_(Water_Overlay)|Breach]]

Revision as of 14:01, 14 January 2020


This page provides an overview and explanation about the Demo San Francisco project, available for all users.

About the project

The Demo San Francisco project is available for all users in the trial version and can be found in the main menu under Edit projects. The demo is a working project in which an I3S Scene Layer is used in the new project generation wizard to create the 3D buildings. This project can serve to further explore the 3D model and its usage.

Demo San Francisco

Flooding and breach growth

The project shows the San Francisco financial district, created from an I3S Scene Layer and OSM data.

Analyse the project

  1. Click around in the project to inspect the buildings.
  2. Add a function highlight overlay
  3. click on a building to see the attributes
  4. Add an attribute overlay
  5. Search in the scene layers for the san francisco layer


See also
  1. Breach
  2. Breach growth formula
  3. Breach flow formula
  4. Flooding overlay
  5. Culvert