Livability Housing (Indicator): Difference between revisions
(Created page with "{{learned|what the livability housing indicator is|how the livability housing indicator is calculated|how the indicator can be changed to fit you project}} ==General== ===Wha...") |
No edit summary |
||
| Line 7: | Line 7: | ||
* one of the goals is to increase livabilty for citizens | * one of the goals is to increase livabilty for citizens | ||
* the livability of neighborhoods need to be compared | * the livability of neighborhoods need to be compared | ||
===Indicator panel=== | ===Indicator panel=== | ||
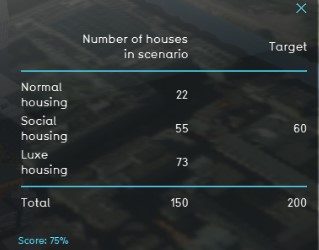
[[File:Target_score.jpg|300px|right]] | [[File:Target_score.jpg|300px|right]] | ||
The indicator panel shows the present neighborhoods in the area, the total amount of buildings present in each | The indicator panel shows the present neighborhoods in the area, the total amount of buildings present in each neighborhood and the percentage of houses with adequate livability conditions. | ||
===Calculation=== | ===Calculation=== | ||
This indicator calculates the percentage of houses with adequete livability conditions in each neighborhood. The livability of a house is considered 'adequate' if the livability score is above -0.5. This score is based on function values of props in the 3d world. | |||
===Score=== | ===Score=== | ||
The score is represented in a progress bar, with a scale from 0 to 100%. | The score is represented in a progress bar, with a scale from 0 to 100%. The percentage represents the percentage of adequate houses in the area in comparison to the total houses. At 0% there are no houses in the area with adequate livability. At 100% every house in the area has adequate livability conditions. The score can be adjusted in three ways. | ||
* The function values of the props in the 3dworld can be changed, see [[Livability (Overlay)]] | |||
* separation between adequete and poor livability condition can b adjusted in the indicator excel file | |||
* The indicator target can changed to a percentage below 100% | |||
==Additional configurations== | ==Additional configurations== | ||
For this indicator to function, | For this indicator to function, the [[Livability (Overlay)]] needs to be added | ||
Revision as of 09:22, 6 May 2019
General
What is the Livability Housing indicator?
The Livability Housing indicator calculates the percentage of buildings which have adequate living conditions in comparison to the total amount of buildings. See the livability (overlay for the livability scoring. The indicator panel shows these percentages per neighborhood. This indicator is useful for projects where for example:
- one of the goals is to increase livabilty for citizens
- the livability of neighborhoods need to be compared
Indicator panel
The indicator panel shows the present neighborhoods in the area, the total amount of buildings present in each neighborhood and the percentage of houses with adequate livability conditions.
Calculation
This indicator calculates the percentage of houses with adequete livability conditions in each neighborhood. The livability of a house is considered 'adequate' if the livability score is above -0.5. This score is based on function values of props in the 3d world.
Score
The score is represented in a progress bar, with a scale from 0 to 100%. The percentage represents the percentage of adequate houses in the area in comparison to the total houses. At 0% there are no houses in the area with adequate livability. At 100% every house in the area has adequate livability conditions. The score can be adjusted in three ways.
- The function values of the props in the 3dworld can be changed, see Livability (Overlay)
- separation between adequete and poor livability condition can b adjusted in the indicator excel file
- The indicator target can changed to a percentage below 100%
Additional configurations
For this indicator to function, the Livability (Overlay) needs to be added
