How to create an SLPK file: Difference between revisions
No edit summary |
|||
| Line 2: | Line 2: | ||
To learn more about ArcGIS Pro visit ESRI's [https://pro.arcgis.com/en/pro-app/help/main/welcome-to-the-arcgis-pro-app-help.htm ArcGis Pro Documentation]. | To learn more about ArcGIS Pro visit ESRI's [https://pro.arcgis.com/en/pro-app/help/main/welcome-to-the-arcgis-pro-app-help.htm ArcGis Pro Documentation]. | ||
In order to export a 3D model as a SLPK, it has to be imported into ArcGIS Pro and Georeferenced to place the model on the right location.<br> ArcGIS Pro allows different file formats to be imported.<br> | In order to export a 3D model as a SLPK, it has to be imported into ArcGIS Pro and Georeferenced to place the model on the right location.<br> ArcGIS Pro allows different file formats to be imported.<br> | ||
' | ==Requirements on 3D models== | ||
Below some notes to take into account when importing a 3D model into the {{software}} | |||
* If the 3D model is of a 3D plan with multiple [[Function]]s, take note of the following. For each [[Function]] in the 3D plan, a separate SLPK file should be created, since it is not possible to do a function mapping. Therefore, you could also consider to only transform the 3D buildings into a SLPK file to import them with the correct form as one function into the {{software}}. If here are multiple types of buildings in the plan, then create multiple SLPK files or after importing, change the type of buildings manually in the Plaform. The other elements in the plan, such as roads, squares and green spaces can then be transformed to a (2D) [[GeoJSON]] file. For a GeoJSON it is possible to do a function mapping, only the generic Tygron models are used for the elements in the plan. | |||
* The plan should only contain the new functions (the new adjustments to the current situation) and no existing functions such as the surroundings. | |||
* If possible, try to draw the plan directly on the right location or after finishing the plan, move it to the right location. This saves a few steps in preparing the data before importing in the {{software}}. | |||
* When designing the model, work with different layers for the different [[Function]]s in the design. For example, all office buildings are in a layer called offices, parks are in the layer green spaces etc. Try to be clear with the naming of the layers. | |||
* Be aware of the fact that [[Function]]s in the {{software}} can't overlap. For example a building polygon may not be on top of a green space polygon. In the {{software}} this would translate to either the building which is imported or the green space, since it is not possible to stack functions on top of each other. In this case, the green space should be drawn surrounding the building polygon. | |||
* Try to make the plan as neat as possible to ensure a valid data file. For example, no lines or polygons on top of each other (duplicates), loose line segments or surfaces that do not belong to the plan, polygons that are not closed etc. | |||
===1. Creating a new ArcGIS Pro project=== | ===1. Creating a new ArcGIS Pro project=== | ||
Revision as of 15:53, 15 March 2021
This page provides information on how to export a SLPK file with ArcGIS Pro. The ArcGIS PRo version used in this documentation is 2.4.0.
To learn more about ArcGIS Pro visit ESRI's ArcGis Pro Documentation.
In order to export a 3D model as a SLPK, it has to be imported into ArcGIS Pro and Georeferenced to place the model on the right location.
ArcGIS Pro allows different file formats to be imported.
Requirements on 3D models
Below some notes to take into account when importing a 3D model into the Tygron Platform
- If the 3D model is of a 3D plan with multiple Functions, take note of the following. For each Function in the 3D plan, a separate SLPK file should be created, since it is not possible to do a function mapping. Therefore, you could also consider to only transform the 3D buildings into a SLPK file to import them with the correct form as one function into the Tygron Platform. If here are multiple types of buildings in the plan, then create multiple SLPK files or after importing, change the type of buildings manually in the Plaform. The other elements in the plan, such as roads, squares and green spaces can then be transformed to a (2D) GeoJSON file. For a GeoJSON it is possible to do a function mapping, only the generic Tygron models are used for the elements in the plan.
- The plan should only contain the new functions (the new adjustments to the current situation) and no existing functions such as the surroundings.
- If possible, try to draw the plan directly on the right location or after finishing the plan, move it to the right location. This saves a few steps in preparing the data before importing in the Tygron Platform.
- When designing the model, work with different layers for the different Functions in the design. For example, all office buildings are in a layer called offices, parks are in the layer green spaces etc. Try to be clear with the naming of the layers.
- Be aware of the fact that Functions in the Tygron Platform can't overlap. For example a building polygon may not be on top of a green space polygon. In the Tygron Platform this would translate to either the building which is imported or the green space, since it is not possible to stack functions on top of each other. In this case, the green space should be drawn surrounding the building polygon.
- Try to make the plan as neat as possible to ensure a valid data file. For example, no lines or polygons on top of each other (duplicates), loose line segments or surfaces that do not belong to the plan, polygons that are not closed etc.
1. Creating a new ArcGIS Pro project
First create a new project in ArcGIS Pro. When starting a new project make sure that you select a local Scene from the Blank Templates section. You can convert a local scene to a global scene after you have imported your model(s).
2. Adding 3D data files
Adding a DWG file
If you are working with CAD data, see the steps on How to import a DWG file.
Import a SketchUp model
To import a SketchUp model, see the How to import a SketchUp model in ArcGIS Pro.
Import BIM data
To import BIM data in ArcGIS Pro, there are multiple options. Here we describe one of them by making use of ArcMap. See for the steps How to prepare BIM data to import in ArcGIS Pro.
Importing other 3D file formats
To import other 3D files like OBJ, DAE, 3DS, FLT or WRL, see the How to import a 3D file.
2.b Importing and assigning texture maps on an imported model
If your model has a texture map and it is not loaded onto the model after importing you can import it manually in ArcGis Pro. To import and assign a texture follow the steps in the How to import and assign textures.
3.Georeference your imported model
If the 3D model is not yet on the right location on the map, follow the steps in the How to to georeference the model:
How to Georeference a 3D model.
4. Export the model as a SLPK file
After importing and if needed Georeferencing your model you can export the model to a SLPK file by following the steps below, which are divided into three sections. Please follow them in order.
Tools
Conversion tool

Input feature
Output Feature Class


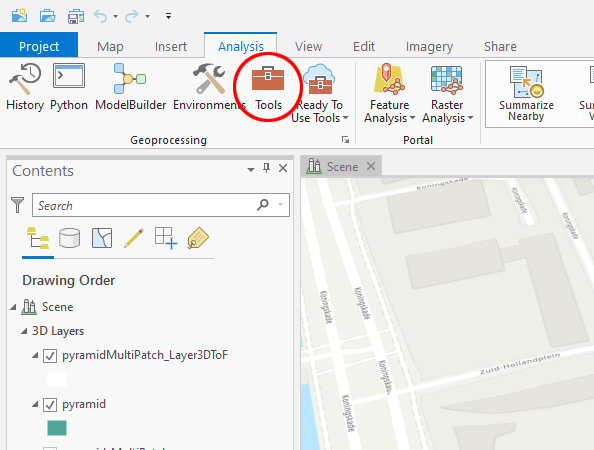
- In ArcGIS Pro go to the "Analysis" Tab and select "Tools".
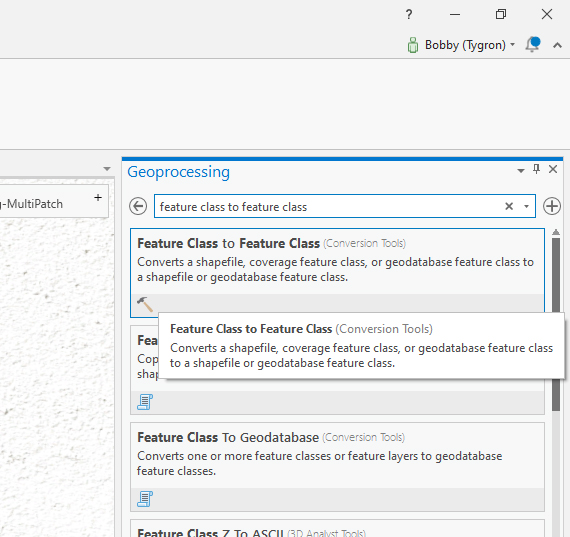
- On the right pane navigate to the "Feature Class to Feature Class" tool or type it in the search bar to find it.
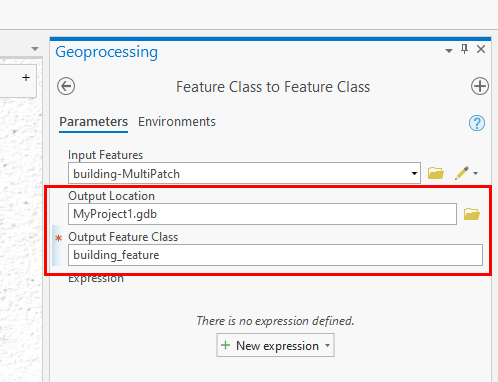
- In the "Input Features" field select the Multipatch feature(s) of the imported object by clicking on the dropdown in the field to select the layers.
- The Output location will be a .gdb (database file) with the project as a name. Leave the default name as is or rename it if you prefer.
- In the "Output Feature Class" field type in a name.This will save the Multipatch layer(s) to the database.
- Click on the Environments tab and choose the CRS for your data.
- Click on "Run" at the bottom right of the pane.
- Go to the "Analysis" Tab and select "Tools" again.
- On the right pane navigate to the "Layer 3D to Feature Class" tool or type it in the search bar to find it.
- In the "Input Feature Layer" field select the newly created feature class not the original multipatch layer(s).
- An automatic name will be generated in the "Output Feature Class" field. Usually it will append a "_Layer3DToF1" tag after the Multipatch name. Leave as default or rename it if you want. Make sure that you can identify the name because we will be needing it in the final step.
- Check "Disable Color and Texture" only if you do not want these features to be converted.
- Click on "Run" at the bottom right of the pane.
- Finally go to the "Analysis" Tab and select "Tools" again.
- On the right pane navigate to the "Create 3D Object Scene Layer Package" tool or type it in the search bar to find it.
- In the "Input Dataset" field select the created Layer3d file from the previous steps.
- In the "Output Scene Layer Package" field type in the name for the SLPK file wich will be created and choose the location for the file to be saved.
- Optimize the textures for various platform by choosing an option from the "Texture Optimization" dropdown field or leave at the default setting.
- Click on "Run" at the bottom right of the pane.
- Now a SLPK file will be created.
Importing a SLPK into the Tygron Platform
After creating a SLPK file, the data can be imported into the Tygron Platform by making use of the Geo data wizard. Read this how to for the steps.