How to add the Travel Distance Overlay: Difference between revisions
Jump to navigation
Jump to search
No edit summary |
No edit summary |
||
| Line 4: | Line 4: | ||
{| class="wikitable" | {| class="wikitable" | ||
|style="width: 5%"|1 | |style="width: 5%"|1 | ||
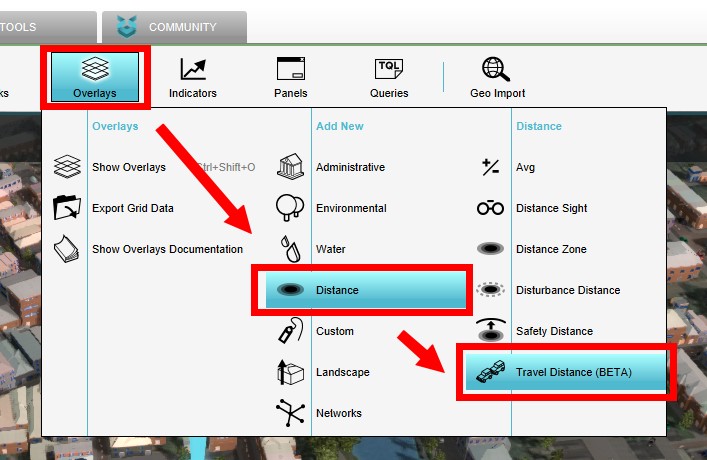
|style="width: 50%"| | |style="width: 50%"|From the [[Current Situation]] tab, add a Travel Distance Overlay. [[Grid_Overlay#Grid_size|Adjust the grid]] as desired, 1 meter will give a nice resolution in our example. | ||
|style="width: 10%"|[[File:Add_Travel_Distance_Overlay1.jpg|300px|center|thumb|]] | |style="width: 10%"|[[File:Add_Travel_Distance_Overlay1.jpg|300px|center|thumb|]] | ||
|- | |- | ||
|style="width: 5%"|2 | |style="width: 5%"|2 | ||
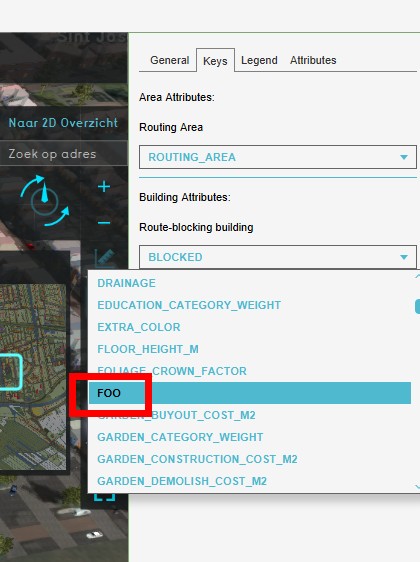
|style="width: 50%"|On the Keys tab of the overlay, on the right side of the editor, the defaults keys ROUTING_AREA and BLOCKED are already filled in. In more advanced setups, added custom keys ('FOO') can also be selected in the drop down menu for each of these keys. | |style="width: 50%"|On the Keys tab of the overlay, on the right side of the editor, the defaults keys [[Routing_area_(Travel_Distance_Overlay)|ROUTING_AREA]] and [[Blocked_(Travel_Distance_Overlay)|BLOCKED]] are already filled in. In more advanced setups, added custom keys (For example: 'FOO') can also be selected in the drop down menu for each of these keys. | ||
|style="width: 10%"|[[File:Keys_Tab1.jpg|300px|center|thumb|]] | |style="width: 10%"|[[File:Keys_Tab1.jpg|300px|center|thumb|]] | ||
|- | |- | ||
|style="width: 5%"|3 | |style="width: 5%"|3 | ||
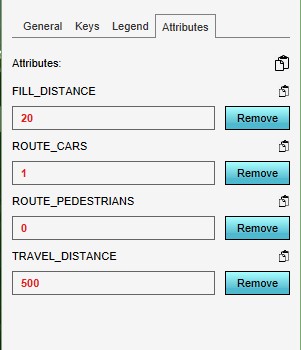
|style="width: 50%"| | |style="width: 50%"|On the Attribute tab the following attributes can be adjusted to fine tune the desired outcome of the overlay: | ||
* TRAVEL_DISTANCE | * [[Travel_distance_(Travel_Distance_Overlay)|TRAVEL_DISTANCE]] | ||
* FILL_DISTANCE | * [[Fill_distance_(Travel_Distance_Overlay)|FILL_DISTANCE]] | ||
* ROUTE_CARS | * [[Route_cars_(Travel_Distance_Overlay)|ROUTE_CARS]] | ||
* ROUTE_PEDESTRIANS | * [[Route_pedestrians_(Travel_Distance_Overlay)|ROUTE_PEDESTRIANS]] | ||
|style="width: 10%"|[[File:Attribute_Tab1.jpg|100px|center|thumb|]] | |style="width: 10%"|[[File:Attribute_Tab1.jpg|100px|center|thumb|]] | ||
|} | |} | ||
Revision as of 11:08, 15 January 2021
Below an example with the Travel distance overlay based on a school and pedestrian traffic.
Setting up the overlay
| 1 | From the Current Situation tab, add a Travel Distance Overlay. Adjust the grid as desired, 1 meter will give a nice resolution in our example. | |
| 2 | On the Keys tab of the overlay, on the right side of the editor, the defaults keys ROUTING_AREA and BLOCKED are already filled in. In more advanced setups, added custom keys (For example: 'FOO') can also be selected in the drop down menu for each of these keys. | |
| 3 | On the Attribute tab the following attributes can be adjusted to fine tune the desired outcome of the overlay: |


